Facebook
 Google
 GitHub
 Linkedin

Hello, some of you may remember this post from 2023 when I started working on a project to use an Arduino to control the kid's electronics project called the Stutter Synth made by Tech Will Save Us.
https://forum.allaboutcircuits.com/...licking-sounds-code-and-diagram-below.191910/
I wanted to use a MIDI source via a PC DAW, LoopMidi then Hairless Midi to send the MIDI numbers to the Arduino. I modified a MIDI powered Glockenspiel program I found online to a) switch the Stutter Synth on an off between musical notes and b) to tune the Stutter Synth (not altering the stuttering frequency) to play a tune.
I took the PWM signal from the Arduino, put it through a DAC and fed the output into the CTRL pin 11 on the 556 of the Stutter Synth.
I am grateful to StefanZe for his help in suggesting my initial set up required a higher current than that supplied by the Arduino. So I powered the Stutter Synth using a 9V battery and switched it on and off using a transistor.
However I am still having problems; the Stutter Synth sounds only one note despite a range of PWM cycles being produced by the Arduino, and a range of DC voltages (with a bit of ripple) being output by the DAC.
Also the volume is very low once the circuit is operating.
The transistor also generates a loud click in the loudspeaker but I can live with this for now.
As of today this is the circuit:
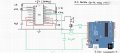 I attach my code below. Thank you for your help!
Caroline
https://forum.allaboutcircuits.com/...licking-sounds-code-and-diagram-below.191910/
I wanted to use a MIDI source via a PC DAW, LoopMidi then Hairless Midi to send the MIDI numbers to the Arduino. I modified a MIDI powered Glockenspiel program I found online to a) switch the Stutter Synth on an off between musical notes and b) to tune the Stutter Synth (not altering the stuttering frequency) to play a tune.
I took the PWM signal from the Arduino, put it through a DAC and fed the output into the CTRL pin 11 on the 556 of the Stutter Synth.
I am grateful to StefanZe for his help in suggesting my initial set up required a higher current than that supplied by the Arduino. So I powered the Stutter Synth using a 9V battery and switched it on and off using a transistor.
However I am still having problems; the Stutter Synth sounds only one note despite a range of PWM cycles being produced by the Arduino, and a range of DC voltages (with a bit of ripple) being output by the DAC.
Also the volume is very low once the circuit is operating.
The transistor also generates a loud click in the loudspeaker but I can live with this for now.
As of today this is the circuit:
I attach my code below. Thank you for your help!Caroline
C++:
/* Stutter Synth MIDI program by Caroline O'Brien 2026
 *  Based on Midi Glock - Mike Cook April 2008
 *  based on code by kuki
 * -----------------
 * listen for MIDI serial data, and fire solenoids for individual notes

#####################################################################################################################################################

HARDWARE NOTE:
The MIDI Socket is connected to arduino RX through an opto-isolator to invert the MIDI signal and seperate the circuits of individual instruments.
Connect the 8 solenoids to pin2 to pin9 on your arduino and pin 13 to the drive enabling monostable.

####################################################################################################################################################
*/
//Target - use older program to find range when R = 470,000K and work out how to turn off synth out of range, if this is cause of ugly beeps

//variables setup

 byte incomingByte;
 double v;
int note;
 double freq;
 double Vctrl;
 float vfloat;
 float y;
 double Ratio;
 double PulseWM;
  byte velocity;
  byte myPin=9;
  int noteDown = LOW;
  int state=0;  // state machine variable 0 = command waiting : 1 = note waitin : 2 = velocity waiting
  //int baseNote = 69;  // lowest note - the signal becomes noise above and below the range 0 to 255
  // use different values of baseNote to select the MIDI octiave
  // 24 for octiave 1 -- 36 for octiave 2 -- 48 for octiave 3 -- 60 for octiave 4 -- 72 for octiave 5
  // 84 for octiave 6 -- 96 for octiave 7

// play only notes in the key of C (that is no sharps or flats) define pin numbers:-
//  byte playArray[] =    { 2,  0,  3,  0,  4,  5,  0,  6,  0,  7,  0,  8,  9 };
// corrisponding to note 36, 37, 38, 39, 40, 41, 42, 43, 44, 45, 46, 47, 48 - for base note = 36 or C2
//int strobe = 13;   // select the pin for the monostable
int channel = 1; // MIDI channel to respond to (in this case channel 2) chnage this to change the channel number
                 // MIDI channel = the value in 'channel' + 1

//setup: declaring iputs and outputs and begin serial
void setup() {

//  pinMode(strobe,OUTPUT);   // declare the strobe pin as output
  pinMode(2,OUTPUT);        // declare the solenoid's pins as outputs
//  pinMode(3,OUTPUT);
//  pinMode(4,OUTPUT);
//  pinMode(5,OUTPUT);
//  pinMode(6,OUTPUT);
//  pinMode(7,OUTPUT);
//  pinMode(8,OUTPUT);
 // pinMode(9,OUTPUT);
  state = 0;  // initilise state machine variable
  //start serial with MIDI baudrate 31250 or 38400 for debugging
  Serial.begin(115200);
  digitalWrite(2,LOW);
}

//loop: wait for serial data, and interpret the message
void loop () {
//digitalWrite(2,HIGH);
//  delay (1000);
 if (Serial.available() > 0) {
//  digitalWrite(2,HIGH);
    // read the incoming byte:
   incomingByte = Serial.read();
   digitalWrite(2,LOW);  // clear any previous strobe


   switch (state){

      case 0:
    // look for as status-byte, our channel, note on
   if (incomingByte== (144 | channel)){
   digitalWrite(2,LOW); //clear any previous note
    noteDown = HIGH;
  // receive a note On set state to 1, then the next byte is the pitch which we want
    state = 1;
 //   Serial.print((int)incomingByte);
   }


   if (incomingByte== (128 | channel)){
    //No incoming byte of 128 in this particular midi file as it uses velocity = 0 instead
    digitalWrite(2,LOW);
    noteDown = LOW;
    state = 1;
  //  Serial.print((int)incomingByte);
   }


       //continue removing comments below ensure braces match up

      case 1:
       // get the note to play or stop
       if(incomingByte < 128) {
          note=incomingByte;
          state=2;
       }
       else{
       state = 0;  // reset state machine as this should be a note number
       }
       break;

      case 2:
       // get the velocity
       if(incomingByte == 0 || incomingByte ==128 ){
  //this looks wrong, incoming byte should be zero if a note off not <128 this looks like a bug
         digitalWrite(2,LOW);
       analogWrite(myPin, 0); // play it if it is one of our notes
   //      playNote(note, incomingByte, noteDown); // fire off the solenoid
     }
     else{
      v = (note-69);
     vfloat = float(v);
     y=v/12;
     freq = pow(2,y)*440;
     Ratio = (1/(freq)-(1E-7*log(2)*100))/(1E-7*(470000+100));
  //   Vctrl=5/(1-0.5*exp(-freq));
 //     PulseWM=(Vctrl/5)*255;
        Vctrl = 5*(2*exp(Ratio)-1)/(1+2*exp(Ratio));
     PulseWM = int((Vctrl/5)*255);

     if (Vctrl <= 0 || PulseWM >= 254) {
digitalWrite(2,LOW);
      }
        else {
      digitalWrite(2,HIGH);
       analogWrite(myPin, PulseWM); // play it if it is one of our notes
      }
     }
       state = 0;  // reset state machine to start
     }
  }
}

void playNote(double note, byte velocity, int down){
  // if velocity = 0 on a 'Note ON' command, treat it as a note off
 // if ((down == HIGH) && (velocity == 0)){
//     down = LOW;
//  }
 //since we can't play all notes we only action notes between 36 & 49 ----- 67 and 103?
 //if(note>=baseNote && note<(baseNote + 13)){

 pinMode(2,OUTPUT);
   //if(myPin != 0) {
//  if(down == HIGH){


    if(down == HIGH) {digitalWrite(2, HIGH); // strobe high to monostable for note on

    }
    // see if the Arduino can switch on the synth
    if(down == LOW) {
    digitalWrite(2,LOW);// turn note off
    // This version is always on, and the midi file shows note off is a note on with note number and velocity 0, so my program miust deal with this.
// At present the machine stays on, so need to figure out where to put note turn off in the program.
   }
 //}

}