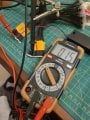
Very helpful, just two things, sorry. The second photo has the meter in the current (amp) range, rather than voltage, which is what we need, And you could do one test with the leads of the meter shorted together in the 200Ω resistance range?
Very helpful, just two things, sorry. The second photo has the meter in the current (amp) range, rather than voltage, which is what we need, And you could do one test with the leads of the meter shorted together in the 200Ω resistance range?
So here is the voltage. I also did the resistance with the battery attached if that is helpful at all. When shorting the meter leads it keeps bouncing the numbers and can't get a clear reading so not sure on that.
So clearly the battery case can’t produce enough current to keep the voltage high enough to light the lamps.
though I am skeptical that those lamps actually draw a full 10 A, they do draw a substantial current and will either require a larger battery with larger wires or a plug in power supply.
I’m sure you are anxious to get this completed and I’m sorry to put you off but I have to take care of some things here. I do believe your best bet is to divide the lamps into two groups that will remain in parallel and put them in series to raise the voltage to 3 V.
This will make it easier to find a reasonable power supply and the higher voltage warming a lower current will be required.
I can help you with it tomorrow and I don’t think it will be much trouble. There may be somebody around tonight who can help but if not I’ll be around tomorrow and I help you work it out.
OK, so here is my proposal. i hope you can follow this first part so you understand why I am suggesting this.
OPTIONAL BUT I THINK IMPORTANT BACKGROUND INFORMATION
Power is measured in Watts (W) and we can determine the amount of power used in a circuit with the formula \(W=VA\) where the V is Volts, units of voltage and the A is Amperes or just "Amps" which are units of current and the total is called amperage.
Very roughly voltage is how hard the current is being pushed and amperage is how much charge is moving over time. The charge is roughly the energy that we are moving around. So a very flawed but useful in this context is filling a bucket with a hose.
If you have a hose of a certain diameter connected to a faucet that provides a certain pressure filling a bucket in, say, 30 seconds and you want to have it fill faster, you can change either the hose diameter (increasing the current, or water that is moving per second) or the pressure (increasing the voltage, or how hard the water gets pushed).
This is a trade off. At a higher voltage a smaller wire can carry the same amount of power (W) as a lower voltage through a bigger wire, This is why the overhead power lines are run at very high voltage, it allows the current to remain low and requires smaller wires for the same amount of power.
There are various ways of trading voltage and current for each other when if comes to using the power, too. Since some things require high voltage and low current to operate and some the reverse.
In your case you have a very high current requirement because your lamps operate a 1.5V but they use 100mA each This adds up to a very large load of 10A. A battery would go flat in a very short time trying to power it.
Now we can't change the total power (W) requirement but we can change the way we deliver it.
When you wire the lamps in parallel, to reduce the resistance (measured in Ohms or Ω) of the circuit for each one you add. As the resistance goes down, the current goes up (this is according to Ohm's Law which I will not get into unless you ask me). It means that if you have one lamp needing 100mA at 1.5V, another in parallel makes it 200mA at that voltage. Amperage, recall, is the "size of the hose" and it works that way with wires. The higher the amperage the bigger the wire must be (called ampacity).
But, if we take the two bulbs and wire then in series, we now find the resistance increases which means we need a higher voltage instead of a higher current. To deliver the same power (W) to the lamps we need 3V but the current drops to 50mA and so the wire can be smaller and the power source doesn't have to produce as much current.
REQUIRED INFORMATION FOR THE SOLUTION
So, all of that said, here's what I think you should do. I think it is best for you to make a series-parallel circuit of four bundles of lamps. So that means if you have 100 lamps, each parallel circuit would be 25 lamps, then you would put those in a series.
This would raise the voltage requirement to 6V, which is a lot easier to deal with in this case, and drop the current requirement ro 2.5A. TO do the you can count 25 lamps, trace the wires on the 25th one down to your big solder joint, then use the soldering iron to melt the joint at the point on each side. This may require resoldering wires that come loose, but that's no big deal.
One you have the four parallel groups, you need to solder them in a chain one to the other leaving the to end ones free. Those are now the connection points. Please let me know if you need any illustrations of this, I am thinking you won't.
Those two end connections now need 6V @ 2.5A to light all the lamps to full brightnesswhich I don't think you want.
When you tested with the single AA cell, you were not applying 1.5V@ 10A. The little battery has the capability of producing about 2A into such a low resistance, and due to the fact that it couldn't make the 10A, the power (W) would have been much lower.
So, if prefer them at that intensity you will have to use lower voltage than the 6V they theoretically need. For that reason, I think it is worth a try to use a hefty USB charger, one that offers 2.1A @ 5V for your first attempt. You can get a decent USB cable, something that advertises faster charging for Android phones which will have a microUSB connector on it.
You'll cut that off, and inside the cable there will be black and red wires, these are the power. There will be Thankfully USB color coding is standard. Connect those wires to the ends of the lamp circuit, and they should light when you plug them into the charger.
(You could also buy an easy to solder connector and use the unmodified mircoUSB cable if you'd prefer that. I can find one if you want.)
Some caveats:
USB chargers are not all made equal. Many that claim they can provide 2.1A can't. So you need to buy one with reviews that says it works properly. If it doesn't all is not lost, there are other slightly more complicated supplies we can use, but this seems the easiest.
Whatever the brightness is, it's what you've got. This can be changed, but it requires more complication so if this brightness level is good for you, there's no point in complicating things. But, if you need to vary it, we can.
Ok this makes sense. Thank you for taking the time to explain it in an easy to understand fashion. I happen to have an Anker 20000 powercore that I don'treally use. Would this work as a good power source?
Ok this makes sense. Thank you for taking the time to explain it in an easy to understand fashion. I happen to have an Anker 20000 powercore that I don'treally use. Would this work as a good power source?
Almost certainly. Anker is a very good product. The only possible wrinkle is if the charger decides to be too smart and the load causes it to shut off because it thinks it is trying draw too much current. If the happens, I will track down a power supply that won't to that. I have some in mind but this is easier for the first attempt and except for the USB cable, it will be the same preparation.
Almost certainly. Anker is a very good product. The only possible wrinkle is if the charger decides to be too smart and the load causes it to shut off because it thinks it is trying draw too much current. If the happens, I will track down a power supply that won't to that. I have some in mind but this is easier for the first attempt and except for the USB cable, it will be the same preparation.
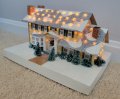
Fantastic, looks great. Don't hesitate to stop back by if you need more help with electronics parts of your crafts. You could do some really cool things with some simple microcontroller stuff that I certain you could learn.
If you have an idea for something that needs lighting, or sound, or motion come back by and talk to use about it before you start so we can get you on the right track from the outset.
Again, it looks really good, congratulations.
If you get a minute, and it's not too hard to manage, could you take some photos of what you ended up doing with the wiring and supply? I'd love to see it.
 Facebook
 Google
 GitHub
 Linkedin