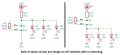
Whatever. Adjust the resistance values to suit your taste.With your pot set at max output voltage, the unloaded voltage divider produces only 5V/3= 1.67V and the LEDs get less than 1V each. Whte leds at less than 1V produce no light.
Rather than a series resistor for every LED, put two LEDs in series across the 5 volts, with one resistor for the string of two. less power wasted as heat, both in resistors and in the control circuit.I think the circuit should be like this:
They will probably not show full brightness, but probably some.Post #1 in this thread says white LEDs.
They are 2.8V to 3.6V so from a 5V supply they cannot be in series.
Not directly as you noted but using a darlington transistor configuration will work with the 1M trimmer you mentioned.LEDs can't be dimmed with 1M resistor in series,

Camera is "Neo" and lsusb recognizes it as "0ac8:307b Z-Star Microelectronics Corp. USB 1.1 Webcam". Attached pictures show disassembled webcam and part of it's PCB from which I took the schematic. R17 is on the opposite side connecting RG to VCC.What is the model number of the camera?
What is TS?what does the TS want to be able to do
OK so the pc board has been modified and the LEDs are now in series with RV1. Is that correct and do they come ON?I should be able to adjust the LED brightness by (external) RV1.
R17 is on the opposite side of the PCB connecting RG to +5V. It is marked 101, I agree with you that it should not be 100 Ohms, I will check it with a meter.Original Circuit with R17 at 10 ohms.
They do come ON only when RV1 is shorted, even slightest movement of RV1 turn them OFF.OK so the pc board has been modified and the LEDs are now in series with RV1. Is that correct and do they come ON?
Which schematic??They do come ON only when RV1 is shorted, even slightest movement of RV1 turn them OFF.
Please read my post #1, the one which started the tread. The dimmer circuit was in the design, but missing in the implementation. Active components were not soldered at all and replaced with jumper wire connecting RV1 to anodes of the LEDs. I think that the value of RV1 (1M) remained from the original design. It is too high to work as a dimmer and, you are correct, it works as a switch. However, when I replace RV1 with 1K pot (right part of your schematic is the right one) it works like a dimmer. R17 is 100 Ohms (101 marking) it is limiting the current (and max LED brightness) to 3-4mA per each diode depending on their voltage drop 3.2 to 2.6V. I will get the real values when I get time to measure them in circuit.To dim the LEDs then you need a dimmer circuit.
These are not dimmer circuits: