This circuit to gerber file

Irving

Joined Jan 30, 2016
5,132
I have been measuring duty cycle and frequency on the two stages/positions with my multimeter.

The trimpots are for this measurements position with the wiper and pin 1. I suppose that is a 10k resistance.

Position 1: 2,1% and 53,5 Hz
Position 2: 4,1% and 52,4 Hz
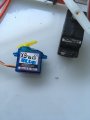
The servo pulses are nominally 1 - 2mS (0 - 180deg) 1.5mS = 90deg
or 5 - 10% duty cycle
so with those values
p1 is 2.5 - 7.5% duty cycle = 0 - 135deg
p2 is 5.5 - 10% duty cycle = 99 - 180deg

It looks like the 555 might be generating the right pulses - can you measure at the other end of the trimmers...
 

Irving

Joined Jan 30, 2016
5,132
yeah I agree. I had no idea that positioning these components were so crucial. I mean it's "only" a 80-90 mm traces.

Okay Ill try to re-position all components. Is there any settings in Kicad which I should enter to improve the autorouting and trace thickness?
Its not too crucial, but it could result in mis-triggering.

decoupling capacitors should be in the trace before the chip pin, otherwise they might as well not be there.
never hop from one chip power pin to the next, take the trace from the main trunk
though these traces can carry the current (good for 0.5A) they have a high inductance and the servo motor noise is likely to be getting back into the timing.
Power traces should be thicker
Autorouting only follows the netlist, it has no idea about the purpose of the connection, so can't think about distance, crosstalk, etc.
Autorouting won't make any judgement call about trace distance or complexity
 

Thread Starter

christiannielsen

Joined Jun 30, 2019
389
First measurement (trimpot wiper at pin 1):
Position 1: 2,1% and 53,5 Hz
Position 2: 4,1% and 52,4 Hz

Second measurement (trimpot wiper at pin 3):
Position 1: 5,5% and 51,5 Hz
Position 2: 7% and 50,7 Hz
 
Last edited:

Thread Starter

christiannielsen

Joined Jun 30, 2019
389
Should I have pull down resistors at the base of Q1-2 ?
And why is it that the 4017 outputs 1.1v when it shouldn't output anything? does your simulation of the circuit output 1.1v?
 

Irving

Joined Jan 30, 2016
5,132
Should I have pull down resistors at the base of Q1-2 ?
And why is it that the 4017 outputs 1.1v when it shouldn't output anything? does your simulation of the circuit output 1.1v?
Both good questions... I'll have a look shortly...

Your KiCAD installation seems to be using old footprint libraries rather than those on github.
 

Irving

Joined Jan 30, 2016
5,132
OK, here's my take on the layout... its not perfect but its a start, there's a few things I'd refine.

Let me point out a couple of things...

If you look at the power traces they are thicker than the signal ones. No power trace goes to a chip without going through the decoupling capacitor first, and all components related to that chip that connect to the power line do so at the chips power pin. The decoupling capacitor is then doing its job both from external impulses in to the chip and internal ones out to the power rail.

All the high current stuff is kept together and the low current stuff further away, as far as possible, and the power trace routed around the outside to keep it away from signal paths as much as possible. I've routed on the back only power with the exception of one signal. In reality I'd change the pin assignments on the 4001 to remove that limitation.

Also, I've tried to keep all the functional blocks together so there is some logic to the flow round the board, avoidind as far as possible, long windy routes.

1597181155279.png
 

Thread Starter

christiannielsen

Joined Jun 30, 2019
389
It looks really good I think. I will try to copy what you did. Although I dont think autorouter knows how to put all power traces at the back.

Did you perhaps try to check your simulation circuit if the base of Q1-2 measured 1.1 v when it should measure 0v ?

thanks again I really appreciate it.
 

Irving

Joined Jan 30, 2016
5,132
Should I have pull down resistors at the base of Q1-2 ?
And why is it that the 4017 outputs 1.1v when it shouldn't output anything? does your simulation of the circuit output 1.1v?
No, no pull down resistors. They have a detrimental effect on the operation, by stopping the 4017 turning on Q1 & Q2 properly.
Really that part of the circuit needs revising. There's a few options, but you need a PNP BJT or a P-channel MOSFET output to supply a fixed voltage to P1 & P2 otherwise your timing is variable.

Is the 1.1v at the 4017 put or the base of Q1/Q2? If at the 4017, you might have one or more diodes back to front. The 4017 output is trying to pull the base low, while another output is trying to pull it high.
 

djsfantasi

Joined Apr 11, 2010
9,237
First measurement (trimpot wiper at pin 1):
Position 1: 2,1% and 53,5 Hz
Position 2: 4,1% and 52,4 Hz

Second measurement (trimpot wiper at pin 3):
Position 1: 5,5% and 51,5 Hz
Position 2: 7% and 50,7 Hz
It appears that you’re talking about RC servos aka hobby servos.

The control signal should be 50Hz. There is some flexibility in the frequency of the pulses, but depending on your particular servo, might not work at some of your frequencies. You can’t depend on success if you’re not operating to specifications.

At pin 1, you are 5% - 10% out of spec.
 
Last edited:

Irving

Joined Jan 30, 2016
5,132
It appears that you’re talking about RC servos aka hobby servos.

The control signal should be 50Hz. There is some flexibility in the frequency of the pulses, but depending on your particular servo, might not work at some of your frequencies. You can’t depend on success if you’re not operating to specifications.

At pin 1, you are 5% - 10% out of spec.
That may be true, but they are misbehaving across the range of the pots so I'm not convinced that's the (only) issue. The servos I have here are happy from 18 - 22mS (45 - 55Hz) as are the majority of cheap ones I've used before. I'm not convinced the method of selecting which preset is used is reliable enough.
 

Irving

Joined Jan 30, 2016
5,132
The 1.1v was at the base of Q1 and Q2.


Don't I have that (Q1 and Q2) ?
No... The emitter voltage is determined by the 4017 output voltage less the Vf of the diode less the Vbe of the transistor. The latter voltage will vary with the collector current, the former two by the current through base->emitter all of which flows through P1+R3 or P2+R7, and varies as the capacitor charges (and all with temperature too). Since these currents are small, <200uA its all a bit variable.
 

Irving

Joined Jan 30, 2016
5,132
Right, its virtually impossible to calculate the correct resistor values for timing as the diode If v Vf curve has a huge impact on the timing, by as much as 30% or more. And it varies by diode type too. So although simple, this is almost a select on test, or we just have to make the pots big enough to cover all possibilities and accept some loss in precision of setting. Its going to vary dramatically with temperature as well. New circuit coming...
 

Irving

Joined Jan 30, 2016
5,132
Ok, this is the revised circuit...

The main differences:
Uses CD4002 dual 4-input NOR gate instead of diode logic, to give a good pull-down on active;
Uses 2 P-Channel MOSFETS to give a good, low impedance, near 6v voltage source for the timing resistors. They're not the ideal MOSFETs as they are medium-power rather than small signal types, but its really hard to find a good small-signal PMOS device in a through-hole package for some reason;
Timing resistors have been made 10x smaller, and capacitor C3 10x bigger. This increases charge & discharge currents from uA to mA and overcomes some of the problems caused by D7. I'm still unhappy with that, I'd like to get rid of D7 but every way I tried was several additional parts. But you must use a small signal diode like 1N4148 or 1N914 otherwise the timing wanders wildly with even mild temperature changes.

1597423623568.png
 

Thread Starter

christiannielsen

Joined Jun 30, 2019
389
Thank you so much. When I get into it I will probably have som questions.
My thoughts about 6v was that I think the servo had too much voltage with a 9volt battery. I am using a 9 volt battery though (and the voltage regulator to 6v) because of its physical size. It fits well for this project.

Som time ago I was wondering if I should use 9 volt for the circuit and then use the voltage regulator for the servo only.

I will have to go through my components to see what I have and what I have coming in the mail and then order what I dont have.
 
Top