Facebook
 Google
 GitHub
 Linkedin
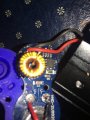
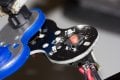
Purchased some bicycle lights with hopes to use them as auxiliary lights on a 125cc motorcycle. 2 wire. Images of the lights are below
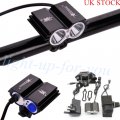
A universal motorcycle light switch was also purchased - 2 wire
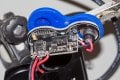
Need to find a way to remove the push button switch located behind the light which switches it on as well give 3 light modes, high low, medium. Hold for strobe / flashing
is their a way to by pass the switch so it switches on and off using the Universal motorcycle switch. I'm happy having it on one setting, preferably high beam.
Anyway Connecting the light and switch as it is simply powers the led indicators on the light unit and has to be manually switched on using the button located behind the light however can be switched of using the motorcycle switch. In convenient due to the position of the light being so low and not in reach.
have attached some images if it helps.. look forward to hearing your thoughts
Any suggestions for alternative lights also welcome, has to be below 40mm diameter or height, Thanks
A universal motorcycle light switch was also purchased - 2 wire
Need to find a way to remove the push button switch located behind the light which switches it on as well give 3 light modes, high low, medium. Hold for strobe / flashing
is their a way to by pass the switch so it switches on and off using the Universal motorcycle switch. I'm happy having it on one setting, preferably high beam.
Anyway Connecting the light and switch as it is simply powers the led indicators on the light unit and has to be manually switched on using the button located behind the light however can be switched of using the motorcycle switch. In convenient due to the position of the light being so low and not in reach.
have attached some images if it helps.. look forward to hearing your thoughts
Any suggestions for alternative lights also welcome, has to be below 40mm diameter or height, Thanks
Attachments
-
 116.6 KB Views: 15
 -
 117.1 KB Views: 15
 -
 125.2 KB Views: 14
 -
 180 KB Views: 15