Multiple daisy chained 74HC165 test

Thread Starter

amarillis

Joined Apr 25, 2021
8
Goodmornig everyone.
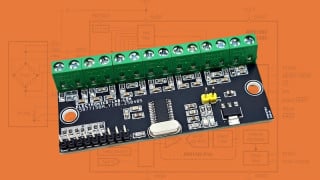
In order to expand the Arduino input capability I built a simple INPUT board that collects all the signals coming from a bunch of HALL sensors using the IC 74HC165...
The 74HC165s are all daisy-chained on the board...
Sometime I miss some of the sensors signal and, in order to troubleshoot the problem, I have to test each HC165 removing them from the board and using a simple test jig I built for this pourpose...
The test is done ONE BY ONE!
The problem is that this procedure is a waste of time and I was looking for something that can allow me to test the HC165 in place and then replacing the dead ones...
Can someone point me in the right direction?
Thanks in advance
 

Thread Starter

amarillis

Joined Apr 25, 2021
8
Hi, well I don't know of any failure mode on the IC...
When I test them one by one I write a pattern in the IC and then I read it back...
If the two patterns match the HC165 is good, otherwise I discard it...
The board contains 15 HC165, at the moment...
 

BobaMosfet

Joined Jul 1, 2009
2,110
@amarillis I find it hard to believe you're having failures of the IC itself, unless some other factor in your design is causing the problem (either damage to the IC, or capacitance, or EMF).

  1. What Frequency are you running your shift-registers at?
  2. Have you looked at the wave-forms on an o-scope?

1623079282973.png
 

crutschow

Joined Mar 14, 2008
34,281
If you are having actual failures of the IC's, then there is something wrong with your circuit that's causing the failures.
 

ericgibbs

Joined Jan 29, 2010
18,766
If the two patterns match the HC165 is good, otherwise I discard it...
hi,
As the TS does not know the failure mode, I find that puzzling, it maybe that his test procedure/method thats at fault.?
E
 

MrSalts

Joined Apr 2, 2020
2,767
It feels like the TS has assumed a problem exists and parts need to be tested before he builds anything. I'd say, there is more chance of damaging placing snd removing them in his test fixture the parts before he gets them into his project.
 

Deleted member 115935

Joined Dec 31, 1969
0
Can I suggest that you post a schematic , and picture of the implementation.

The 74HC165 is a parallel to serial shift register,
you say you have daisy chained them,
How fast do you shift in the data ?

What happens if a hall effect sensor changes whilst your shifting in ?
you will miss it

What is the output of the hall sencors ?
digital ? or analog ?
if digital, is it at the right voltage,
 

Thread Starter

amarillis

Joined Apr 25, 2021
8
Thans for all the replays...
I try to answer to all of you according to my knowledge...
The HC165 are driven by an Arduino which is in charge to poll them at every program loop/cycle...
According to my measures taken with a digital scope the loop will last a few millisecond...
The Arduino uses the SPI bus to poll the ICs...
The HALL sensors I use for this project are Murata AS-M15TAN and the output for these sensor is LOW when a magnetic field is applied to the sensor...
The sensors are excited almost one by one by a neodimium magnet that runs over the sensor once every few seconds...
Everything is running in digital mode, so HIGH and LOW is all what I care about...
The problem is probably caused by a spure signal that is inside of the environment that is causing some of the IC to FAIL and destroy...
I almost know this for sure due to the features of my envirnoment...
BUT, a part for the reason that is causing the problem, my question is still the same: How can I test a board full of HC165 without taking each one on the bench and test each and every one?
The jig I made for test is working fine for one IC but I can not figure out how to expand this concept to more than one IC, simply because they are daisy chained and if one IC is failing I can not know anything about what is happening to the next ones...
I hope that some of these infos can help you understand the situation better...
Thanks.
 

MrSalts

Joined Apr 2, 2020
2,767
What happens if a hall effect sensor changes whilst your shifting in ?
you will miss it
If it was possible to change data while shifting it, the chip would be useless. Thankfully, the chip isn't useless because your suggestion of "you will miss it" is not possible. Look up the datasheet and review the function of Pin#1.
 

Deleted member 115935

Joined Dec 31, 1969
0
If it was possible to change data while shifting it, the chip would be useless. Thankfully, the chip isn't useless because your suggestion of "you will miss it" is not possible. Look up the datasheet and review the function of Pin#1.
Thank you @MrSalts , I know the 165 well,

@amarillis

Can you expand with a schematic and timing diagram how your using these shift registers,

As MrSalts says, you need to grab the data with the load pin,
then you can shift it out,

How often are you enabling the load and how fast are you shifting out ?

I ask as I have seen someone in the past,
a) tie the load / shift pin low and wonder why it was not shifting,
b) tie the load shift high, and wonder why it was not capturing any data
c) pulse the load / shift pin whilst the clock was running ( fail of set up / hold time )
d) pulse the load / shift pin, then wonder whilst they were shifting the data,
as to why a data pulse in was missed,

The other common reason is wrong voltages, to much load on the clock / enable, glitches on the clock line,

Just trying to capture the obvious first guesses to us who have been around this a few times,
 

Thread Starter

amarillis

Joined Apr 25, 2021
8
Thank you @MrSalts , I know the 165 well,

@amarillis

Can you expand with a schematic and timing diagram how your using these shift registers,

As MrSalts says, you need to grab the data with the load pin,
then you can shift it out,

How often are you enabling the load and how fast are you shifting out ?

I ask as I have seen someone in the past,
a) tie the load / shift pin low and wonder why it was not shifting,
b) tie the load shift high, and wonder why it was not capturing any data
c) pulse the load / shift pin whilst the clock was running ( fail of set up / hold time )
d) pulse the load / shift pin, then wonder whilst they were shifting the data,
as to why a data pulse in was missed,

The other common reason is wrong voltages, to much load on the clock / enable, glitches on the clock line,

Just trying to capture the obvious first guesses to us who have been around this a few times,
I'm sorry if I repeat myself BUT when the HC165 are working (read they are HEALTHY) everything is working just fine...
The problem rise when one of the ICs is damaged and I do not know which one of the 15 HC has died...
They work great when everything is "working" but the problem is to troubleshoot which one is DEAD when something goes wrong...
So I don't mind if sometime one of the HC165 dies but I want to know which one of the 15 has gone...
I know I have some big problems with some spure current somewhere but the system is more complicated than you can expect it to be...
I run both AC and DC current at low and high ampere...
There are 18V AC/PWM at 10A, 12V DC at 5A, 12V DC at low current, 5V at 8A and so on...
I'm sure that somewhere in the system something is not properly insulated from the rest of the world, and that is MY FAULT!!
I tried also to keep a single GND reference for all the DC devices but as I said the system has grown "WILD"...
So, it should all be focused on the way I can test a bunch of daisy chained ICs without taking a part the board each time something is wrong...
Let's put it the other way: I want to build a board that is able to test some HC165 chained together. TEST means that if they are working a GREEN LED wil be turned on for each HC, viceversa a RED LED will be lit up at least for the FIRST HC165 that is dead. Is this possible?
 

Deleted member 115935

Joined Dec 31, 1969
0
Ok,

get a solderless bread board, e.g.

https://uk.rs-online.com/web/p/breadboards/8352716/?cm_mmc=UK-PLA-DS3A-_-google-_-CSS_UK_EN_ESD_Control_&_Cleanroom_&_PCB_Prototyping_Whoop-_-Breadboards_Whoop-_-8352716&matchtype=&pla-345919421716&gclid=Cj0KCQjwh_eFBhDZARIsALHjIKetbPA-SLFMt88RqN6Fhtoy7ZV1JHvqwxvrOV5PW1Vsl8wcAyTMjKsaAjN_EALw_wcB&gclsrc=aw.ds

Plug in a crystal oscillator, and some counters,

which produce a one clock high pulse every say 100 clocks,
the pulse loads either all 1 or all 0 into the shift register,

wrap the Q bar output back to the serial input,

and put scope on the serial output,

you should see a nice square wave,
if its not , then you have a duff 165,

Can I ask , why do you believe that one of the 165s blows ?
its much more likely to be a timing or a glitch problem,
which the test circuit wont find for you , as its a system level problem,

Its a real pain this sort of problem
sorting this sort of system complexity is very difficult,

Good luck

rule of thumb,
isolate all inputs / outputs,
opto isolators are a good step
 

Thread Starter

amarillis

Joined Apr 25, 2021
8
OK! Now we go!
Thanks for the infos and the effort you put in this solution....
Yes, I know for sure that one or more of the HC165 blow because this is what is happened in the last two years...
I mean, when I see that some sensors are no more available (I can not see their state) I know that one of the HC165 is dead...
The reason for the fault is almost for sure a spike in the power bus used to "power" the board...
This can be anything from a static charge or a voltage surge somewhere in the system that can affect the HC165 subsystem in some way...
And yes, I have a capacitor that is in charge to filter the 5V supplied to the HC board but it seems it is not doing its job very well...
Since I do not know which one is dead I have to disasemble the board and, as I told before, using my jig test each one of the HC...
The test is done using another Arduino MEGA with a piece of code I wrote for this pourpose...
The code is very simple...
A pattern (byte) is presented on the 8 input pin and the same pattern SHOULD be read back...
When this does not happen the HC is trash...
Unfortunately, this is happened frequently in the last few months and each time is a PITA!
Anyway, the problem of course, is that when an HC165 is dead, you can not tell anything about the following daisy chained ones because the faulty one does not let you read the next one correctly...
And this is why I was asking for a way to reliably test a number greater than ONE of HC chained together...
Thanks a lot again...
I hope I can come to a conclusion very soon...
 

Deleted member 115935

Joined Dec 31, 1969
0
no easier way I can think of to test the 165, in series or on own,

sorry,
suggest that as the faults are becoming more frequent,
its going to get even worse

My only suggestion is that you bite bullet and update the front end to a reliable system,

BTW: Capacitors generally are not there to provide protection for the chips, they are to provide local power to the chips when the input voltage dips.
 

MrSalts

Joined Apr 2, 2020
2,767
@amarillis , do you have a 0.1uF (100nF) ceramic capacitor next to each 74HC165? This is standard design for any chip.
Also, next to the large electrolytic capacitors across your 5v rails, put a 100nF ceramic capacitor in parallel. The spiral-wound electrolytic can create inductance if it is under heavy loads and the small ceramic cap can stabilize those voltage fluctuations.
You can also add some 6.2v zeners from inputs to ground to protect for over voltage (and negative voltage) transients. Or, possibly even more of buffer to protect the 74hc165. Even some 100k resistors from input to ground can give a path to ground in case you are building up static at an input if your sensors have a high impedence output state and their is no path to ground to discharge static.
It's really hard to diagnose what your problem could be without a schematic and more info.
 

Deleted member 115935

Joined Dec 31, 1969
0
@amarillis ,
can you share your schematic please and we might be able to help you reduce eradicate the problems your having,
 

Thread Starter

amarillis

Joined Apr 25, 2021
8
I'm sorry but I don't have any schematic for what I built since it was something that I discovered on the net for a pair of HC165 that I simply enlarged to 15 of them...
Anyway, yes, there are two capacitors on the main power bus: one is an electrolytic 10uF and the other one is a ceramic 100nF as you can see in the image below...
The upper black rail is the 5V power input for the board needed to power the HC165s...
Each HC165 has its input tied to GND via a resistor...
There are 5 rows with 3 HC165 per row, this will give me 120 input to use for my magnetic sensors...
I just realized that the problem could be in the input signal from the sensor to the HC165 input pin...
If this input value exceeds the 5V limit maybe will destroy the IC...
This is why in an earlier message I was speaking about static and so on...
The power supply for the board is very close to the board itself, say a 30cm cable, BUT the wiring from the sensors to the board can vary from 50cm to 3-4 meters....
This cable length can act as an antenna that captures all the worst thing in the world and pass them to the input of the ICs...
This is why I was thinking about some optocoupler to be added between the HC165 input ( the double black rail that is visible in the photo) and the wiring from the sensors...
Anyway, I'm sorry but I'm really dumb in electronic and I'm not even close to the dumbest of you, just to be fair...
I try to do my best to understand and not to damage the whole system....
I'm learning a lot from my own errors but sometimes what is obvious for you is absolutely dark for me...
Thank you all!
HC165 board.png
 

Thread Starter

amarillis

Joined Apr 25, 2021
8
I'm sorry I forgot to say, if you really want to have fun I can shoot a photo of the wiring side of the board so you can se what is for me rocket science and for you just a comic....
 
Top