Motor direction control

Thread Starter

cybertronics

Joined Aug 29, 2009
46
Tronster

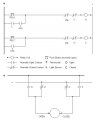
THANKS for the sketch this makes much clearer sence too me how the Acme rod nut and motor work together, I couldn't picture this without seeing a 2D image and you made a 3d image nice and thats how my box is build ,the image help.

But Will this work for me? It all depends on if it could be attached to the inside, because the box has to sit in anther box called a drainage well so theres no why it could be attached to the ouside.

Also when the motor moves the rod through the nut up and down as the lid moves the motor MUST move with the angle of motion too if the motor dose not move as the angle of the lid gos up/down the lid will jam up and not move correctly because the lid must open and close from 0-90 degrees. And the nut must be attach too the lid. The way the set up is in the image it will move as high the angle is' after the angle changes the motor must move with the changing of the lids position if it dosen't like i said the lid will jam up and if the motor is real strong and dose not detect a jam-up the motor will keep moving and may break the lid or just stop and start making noise because its iding because of the angle changed.

His there a way I could use something like this in side the box but still the motor at the bottom will still have to change it position when the lid gos pass a 45dg angle.it will have change with the lids position to work.

Do you have any other ideas how this could work.
and the nut must be connect to the lid.
 

drc_567

Joined Dec 29, 2008
1,156
.... right ..... the acme nut must swivel, and it is attached to the lid. Also, the motor mount must swivel, to accommodate the lid motion.

However, if the lid opening mechanism must reside within the box, then this scheme probably won't be acceptable.

Another possibility ....
There is something called a scissor jack:
http://www.northerntool.com/images/product/images/144870_lg.jpg

If you could find one of these jacks, which when collapsed, would sit within the available space, it should be able to raise and lower the lid.
.... Maybe locate the jack towards the rear of the box, near to the lid hinge.
You would have to find a suitable motor, and come up with a way to link the motor drive shaft to the scissor jack drive screw .... which would have some vertical motion to it.

These scissor jacks seem to come in various sizes .... It's just a matter of finding one that will fit in your allotted space.

The main problem here might be to devise a way to mount the drive motor, and to connect it to the drive screw of the jack, which would have a limited vertical travel as it opens and closes.
 

Thread Starter

cybertronics

Joined Aug 29, 2009
46
I'm not convinced you need such a strong
servo. but I'm sure you already know all about how moving your force application point farther from the hinge improves the applied force assuming constant servo torque.

Yes you do need a stronger servo if the force is 1770in lbs to lift a 10lb lid. And i don't use mechanial mean to lessen the force vs torque.Your point is vaid only if I change the force with mechanial means Also if i change the applied force by moving the forces application point farther from the hinges to improve the applied force this also changers angle of rotation of how the lid gos up/down from 0-90 degrees to a non-specifiy angle.because i try what you are suggesting with other mechanial mean called gas spring on another project and by changing mounting points,center of gavity,and angle of rotation affects all caluclation in the
lifting the lid.

This is why i was looking for a servo with 1770 in lbs of torque so i did have too change the apply lifting force on the lid.By not finding that strong of a servo then i will of might need to recify the force too torque factor.
But you did have a vaid point and suggestion.

Thanks
 

Steve C

Joined Nov 29, 2008
88
my suggestion was the similar as what the drawing has shown. Used in that configuration, we call the allthread a "lead screw"

Only I was suggesting the alltread be the main lifter, not the nut. So my design would have limited you to 8" of lift, which I assumed would have been sufficient for temperature control. Since my design did not physically connect the lead screw to the lid (just pushed it up as if you were inside the box pushing the lid up), you'd have been able to use your hand to physically open the lid when you wanted access to 90 degrees.

But if you don't mind an allthread rod sticking up 4.25 feet into the air (to lift a 3 foot hatch to 90 degrees), that design is great.

And because you are turning a nut on a screw you really dont need to be able to lift 10 pounds with your motor, the torque requirement is way, way lower. That is what I was trying to say.

I still think your most silent option will be a stepper with the advantage of having VERY fine control of lid position compared to an automotive motor. But if you don't mind an increase in motor cost and an increase in current requirements and an increase in noise, check out "universal power window motors" on ebay. The system will come with a motor assembly that turns a through-hole spline. Real easy to JB-weld a nut in the middle, and you are good to go.
 

Thread Starter

cybertronics

Joined Aug 29, 2009
46
Sqt Wookie

In the circuit daigram you post, I need too know where the limit switches are connected is the Com pin connected to the coil and is N.C. pin connected to GND or is N.0. pin connected to GND. Please advise!

As for the situation with the lid in my project I thing the springs may work too counter the force to torque ratio but i need to locate the brackets i might have a soruce i have too check out frist or make one my self. This idea i thing is the best way too go then because it will work better with the 0-90dg rotation i need the other suggestions not work well for this but they are all vaid ones. if the springs do work for me then what DC motor or servo can i use with the circuit that you posted.Please reply

Thanks
 

Thread Starter

cybertronics

Joined Aug 29, 2009
46
Steve

I'd like to use the cheapest, quietest, smoothest of operation, for a motor but i've nerver used a stepper motor or a DC induction motor before. Are there any links you know off or projects that used a stepper motor similar to my application.
Also can i use the push button up/down circuit for activing the stepper motor thats in this thread.

''hey if a stepper motor is as cheap as you say do you have a soruce where to by them cheap as you say. But are they new.

Also do you know of a link on how to use stepper motors for motor control projects.
 

Steve C

Joined Nov 29, 2008
88
Steve

I'd like to use the cheapest, quietest, smoothest of operation, for a motor but i've nerver used a stepper motor or a DC induction motor before. Are there any links you know off or projects that used a stepper motor similar to my application.
Also can i use the push button up/down circuit for activing the stepper motor thats in this thread.

''hey if a stepper motor is as cheap as you say do you have a soruce where to by them cheap as you say. But are they new.

Also do you know of a link on how to use stepper motors for motor control projects.
as for stepper control or anytime I want a 101 crash course in basic robotics, my serches include "arduino". Because that controller is tailored to less technical folks, the information generated is typically easier to digest and comprehend. Like trade school vs university. I typed "control a stepper with arduino" into bing and got many useful hits.

But really, I only mentioned steppers because my local surplus stores sell them by the barrowful for pennies, but none sell servos or high power DC motors for a comparable cost.
I can buy a stepper locally any time, here are my local suppliers:
http://www.halted.com/ (type stepper into the product search)
http://www.excesssolutions.com/cgi-bin/category/20000

I have other suppliers but these guys have the most friendly websites.

definitely not new, these guys are surplus suppliers.

------

I wonder though if it might be better to use some sort of feedback instead. some sort of pot that indicates the lid position. That'll let you use a simple DC motor and know what the lid is doing too.
 

drc_567

Joined Dec 29, 2008
1,156
And because you are turning a nut on a screw you really dont need to be able to lift 10 pounds with your motor, the torque requirement is way, way lower. That is what I was trying to say.
o.
This is true .... Actually, the larger the threaded rod diameter and the finer the thread pitch .... threads per inch .... the greater the mechanical advantage ....

Also consider that the motor load is not just a 10 lb. lid. It is actually something defined as the moment, which is the lid weight times the distance from the hinge to the area centroid of the lid .... not sure .... seems like that would be something like 10 lb.* 2.5 ft. .... as I recall, or maybe 25 ft.-lb.

By using the mechanical advantage of a nut and screw assembly, you can use a smaller motor to generate the required torque ( torque comes in units of ft.-lb).

An alternative to a smaller motor .... such as a stepper .... would be to get something like an automotive window gear motor ... which would have a very large torque output, but would require a large DC current .... requiring something like a car battery to power it.

So, it seems to me ..... your major decision is to choose a plan that will give you the mechanical power to perform the lid movement.
Something like a stepper motor and a screw drive might require more construction ...as well as programming a controller. However, you won't have to maintain a car battery to power a big motor.

Take a look at the Allegro website ... Maybe they have a motor controller of some sort ... that will assist your design efforts.
 

SgtWookie

Joined Jul 17, 2007
22,230
Sqt Wookie

In the circuit daigram you post, I need to know where the limit switches are connected.
Is the Com pin connected to the coil and is N.C. pin connected to GND or is N.0. pin connected to GND. Please advise!
The limit switches (S3 and S4) are NC (normally closed) switches.
If the switches you obtained have three terminals (COM, NO, NC) then just use the COM and NC terminals.

As for the situation with the lid in my project I thing the springs may work to counter the force to torque ratio but i need to locate the brackets i might have a source i have too check out first or make one my self. This idea i think is the best way too go then because it will work better with the 0-90dg rotation.
If you use the Allthread/ACME screw design, you won't really need a counterbalance spring, as it will have tremendous mechanical advantage. My thoughts originally were to use a small motor at the hinge point with a counterbalanced lid. However, that was when I thought the lid was relatively small, not 3'x4'. That will not work in an outside environment with a lid that large; the first gentle breeze would snap the drive train, motor case or mountings.

The Allthread/ACME screw will require the use of a brass or stainless steel screw and nut(s) in consideration of the outdoor environment to reduce/eliminate corrosion. Stainless steel would be more difficult to work with, but would be stronger and more corrosion resistant. Both would need lubrication to work smoothly.

I need the other suggestions not work well for this but they are all vaid ones. if the springs do work for me then what DC motor or servo can i use with the circuit that you posted.
You will need a water-resistant DC motor design. You may wind up having to build a box about 6" wide and perhaps 1' deep and as high as your box in order to house the motor and bracket inside your box. The motor cannot be immersed in water, so you will have to epoxy or fiberglass the smaller box inside your planter box, and drill holes in the bottom to ensure drainage. One possibility would be to use a 12v battery powered drill motor.

The allthread/ACME screw will be very vulnerable to damage, as it will be supported only at two points; where it connects to the motor, and where it threads into the nut on the flexible attachment at the lid. If the allthread/ACME screw is subjected to even a minor sideways force, it may be permanently bent and thus ruined.

Without performing any analysis, I suggest 3/8" diameter would be the minimum suitable.

Allthread is available in 3' lengths at many hardware stores.
 
Last edited:

Steve C

Joined Nov 29, 2008
88
I suppose if you went with the universal power window motor idea the torque it can generate, especially turning a lead screw, you wouldnt have to put the screw and nut so far away from the hinge. Like Tronster said, it's about moments, so though placing the lead screw, say, halfway between the hinge and end of the lid would require twice the torque to achieve the same force, you'd have it because of the power you have on tap. (less so with a cheap stepper)

You can get Smart Chargers to maintain a 4-8 Ah 12V battery (shouldnt be more than $15, and likely less for the battery) to run the whole thing. I've seen them as cheap as $15, but this guy does a great job.
http://www.batteryspec.com/cgi-bin/cart.cgi?action=link&product=115
I use the 8 amp model to plug in my car when I am performing stereo related activities for long periods of time. This would take all the guess work out of keeping a battery going. But you would definitely have to take the time to weatherproof it.

----------

it WILL be more noisy. Hop in your car if you live on a quiet street, wait for a quiet moment, then activate your moonroof or window, engine off. That's what you'd be dealing with for noise.

---------

to make it easier to visualize what I was talking about with the universal power window motor, look at this:
http://cgi.ebay.com/ebaymotors/Univ...ptZMotorsQ5fCarQ5fTruckQ5fPartsQ5fAccessories
the motor turns a belt through the cable housing that makes the ring gear turn in the assembly opposite the motor. The ring gear interlocks with adapters you see in the picture, like a set of servo horns that fit into the ring.

I'm imagining you JB-welding a 3/8ths inch nut into one of those "horns" which you can then slip into the ring. Turning on the motor will spin the nut which you can use to slide up and down a stationary (hinged, in your case) leadscrew. about 3' from a hardware store should do it :)
 
Last edited:

Thread Starter

cybertronics

Joined Aug 29, 2009
46
The allthead rod and nut system connected to a motor sound doable, But it will not work with the motor being stationary the motor must move with the lids rotation of angle as well as the nut for me to have a 0-90dg rotation if it dosen't it will stop start binding and making the motor will keep on moving until it stalls or breaks the lid no matter how you look at it. This looks more complex then i want to tackle how would i attach a motor that will rotate as the lid changers its position or angle.

There's only two ways this will work for me.
1. Making a small enough motor to rotate will the lids angle of motion.
2. also how to attach a motor to the box so it can rotate.
Also which motor would be lees feesible too use
and making it work off of a 12vdc wall adapter with low output current.

This sounds simple and looks simple but to make it work or build it is complex do to getting the motor too move as the angle of the lid changers it position at every point from 0-90dg. like i said there is no way this motor i use can stay at a stationary position. yeah it would be doable is angle was 0-30dgs at most until the angle of rotation changers.

I think i will use some of the suggested ideas and try to solve the force to torque ratio with springs so i can use them inside the box i have a few ideas this is my biggest problem to solve once i get that down then i could try and find a motor where i wouldn't need very high torque to move the lid up/down.

Sqt wookie if i come back to this forum like say a month or two from now to add to my thead would i need to open a new thread for the same project. I'm only asking since you're been at this forum for sometime now.

If anybody has additional ideas or suggestions please post them concering my project.

thanks
 

Thread Starter

cybertronics

Joined Aug 29, 2009
46
Sqt wookie

I do have the COM.NC.NO. TYPE OF SWITCH.

So i connect the Com pin to the coil and connect Normally close pin to Ground Correct! and Normally open pin just floats no connection. Correct! If I'm wrong please correct me.
 

SgtWookie

Joined Jul 17, 2007
22,230
Sqt wookie

I do have the COM.NC.NO. TYPE OF SWITCH.

So i connect the Com pin to the coil and connect Normally close pin to Ground Correct! and Normally open pin just floats no connection. Correct! If I'm wrong please correct me.
I guess you didn't see my reply #49, in which I wrote:
The limit switches (S3 and S4) are NC (normally closed) switches.
If the switches you obtained have three terminals (COM, NO, NC) then just use the COM and NC terminals.
The bolded portion implies that you don't connect the NO terminal to anything.

It does not matter if you connect the NC terminal to ground or the motor, or the COM terminal to ground or the motor - so long as one is connected to GND, and the other is connected to the motor.

If you decide to put the project on hold for a period of time, just continue on with this thread. No point in starting a new thread for the exact same project.
 

williamj

Joined Sep 3, 2009
180
Cybertronics

I'd like to make a couple of suggestions if I might.

First of all, get DPDT relays. Use one set of contacts for the motor circuit (as illustrated below, sorry for the ladder diagram, I'm lousey at schematics) and the normally closed contact on the second set of contacts as a safety in the control circuit. If the motor contacts arced and locked in place this would prevent a short and possibly a burned out motor.

Secondly consider a light sensor in the circuit, just to keep it from autofunctioning at night.

Good luck with your project.

williamj

factoid:

No factoid today, maybe tomorrow, maybe not


Attachments

Thread Starter

cybertronics

Joined Aug 29, 2009
46
Sqt Wookie

I didn't see #49 I must of scroll down right pass it

thanks for reposting to question. Totally got it.


Williamj thanks for contributing too the thread

I throught of a light sensor.


Thank again too all who help.
 

Thread Starter

cybertronics

Joined Aug 29, 2009
46


I'm using this circuit which Sqt wookie posted, and I will be using to small Dc gearmotors for my project in this thead. I know I will need to use 2 DpDt relays for adding that second motor.
What added compoenets would i need add to protect the above circuit from noise, current ripple and EMF by adding that second motor to this circuit.

By using counterweights to limit the force to torque on the motor from 10lbs to 2.5 lbs i would need two small motors.

Sarge.
Any further advice on adding a second motor to the above circuit would be appreciated.
 

SgtWookie

Joined Jul 17, 2007
22,230


I'm using this circuit which Sqt wookie posted, and I will be using to small Dc gearmotors for my project in this thead. I know I will need to use 2 DpDt relays for adding that second motor.
What added compoenets would i need add to protect the above circuit from noise, current ripple and EMF by adding that second motor to this circuit.

By using counterweights to limit the force to torque on the motor from 10lbs to 2.5 lbs i would need two small motors.

Sarge.
Any further advice on adding a second motor to the above circuit would be appreciated.
The S1 and S2 will remain the same.
You'll need to duplicate S3, RLY1, RLY2, and S4 for the 2nd motor.
 

Thread Starter

cybertronics

Joined Aug 29, 2009
46
Sarge

I will being using two 12v DPDT Relays for the add motor to replace the two SPDT Relays instead of using 4 SPDT Relays for the added motor. Would that be OK!

So. by pressing S1 this will turn the two motors at the same time in the forward direction and when S2 is pressed the two motors will turn in the opposite direction is that, right!

is there anything I would need to know other then you advised.


Thanks Sarge.
 
Last edited:

Thread Starter

cybertronics

Joined Aug 29, 2009
46
Sarge

The only part I'm not sure of is how is the second set of S3 and S4 is to be connected to the added relays.

I'm assumming the second set of S3 and S4 is to be connected to the added relays additional coils and the other side of the switches to ground,And not to the first coils as used for a one motor circuit. if that makes any sense.
If I'm wrong can you drawing a schematic so I connect this part of the circuit correctly.

Thanks
 
Last edited:

Thread Starter

cybertronics

Joined Aug 29, 2009
46
Sarge

The only part I'm not sure of is how is the second set of S3 and S4 is to be connected to the circuit for the add motor.

I'm asumming S3 And S4 is connected to the added relays coils to one side of the two switches then the other sides of the switches are grounded, And not connected to the first relays coils as for a one motor set up. if this makes any sense.
If I'm wrong can you drawing a schematic to show how this part is connected to the second motor in the above circuit.

Thanks
 
Top