Modify Hood Class A Amp for DC Path and Unipolar Output from Sound Card

Thread Starter

Sir Kit

Joined Feb 29, 2012
172
I have several Hood 1969 amplifier boards at hand. I would like to modify the signal path to be DC coupled to conduct a range of frequencies from 20KHz down to two Hz.. The signal source is a USB sound card line output (nom. +/-1.5Vpp). That is a bipolar signal, so I need to adjust its DC input level to suit the class A amp (with its input cap removed). The intended purpose is to drive an electromagnet (22R) in such a way that its field remains unipolar, i.e. does not reverse. The amps would run on 12VDC.

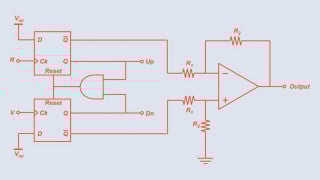
Here is the orignal Hood circuit that I now have.

hood.png
My proposed modification is below. Corrections or suggestions would be very much appreciated. I prefer to use these particular amps, and not scratch build, because they are already in my bin with large heatsinks attached.
hood-input-adj.png
 

Ian0

Joined Aug 7, 2020
8,947
It seems a bit pointless. For a unipolar output, Q2 is superfluous, therefore there is no need for bias in the output transistors, and no need for any wasted heat.
 

Thread Starter

Sir Kit

Joined Feb 29, 2012
172
Thank you for your reply.

If I understand correctly, you are proposing an emitter follower. Apart from removing Q2, Q3 and R7 and making KT2 a fixed resistor, are any other changes advised?

But ... if I did want to use the amp as is with the mods shown, do you see any other problems? Are the components for the DC level adjust OK?
 

Thread Starter

Sir Kit

Joined Feb 29, 2012
172
That is one impressive circuit Danko.

Here is a boring emitter follower for scratch build. Not what I originally had in mind, but I leave this for future visitors looking for a solution.

soundcard_offset_lm358_tip41_unipolar.png
 

Ian0

Joined Aug 7, 2020
8,947
That is one impressive circuit Danko.

Here is a boring emitter follower for scratch build. Not what I originally had in mind, but I leave this for future visitors looking for a solution.

View attachment 296166
I'd stick a cap in series with R1 and R3 so that the op-amp doesn't amplify the DC offset, so DC offset and gain can be set independently.
 

Ian0

Joined Aug 7, 2020
8,947
Good point. Which I believe is the same as inserted between R1 and the inverting input. Maybe 10uF?
C=1/(2πRC)
You have an unusually low cutoff frequency (2Hz) so the cap is much bigger - 220uF in series with R3 and 100uF in series with R1 would be my choice.
R1 and R2 would perhaps benefit from being bigger - 1k is a bit of a tough load for some audio sources - try 10k. (then C could be smaller)
 

Thread Starter

Sir Kit

Joined Feb 29, 2012
172
Sorry, I misunderstood. If I place a 100uF cap between R1 and Pin 3. I will loose the desired DC path. I think that is why I left it out. So as not to distort subaudio waveforms.

In the absence of that, I am not sure what the 220uF cap would do. Could you please explain further?
 

Ian0

Joined Aug 7, 2020
8,947
Sorry, I misunderstood. If I place a 100uF cap between R1 and Pin 3. I will loose the desired DC path. I think that is why I left it out. So as not to distort subaudio waveforms.

In the absence of that, I am not sure what the 220uF cap would do. Could you please explain further?
If there is no capacitor in series with R1, then the DC offset will be attenuated by the source if the source is DC coupled.
220uF goes between R3 and ground.
 

AnalogKid

Joined Aug 1, 2013
10,787
Sorry, I misunderstood. If I place a 100uF cap between R1 and Pin 3. I will loose the desired DC path.
When the gain pot is mid-range, the circuit gain is 11. The pot has 12 V across it, but the voltage range you need at the wiper is less than 1 V. The offset will have to be set very carefully, and will drift as the components warm up. You can help this by adding resistors in series with the top and bottom of the pot. This will reduce the adjustment range, improving adjustability by reducing the volts-per-degree-of-rotation.

Consider this: One cap between R3 and GND will give the circuit unity gain at DC no matter what the gain is. To be "flat" at 2 Hz, the corner frequency will have to be at least 2 octaves below that, or 0.5 Hz. On paper, the frequency response will be down 1 dB -ish at that freq. Flatter than that means a really large cap. To help with this, increase VR2 and R3 by 10x to 100x each.

Note: How sure are you that the signal source does not have an output coupling capacitor? What is its frequency response at 2 Hz?

ak
 

Thread Starter

Sir Kit

Joined Feb 29, 2012
172
When the gain pot is mid-range, the circuit gain is 11. The pot has 12 V across it, but the voltage range you need at the wiper is less than 1 V. The offset will have to be set very carefully, and will drift as the components warm up. You can help this by adding resistors in series with the top and bottom of the pot. This will reduce the adjustment range, improving adjustability by reducing the volts-per-degree-of-rotation.

Consider this: One cap between R3 and GND will give the circuit unity gain at DC no matter what the gain is. To be "flat" at 2 Hz, the corner frequency will have to be at least 2 octaves below that, or 0.5 Hz. On paper, the frequency response will be down 1 dB -ish at that freq. Flatter than that means a really large cap. To help with this, increase VR2 and R3 by 10x to 100x each.

Note: How sure are you that the signal source does not have an output coupling capacitor? What is its frequency response at 2 Hz?

ak
Good advice about the stand-off resistors. I originally used a 10T trimmer which worked out OK after a bit of twiddling.

I will try changing those component values as you suggest. Thanks.

Yes, the line output of an inbuilt sound card would have a cap in series. I normally use an external USB type for this type of application.
 
Top