inexpensive timing relay circuit

Thread Starter

strpdbas

Joined Dec 24, 2008
99
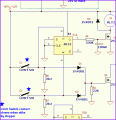
Pin 14 of 4013= 15.15
Pin 8 of 555= 15.17
Pin 4 of 4013 sw open= 13
Pin 4 of 4013 sw closed= 15.2
Pin 6 of 4013 sw open= 13
Pin 6 of 4013 sw closed= 13
Pin 1 of 4013= 13.65
Pin 2 of 555= 14.73

As soon as I plug unit in motor begins rotating. Pressing limit switch has no effect.
 

eblc1388

Joined Nov 28, 2008
1,542
Pin 4 of 4013 sw open= 13
Pin 4 of 4013 sw closed= 15.2
Pin 6 of 4013 sw open= 13
Pin 6 of 4013 sw closed= 13
These voltages are not correct.

The correct voltage is 0V when the limit switch is NOT pressed, but goes up to 15V when the limit switch is pressed.

Please remove the CD4013B from its socket and measure again.

If voltage is then correct, then CD4013B is defective.

If the voltages are still the same without the CD4013B, then you have connected the limit switches wrongly.
 

Thread Starter

strpdbas

Joined Dec 24, 2008
99
I pulled the 4013 and when I measured the voltage @ pin 6, 13v. It did not go up when I closed the switch. Oddly the voltage @ pin 6 did go to 15v when I pressed the limit switch connected to pin 4.
 

Thread Starter

strpdbas

Joined Dec 24, 2008
99
I found a hairline break in the foil leading to the common switch contacts and the pot. After bridging the connection I re-measured the voltage on pin 6 and pin 4, with and without the 4013 installed. This time they both went to 15 volts when I closed the limit switch contacts, but it doesn't matter which switch I close. If I measure pin 6 I get 13v. When I close the contact on either limit switch one or two the voltage goes to 15.4v. The same thing occurs on pin 4. I don't think it matters, but the model number of the chip I am using is SCL4013BE
 

eblc1388

Joined Nov 28, 2008
1,542
The operation is still not entirely correct. The 4013B is made by different manufacturers and their prefix might be different but it is the same. The fault is probably not due to the chip because without it the voltages is still not correct.

One limit switch should pull high the corresponding pin individually instead of both at the same time.

Check and confirm connections of R6, R7 and R8 and polarity of diode D1 and D2.
 

Thread Starter

strpdbas

Joined Dec 24, 2008
99
Getting closer. Must have had cold joint. Now when I press limit switches the motor does reverse, but no time delay. I replaced the 555 and removed the 470uF cap (c4) and installed the 100uF. I turned the pot to both stops but no effect.
 

eblc1388

Joined Nov 28, 2008
1,542
555 is not being triggered via the limit switches.

Try increasing the value of capacitor C3 (at 555 pin#2) from 0.01uF to 0.1uF.

If that does not work, then remove R4 330K and increase R3 from 10K to 47K.
 
Last edited:

Thread Starter

strpdbas

Joined Dec 24, 2008
99
Replacing the .01 cap with a .1 seems to work better but when I depress the limit switch the motor stops and I begin hearing a clicking sound @ 1/2 second intervals from relay 1. The rotation does reverse, but the time delay is not consistent. Perhaps this is due to removing, resoldering the prototype board. I hope I didn't cook anything. Any thoughts?
 

eblc1388

Joined Nov 28, 2008
1,542
Replacing the .01 cap with a .1 seems to work better but when I depress the limit switch the motor stops and I begin hearing a clicking sound @ 1/2 second intervals from relay 1. The rotation does reverse, but the time delay is not consistent. Perhaps this is due to removing, resoldering the prototype board. I hope I didn't cook anything. Any thoughts?
The clicking sound is possibly the 555 timed out, due to two reasons.

The first is the use of C4 100uF instead of 470uF, as you have told me earlier. If you replace the capacitor, then you will hear the clicking sound at a longer interval of perhaps a few seconds apart.

The second is the connection of R4(330K). It is required in the circuit and would be better to connect one end of this resistor to +Vcc instead of to 555 pin#2 in the original design.

Have you also changed the R3 from 10K into 47K?
 

Thread Starter

strpdbas

Joined Dec 24, 2008
99
I did not install the 47K yet. I wanted to change one component at a time and swapped out C3 to .1uF first. I will change C4 back to 100uF and install the 47K today. I will let you know what happens. Why does the relay click?
Thanks!
 

Thread Starter

strpdbas

Joined Dec 24, 2008
99
I need some clarification. In one reply you suggest removing R4 330K and changing the value of R3 from 10 to 47K. Another reply states that R4 is required in the circuit. I now have one lead of R3 @ 47K attached to pin 2 of the 555 the other attached to +Vcc. R4 (330K) is now connected to drain of Q2 and C3 (.1uF). The other side of R4 is connected to C3 and +Vcc. C4 has been changed to 100uF. I ask that you review my board layout before I start soldering again.

MASTERCKT..jpg
 

eblc1388

Joined Nov 28, 2008
1,542
I need some clarification. In one reply you suggest removing R4 330K and changing the value of R3 from 10 to 47K. Another reply states that R4 is required in the circuit.
In this case, the more recent post is the more updated suggestion.:)

R4(330K) should not be connected across capacitor C3 as in the original design.

One end of R4(330K) should now be connected to Vcc instead of 555 pin#2. The other end should be connected to the drain of the MOSFET Q2.


Attachments

Thread Starter

strpdbas

Joined Dec 24, 2008
99
OK, I've made the changes. Here is what happens now. The timing works, and the motor reverses, however, this only works correctly when I quickly press and immediately release the switch. When I press and hold the switch, which will be the case in normal operation, the motor immediately reverses. As soon as I release the switch the motor stops, times out and reverses operation. Getting closer. What would you suggest to resolve this issue?
 

eblc1388

Joined Nov 28, 2008
1,542
When I press and hold the switch, which will be the case in normal operation, the motor immediately reverses.
This is not correct.

When either switch is pressed, the motor will stop while the direction relay changes. You are still experiencing trouble triggering the 555.

Monitor the gate voltage of the Q2 2N7001 using a DC voltmeter and post back what is the measured voltage at the gate.

The correct level is 15V when either limit switch is pressed and zero when they are released while the motor is traveling before reaching the limit switches at either end.
 

Thread Starter

strpdbas

Joined Dec 24, 2008
99
When I plug the unit in to 110VAC the motor does not start until timer activates the relay. The voltage at Q2 gate while motor is turning in either direction is 0.92V. If I press and hold the switch closed the gate voltage for switch one is 14.08V and 15.18V when switch 2 is held closed. When either switch is held in the closed position the motor instantly reverses direction. When I release the switch the motor stops and I measured 0.87V @ gate Q2. The time cycle starts and the motor then reverses raising the gate voltage back to 0.92V. The only time the operation works correctly is when I press and immediately release the switch contacts. The attached ckt trace reflects the latest changes. Thanks for all of your help. If I ever make it to the UK I will buy you a nice dinner.

MASTERCKT..jpg
 

eblc1388

Joined Nov 28, 2008
1,542
If I press and hold the switch closed the gate voltage for switch one is 14.08V and 15.18V when switch 2 is held closed.
These two voltages are not right. They should be exactly the same because they have the same component with same value in their path.

The 15.18V appears to be OK but you will need to find out why one voltage is lower than the other by one volt.
 

Thread Starter

strpdbas

Joined Dec 24, 2008
99
I apologize for my ignorance but what could cause this difference in voltage? I would also appreciate it if you could review my board layout. I want to start one from scratch as the one I am having the problem with was modified to incorporate the modifications you previously suggested.
C4 is 100uF C5 1000uF. Also in regard to the potentiometer I am only using two of the three connections, is this correct?

MASTERCKT..jpg
 

eblc1388

Joined Nov 28, 2008
1,542
I apologize for my ignorance but what could cause this difference in voltage?
For this you will need to disconnect the motor, power up the circuit and check the DC voltage on Pin#4 and Pin#6 on the socket of the CD4013B, first with the IC inserted and next removed. Connect the black lead of the meter to 0V.


A: With CD4013B in socket

1. Pin#4, Pin#6 and Q4 gate voltage, both limit switches not operated

2. Repeat (1) again, this time with limit Switch S1 operated

3. Repeat (1) again, this time with limit switch S2 operated

B: CD4013B removed

1. Repeat (1)~(3) of A above, with CD4013B removed from socket

So all together there will be 9 voltages in A and 9 voltages in B.

I would also appreciate it if you could review my board layout. I want to start one from scratch as the one I am having the problem with was modified to incorporate the modifications you previously suggested.
Not before you have the circuit working correctly.

C4 is 100uF C5 1000uF. Also in regard to the potentiometer I am only using two of the three connections, is this correct?
It is better to use all three of the potentiometer connections. Just connects the wiper(middle) terminal to either ends.
 

Attachments

Last edited:

Thread Starter

strpdbas

Joined Dec 24, 2008
99
As per your instructions here are the voltage measurements for each connection. I allowed the ckt to warm up a bit to stabilize. In all cases the voltage measurements bounced around a bit.
CHIP INSERTED:
BOTH SWITCHES OPEN
P4: 0.01-0.03
P6: 0.00-0.01
Q4G: 0.95-0.99
SWITCH ONE HELD CLOSED
P4: 0.00- 0.01
P6: 15.59-15.61
Q4G: 15.03-15.06
SWITCH TWO HELD CLOSED
P4: 15.48-15.55
P6: 0.00- 0.01
Q4G: 14.85-14.93
CHIP REMOVED
BOTH SWITCHES OPEN
P4: 0.00- 0.01
P6: 0.00- 0.01
Q4G: 0.95- 0.99
SWITCH ONE HELD CLOSED
P4: 0.00- 0.01
P6: 15.59-15.61
Q4G: 15.03-15.06
SWITCH TWO HELD CLOSED
P4: 15.50-15.56
P6: 0.00- 0.01
Q4G: 15.00-15.05
While checking voltages I found it odd that I had line voltage at both the N/O and N/C contacts of relay 2. Could the motor capacitor be causing this to happen? I removed relay 2 and ensured the contacts were not shorted, they were not. I tested and installed a new relay and again measured line voltage at both contacts. I double checked to be sure I had
the common and switchable contacts properly identified, they were correct. Pin 1 and 5 for the coil, pin 2 common, pin 3 normally open, pin 4 normally closed. I am using Omron G5SB-14-DC12 relays. Pin 3 of relay 1 is not used. The board is wired so the P4 contact of relay 1 is attached to p2 contact of relay 2.
 

eblc1388

Joined Nov 28, 2008
1,542
As per your instructions here are the voltage measurements for each connection. I allowed the ckt to warm up a bit to stabilize. In all cases the voltage measurements bounced around a bit.
Your limit switches, CD4013 and diode circuits checked out correctly. Now the voltage differs by just ~0.2V instead of the previous ~1V and is now acceptable.

However, you still need to take care of another problem. The Q4 gate voltage should be zero and not ~1.0 volt if no limit switch is operated. You new task to find out and make correction until this voltage becomes zero.

Check that the gate resistor R2 is really 22K and is properly connected to 0V, i.e. the 0V copper trace is good and intact all the way to the other 0V connections. You need to continue checking until this gate voltage is truly zero. Check voltage again with the meter leads directly across 22K.

Remove Q4 for another voltage check if necessary. If removing Q4 results in zero gate voltage, Q4 is defective or being put in with the wrong pin orientation previously.

While checking voltages I found it odd that I had line voltage at both the N/O and N/C contacts of relay 2. Could the motor capacitor be causing this to happen?
Yes.
 
Top