Facebook
 Google
 GitHub
 Linkedin
MisterBill2
- Joined Jan 23, 2018
- 27,519
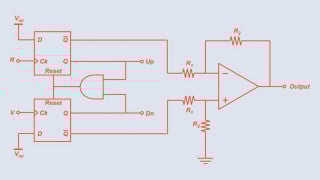
Now it is clear to me that I don't know what is being called "the breadboard". And "The Onboard Test signal" does not provide much information.
But now I have some advice for everybody, which is that because this tool is so subject to destruction, all should avoid purchasing or even borrowing it.
AND probably it would be wise to avoid all products offered by that manufacturer.
But now I have some advice for everybody, which is that because this tool is so subject to destruction, all should avoid purchasing or even borrowing it.
AND probably it would be wise to avoid all products offered by that manufacturer.