Emergency Led Flasher

SgtWookie

Joined Jul 17, 2007
22,230
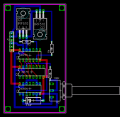
Did you connect the power and ground pins as shown in the board layout?
IC1 (4017) - pin 8 to ground, pin 16 to +12v
IC2 (4075) - pin 7 to ground, pin 14 to +12v
IC3 (4093) - pin 7 to ground, pin 14 to +12v

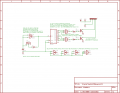
Sorry I forgot to mention that the schematic doesn't show the power and ground pins. The software automatically handles those connections and they're not shown in the schematic to reduce "clutter". They are, however, shown in the board layout.

Beware of static electricity; CMOS circuits are very vulnerable to static discharge. Sorry I didn't mention that sooner; I live in Florida and it's so humid that static isn't a problem here, so I tend to forget about it.
 

Thread Starter

Graphite SRT

Joined Jan 11, 2008
23
When i built it i went directly off of the board layout. I took precautions to prevent static so that should'nt of been a problem.

Are you sure you didnt switch pins 14 and 16 on the first two you just listed 4075 only has 14 pins and 4017 has 16

I will troubleshoot the MOSFETs tonight
 

SgtWookie

Joined Jul 17, 2007
22,230
Yes, you are correct - I ham-fingered it when I copied/pasted the Vcc pins for IC1 & IC2 :rolleyes: I really shouldn't attempt these things when my caffiene stream is too high in blood content, particularly in the wee hours of the morning... I've corrected that post.

I'm afraid I'm going to be offline until perhaps Sunday morning; I'm on my way out of town. However, you could use one of the spare 4093 gates, a standard LED and a 680 Ohm resistor as a logic analizer. Connect the short lead of the LED to the output of a gate, the long lead to one of the 680 Ohm resistor leads, and the other lead to 12V. Keep the two inputs of the gate shorted together, and use a length of wire to probe around with. If you touch the wire probe to 12V, the gate will provide a ground to the LED and it should light. If you touch it to ground, it should extinguish. With it floating (not touch anything) it may flicker, as CMOS inputs float all over and may read anything.

You should see a constant train of pulses coming out of the 1st 4093 gate, and you should see a 1/10 duty cycle flash from the outputs of the 4017.

Also, post back the EXACT part numbers (and manufacturer) of the ICs that you received. If they substituted something else, that may be a problem.
 

Thread Starter

Graphite SRT

Joined Jan 11, 2008
23
the MOSFET would not work through the circuit but if i supplied ground to pin 3 of the mosfet the LED would light constantly.

If i also disconnected pin 1 i could toggle the led on and off going between 12v and ground but this is only if i supplied ground to pin 3 also.
 

SgtWookie

Joined Jul 17, 2007
22,230
Aha!

Solder a jumper from J1 pin 3 (ground) to Q1 pin 3 (drain).

Then try it again.

For some reason the program didn't like me having both GND and Vss on the same line, and didn't show that connection in the board. Sorry about that.

It would've made routing the traces a good bit easier as well.
 

SgtWookie

Joined Jul 17, 2007
22,230
I've updated the schematic to remove references to GND and substitute Vss instead, which has resolved the conflict.

Attached are V2 of the schematic and board.

Ignore the purple border; that is part of a "copper pour" routine that's used to prepare the output for processing by a circuit board vendor. I didn't use the fill because it would be harder to see the traces. (Red is top of the board, blue is bottom - but if you're running physical wires it doesn't really matter.)
 

Attachments

frylock

Joined Jan 17, 2008
2
Yup I'm so lost right now. Anyways, do you think I could use a turn signal relay as an led flasher? I'm trying to flash 128 leds or 2 lights with 64 leds each. Theres gonna be 1 light on each side of my windshield and the power will come from a cig plug spliced onto the flasher that I hope I can make and the lights.
 

SgtWookie

Joined Jul 17, 2007
22,230
Hi again Frylock,

I need to go back in this thread and clean up a few things, but I don't really have time at the moment. Need to make sure that Graphite_SRT's flasher works first, and my out-of-town trip got delayed until tomorrow AM.

Turn signal flashers are designed to work with a fairly heavy current drain; that of the turn signals and side markers. LEDs draw significantly less current than the turn signal and side marker lamps; so the flasher module wouldn't work unless that difference was made up somehow. A turn signal flasher would not be nearly as reliable or flexible as a purely electronic circuit.

If you feel that this circuit is beyond your abilities and/or doesn't do quite what you want, that's OK - please start another thread and ask for something a little different; for example, your desire to have multiple patterns rather than simply the typical opposing triple flash.

It really helps to keep things in order on the board to do that; otherwise threads can get very confusing and go on many tangents (well, not like they don't already, but things can be lots worse ;))
 

SgtWookie

Joined Jul 17, 2007
22,230
To my chagrin, I found an elusive error in the original simulation. :rolleyes: My apologies. :(

It appeared that pin 13 of the 4017 was connected to 12V - however, it wasn't; it was floating near ground.

To correct your board, you will need to:
1) Remove the far end of the wire that's attached to pin 13 of the 4017.
2) Connect pin 13 to ground; the closest ground is pin 15 of the 4017.

I've updated the schematic and board to reflect the change (V3), attached.
 

Attachments

Thread Starter

Graphite SRT

Joined Jan 11, 2008
23
The only thing i had to add to what i did was reconnect the disconnected wire from pin 13 to ground.

It works perfectly now, i would also like to see if the other guy starts a thread on the programmable one as i like the idea of the project.

thanks for all your help
 

SgtWookie

Joined Jul 17, 2007
22,230
Hey, I'm glad you figured it out yourself - great work :)

Sorry I had that error causing so much trouble - I just found it a couple hours ago.

Yes, the programmable one would be interesting - but I haven't fiddled with PICs yet, and that would likely be the cheapest microcontroller to use.
 

Chikan

Joined Jan 18, 2008
24
Hey there guys...

I used to do a lot of electronics way back in school, but that's been years ago now and I've forgotten a lot of stuff unfortunately.. :(

I'm in the same boat as Graphite here, trying to design/build a cheap LED flasher unit. I like this one that you've set up here Sgt, but I had a couple quick questions:

1) I may be misunderstanding the schematic, but I'm assuming the other gates could be used to change it to a quad flash instead of triple?

2) Am I correct in understanding that this outputs a standard 12(ish) volts from each MOSFET, and could power any number of LEDs as long as they've got the correct resistors wired in? Or is this schematic specific for this application? I'd like my flasher to be able to run a large number of LEDs if necessary.

I'll probably end up with other questions later.. As I said, it's been a while.. :)
 

SgtWookie

Joined Jul 17, 2007
22,230
Hi Chikan,
1) The limiting factor here is the 4017; it has a maximum of 10 states. Actually, it COULD be set up to flash 4 times on each side, but the 3-input OR gate (4075) would have to be swapped out for a 4-input OR gate (I don't know the number offhand); and the 4th flash would come after the 1st flash on the opposite side. So yes, it could be set up to flash 4 times per side, if you don't mind the overlap.

2) No, the circuit does not output voltage via the MOSFETS; the MOSFETS provide a GROUND to the LEDs. The LEDs must be supplied voltage and current limiting resistor(s) or circuit, outside of this circuit. The idea of using the MOSFETS is that they can sink a great deal of current without a significant voltage drop across them, therefore they don't generate much heat due to power dissipation.
 

Chikan

Joined Jan 18, 2008
24
Hi Chikan,
1) The limiting factor here is the 4017; it has a maximum of 10 states. Actually, it COULD be set up to flash 4 times on each side, but the 3-input OR gate (4075) would have to be swapped out for a 4-input OR gate (I don't know the number offhand); and the 4th flash would come after the 1st flash on the opposite side. So yes, it could be set up to flash 4 times per side, if you don't mind the overlap.

2) No, the circuit does not output voltage via the MOSFETS; the MOSFETS provide a GROUND to the LEDs. The LEDs must be supplied voltage and current limiting resistor(s) or circuit, outside of this circuit. The idea of using the MOSFETS is that they can sink a great deal of current without a significant voltage drop across them, therefore they don't generate much heat due to power dissipation.
Thanks for replying Sgt...

Ok.. 4 flashes isn't really a priority.. I just wanted something more than a basic flipflop if I could help it..

So the MOSFETs provide a ground.. Ok I thought that's what the diagram was showing, but I wasn't sure so that's why I asked... Is my initial assumption correct then, that as long as they have proper resistors/circuits attached in-line, this flasher could operate any number of LEDs?
 

SgtWookie

Joined Jul 17, 2007
22,230
With proper heat sinking, the IRF510 can sink up to 5.6A continuously, 20A pulsed (see the datasheet.)

There is ALWAYS a limit as to how many LEDs can be driven, but in this case it's fairly high, depending upon the V@I (voltage @ current) rating of the LEDs in question. Don't forget, you can run multiple LEDs in series depending upon their rating.

Let's say you had some red LEDs that were rated for 15mA@2.1V, and you're planning on running them from a boats' electrical system, or "12V". However, with the charging system operating, you may get anywhere from between 13.5 and 14.3V depending upon the charge in the battery. Let's round it off to 14V for the majority of circumstances.

Since the current sink is a power MOSFET, it has very low on-resistance; about 1/2 Ohm. This will result in a relatively low voltage drop, even at near-maximum rated current flow.

So, how many LEDs can we run in series?
14V / 2.1V = 6.6667 (approx)
Round it down to the integer value: 6
We can drive up to six of these 2.1v LEDs in a series "string", but we will also need a current limiting resistor.

Calculating the resistor - first find the voltage remaining:
E = 14V - (6 x 2.1V)
E = 14 - 12.6
E = 1.4V
Now let's see how much resistance we'll need to limit current to 15 mA
Ohm's Law:
R = E / I (or, Resistance = Voltage / Current)
R = 1.4V / 15mA
R = 1.4 / 0.015
R = 93.333 Ohms
Choose the next larger resistor size, or 100 Ohms.
To calculate our current from our selected resistor:
I = E / R
I = 1.4 / 100
I = 14mA

So, one string of 6 LEDs with this rating using this 14V power will draw 14mA. So, how many strings can we drive?
5.6A / 14mA = 400 strings of 6 LEDs, or 2,400 LEDs.

Now if you had a lot more LED's to drive, you could replace the IRF510 MOSFETs with IRF3703's, which will handle well in excess of 60A. You could drive 25,000 LED's with one of those, and it would barely break a sweat. Of course, your boat might sink with the weight of all the solder on the LEDs... :rolleyes:
 

Chikan

Joined Jan 18, 2008
24
:D Yea.. I was thinking maybe 2-300 LEDs tops, so I think the current setup would work well for my needs... 2400 would be a bit... ehh.. excessive? And 25000 would just be overkill... I dont think I've ever seen a commercially available emergency lightbar (the full-sized, rooftop ones) with more than 1000... :D

Thanks for the explanation and all the help Sgt! I think I've found my next project.
 
Top