Desoldering woes…

Thread Starter

Gizer

Joined Aug 15, 2017
52
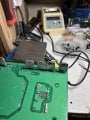
Im having a terrible time trying to desolder these capacitors from an old tig welder pcb. Ive tried so many times You can see the damage/scratches!
The iron im using is at the back of the photo, turned up to 400c, i have to hold it on the solder for half a minute or so before it gets soft and im not getting a nice pool of solder to vacuum off.
driving me round the bend tbh!
I am using a nib/pointed solder head but on its side.
Any tips or ideas what might be the issue here before i invest in a desolder machine?

thanks!!
 

Attachments

nsaspook

Joined Aug 27, 2009
16,250
Always use (don't be stingy, cover all of the joint) liquid or gel flux on old joints before trying to resolder and keep the tip bright and clean before each application. Solder wick does wonders for removing old solder if you use plenty of flux to keep the surface clean while heating.
 

Sensacell

Joined Jun 19, 2012
3,768
Buy a cheap, massive 100W soldering iron.
No amount of fiddling will solve the problem if your Iron lacks the heating power to do the job.

It's all about having enough heat transfer and thermal mass to get the job done
 

Beau Schwabe

Joined Nov 7, 2019
186
I second the thermal mass issue ... look at the huge traces on the PCB ... believe it or not, those are pulling heat away from the iron to the point that the solder can't melt.

What you could try and it may sound counter intuitive is to ADD more solder only do it as a blob on your soldering iron and move it towards and combine it with the part you want to de-solder. You must act quickly and precise or you will just contribute to the problem.
 

Ya’akov

Joined Jan 27, 2019
10,226
Welcome to AAC.

I am going to agree with several points raised above, and add a couple of my own. In summary:

1. Your problem is the big copper flood which acts like a big heatsink.
2. Use flux, and add lead-based solder to the joints, use a 63Sn/37Pb alloy which will have the lowest melting point.
3. Use solder wick (desoldering braid), it can help to put flux on it as well.
4. Possibly get a bigger iron—I have a classic Weller pistol style iron for things that just need more heat.

and, here are my additions:

1. Preheat the board using hot air—ideally it would be with a purpose-built hot air station, but you might have success wiht a hair dryer on high, very close to the board. Raising the temperature of the board can go a long way in making your iron more effective at getting the local temperature of the solder joint over the melting point.

2. Get some “low melt“ or “desoldering alloy” solder. This is a metallic alloy with a very low melting point that will alloy with the existing solder and lower its melting point as well. It can perform miracles, as it will remain in a liquid state for quite a while. IUf you use this method, none of the other things may be necessary.

Some points about using low melt alloys:

1. You need very little. A bead about the same length as the thickness of the solder wire will be enough. Place it near the joint and press it in with your iron’s tip until it melts into the existing solder. Do not remove the solder at that point, instead do all th leads for the component and remove it—then remove the solder.

2. Make sure you remove all traces of the low melt alloyed solder. Even small amounts will make new joints on the pads unreliable, Use solder braid, and then clean the iron’s tip carefully. Then use swabs with IPA to clean the pads as you heat them a bit (not too much, it isn‘t necessary).

The low melt alloy really is an amazing aid in desoldering, just be sure to clean up after yourself.
 

Thread Starter

Gizer

Joined Aug 15, 2017
52
These are all clear and make sense, thanks so much for all the great feedback!

i have ordered some wick and will try the suggestions (adding flux, more solder, heating the area etc), am feeling more optimistic about :) i mean its a pretty fundamental operation if you want to repair anything soni’ll have to master it!

I do also have an old gun style iron which i’ll try too.

Thanks again and i will report back!
 

twohats

Joined Oct 28, 2015
606
Hi,
A paint stripper hot air gun will help.
If it has not been asked, do you need the old fets?
If not, cut them off and remove the legs one a ta time.
Good luck..........
 

bassbindevil

Joined Jan 23, 2014
918
I'd do one pin at a time: heat it up then tilt the capacitor to pull the lead out. Depending on the shape of the cap, you might have to go back and forth between pins before it comes free. Then use the solder sucker to clean the hole, or maybe just shove a stainless needle in there while it's molten. (Solder won't stick to stainless.) If the hole isn't clear enough to insert the new cap, my not-universally-accepted trick is to gently use a small drill bit (HSS not carbide, something like #74) in a pin vise (rotate it with your fingers, not a motor) to embiggen the hole. The solder tends to keeps the bit centered in the hole so it doesn't damage the through-plating.
 

Thread Starter

Gizer

Joined Aug 15, 2017
52
Hi,
A paint stripper hot air gun will help.
If it has not been asked, do you need the old fets?
If not, cut them off and remove the legs one a ta time.
Good luck..........
i didnt use the hot air yet, so will definitely try that.

i did consider cutting them away, i intend to replace all 4 capacitors, but this seems like a skill/technique i really need to master to be able to repair stuff. I thought it would be a lot easier than its probed to be!!
 

Thread Starter

Gizer

Joined Aug 15, 2017
52
I'd do one pin at a time: heat it up then tilt the capacitor to pull the lead out. Depending on the shape of the cap, you might have to go back and forth between pins before it comes free. Then use the solder sucker to clean the hole, or maybe just shove a stainless needle in there while it's molten. (Solder won't stick to stainless.) If the hole isn't clear enough to insert the new cap, my not-universally-accepted trick is to gently use a small drill bit (HSS not carbide, something like #74) in a pin vise (rotate it with your fingers, not a motor) to embiggen the hole. The solder tends to keeps the bit centered in the hole so it doesn't damage the through-plating.
i was doing one at a time and trying to move the capacitor. Think i didnt have enougj heat / heat was being drawn away due to the large amount of copper as others above pointed out.

thanks for the tip with the drill bit, will use as/when i get that far
 

Thread Starter

Gizer

Joined Aug 15, 2017
52
SUCCESS!!

After weeks and many attempts, i removed one of the capacitors, hooray!

So many good tips above and i learned a lot, got all the gear (wick, vacuum sucker, hot air gun etc), and used the more powerful gun style iron but in the end, the problem turned out to be something else entirely…It was glued in place!!!! (Red face)

couldnt believe it ,once i moved it a bit, the glue broke off and after a few seconds of heat i managed to pull out each terminal.

Whole family laughed at me when i told them, bit embarrassing but thought i owed it to you guys to report back. We live and learn :D
 
Top