Coffee Machine Delonghi EC7.1 - Electrical parts

Thread Starter

Freeman Dom

Joined Dec 2, 2021
44
Hello and Thank you for accepting me,
I was cleaning my coffee machine from precipitations so i had to decmpose it, then i tried to undestand the work principle of machine but i had some questions:
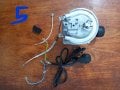
1. What's the material of wires, Aluminum ? Why is not Copper ? (Pic N°1)
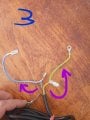
2. Why there is wires sections modifications tow times ? (Pic N°3)
3. Is the Machine Circuit draw is correct ? (Pic N°2)
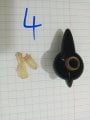
4. Where can i find this broken plastic piece ? (Pic N°4)
Sorry for my english and Thank you in advance,
 

Attachments

Last edited:

Ya’akov

Joined Jan 27, 2019
9,068
Welcome to AAC.

1. The wire is copper, with plating to resist corrosion.
2. I couldn't answer without examining the machine.
3. The line cord (flex) comes with a short, prepared "pigtail" which is added on to in order to get reach the proper terminals. Using such a standard part saves a lot of money.
4. From the manufacturer, it is very likely a custom part. You might be able to 3D print a replacement and it's probably worth your time looking for someone who has done it already somewhere like Thingaverse. If you can find a model, you can have it printed cheap.
 

Thread Starter

Freeman Dom

Joined Dec 2, 2021
44
Welcome to AAC.

1. The wire is copper, with plating to resist corrosion.
2. I couldn't answer without examining the machine.
3. The line cord (flex) comes with a short, prepared "pigtail" which is added on to in order to get reach the proper terminals. Using such a standard part saves a lot of money.
4. From the manufacturer, it is very likely a custom part. You might be able to 3D print a replacement and it's probably worth your time looking for someone who has done it already somewhere like Thingaverse. If you can find a model, you can have it printed cheap.
Thank you so much
 

MisterBill2

Joined Jan 23, 2018
18,167
There is no modification! The circuit drawn is incorrect. There are splices in the wires, not modifications, because the cord wire costs more than the single wires plus the connectors.
There are two heater elements, the low resistance element provides the high heat for brewing the coffee, and then when the temperature of the water has risen to some hotter temperature the thermostat switch opens and that adds the "Keep Warm" heater in series with the high power brewing heater.
That broken plastic piece is part of the knob assembly. It is an insulated shaft extension and it is not likely that a replacement will be available. You may possibly be able to obtain a section of a suitable plastic tubing to produce an acceptable replacement.
You may be able to purchase a knob with a longer portion so that you will not need that extension part,
You may be able to adjust the setting to some position that does not need to be changed.

And I doubt very much that the coffee maker will function correctly and not leak when it has been reassembled.
 

Thread Starter

Freeman Dom

Joined Dec 2, 2021
44
There is no modification! The circuit drawn is incorrect. There are splices in the wires, not modifications, because the cord wire costs more than the single wires plus the connectors.
There are two heater elements, the low resistance element provides the high heat for brewing the coffee, and then when the temperature of the water has risen to some hotter temperature the thermostat switch opens and that adds the "Keep Warm" heater in series with the high power brewing heater.
That broken plastic piece is part of the knob assembly. It is an insulated shaft extension and it is not likely that a replacement will be available. You may possibly be able to obtain a section of a suitable plastic tubing to produce an acceptable replacement.
You may be able to purchase a knob with a longer portion so that you will not need that extension part,
You may be able to adjust the setting to some position that does not need to be changed.

And I doubt very much that the coffee maker will function correctly and not leak when it has been reassembled.
Thanx a lot,
There is no modification! The circuit drawn is incorrect. There are splices in the wires, not modifications, because the cord wire costs more than the single wires plus the connectors.
There are two heater elements, the low resistance element provides the high heat for brewing the coffee, and then when the temperature of the water has risen to some hotter temperature the thermostat switch opens and that adds the "Keep Warm" heater in series with the high power brewing heater.
That broken plastic piece is part of the knob assembly. It is an insulated shaft extension and it is not likely that a replacement will be available. You may possibly be able to obtain a section of a suitable plastic tubing to produce an acceptable replacement.
You may be able to purchase a knob with a longer portion so that you will not need that extension part,
You may be able to adjust the setting to some position that does not need to be changed.

And I doubt very much that the coffee maker will function correctly and not leak when it has been reassembled.
Thanx a lot,
For this coffee maker type there is no "Warming element" as in the drip coffee makers, because all the process of brewing is just about 20 to 30 seconds, so it dont need to "keep Warm" anything.
Yes in the drip coffe makers type there is Heating element + Warming element because the process is about 10 minutes, so in the wiring diagram must be just one Resistor but i think my wiring diagram still incorect.
 

MisterBill2

Joined Jan 23, 2018
18,167
Some of those cheapo pass-thru coffee makers that I have had did have a warming heater that the glass pot sat on. But that large casting that I saw looked like it had two heaters. If not for keep warm, I have no clue. Possibly just a heater to keep the thermostat from recycling until it was unplugged, or switched off.
 

Thread Starter

Freeman Dom

Joined Dec 2, 2021
44
Keep-warm means Time and the Question will be : Keeping warm How much Time ? If we suppose less than one minute I think logically it dont need tow heaters, But to be sure I will try to find the real Wiring diagram.
 

MisterBill2

Joined Jan 23, 2018
18,167
Usually the "keep warm" heater is able to hold the temperature hot enough that the thermostat does not close and connect the high powered heater again. So it is not a time function.
 

MisterBill2

Joined Jan 23, 2018
18,167
I am not familiar with espresso machines. I did look at the photo provided by the TS and what I think was present was a higher powered heater and a lower powered heater and a thermostatic switch. That string of components implies two heat levels and an automated shift between them. The mechanism is more complex than the cheap coffee makers that I have seen, but that may not matter.
And I have not seen the word "espresso" even once before in this thread.
 

Wolframore

Joined Jan 21, 2019
2,609
All good, just checking:

Might be a Italinglish problem... Delonghi calls it a steam coffee maker. Europeans seem very conscientious about repairing and not adding to the land fills. I've helped my German friend fix a similar, its not impossible or hard.

1638983045561.png
 

Thread Starter

Freeman Dom

Joined Dec 2, 2021
44
Ok, I think the Technical name of this coffee maker is Steam Boiler, I try to dscribe it in this first Table to make things more clearly for drawing the Wiring Diagram.
Maybe I have to change the table title, and I will try to fix things about this subject before 2022.
Thanx for eventual remarks,
 

Attachments

MisterBill2

Joined Jan 23, 2018
18,167
OK, a number of things have become clear after examining the photos again in a magnified mode. There is no second heater element, there is only the main thermostat that is adjustable and an over-temperature thermal fuse in that section of plastic tube that has a white wire on one end and the black wire on the other end. There were no "modifications" made, the crimp splices are used to connect the internal wires to the line cord.
Note that the power switch has three terminals and if the TS did not very carefully note which wires went to which terminals there will be a big problem. That is because the switch is a lighted switch and so both sides of the mains power are connected to the switch, and if the connections are incorrect then the switch will close directly across the mains power, which will damage the switch and make it unusable. Note also that in none of the vies showing the wires do we have enough information to provide valid advice as to the correct connections. And the three switch connections do not show in that diagram.
 

Wolframore

Joined Jan 21, 2019
2,609
My advice, which is a little late, is to take pictures and document better before disassembly. If you do some searching you may be able to find a wiring diagram. It’s a simple circuit.

this is for a similar DeLonghi unit (EC155)
1639054506449.gif
 
Last edited:
Top