Thread Starter

babysettlers

Joined Dec 9, 2023
1
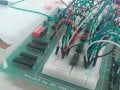
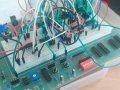
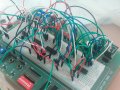
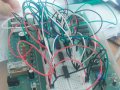
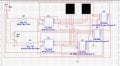
I am given a school project where i have to design a mod 60 counter with start/stop and reset functions on a digital trainer breadboard circuit using two 4-bit binary counter IC chips (74LS93). I am also able to use other basic logic gates such as NAND, NOT, AND and OR gates to construct my circuit. I successfully simulated this counter using the software multisim. (picture and file of counter will be attached). However, as i attempt to construct this counter on my actual hardware breadboard circuit. I encountered a problem. Initially I had success in constructing a mod-60 counter that counts from "00" to "59" before resetting to "00" when it reaches 60. I also managed to successfully implement the second part successfully, a button when pressed can start/stop the counter circuit. For example, if i pressed the start/stop button the 7-segment LED display would stop counting upwards and whenever the counter circuit successfully complete counting one cycle, I can press the start/stop button to resume counting when the LED 7-segment display remains at "00". However, at the third part, which is implementing a reset button function is where i failed at. As simulated in my file, when the reset button is pressed LED 7-segment display is supposed to reset to "00" regardless of what the number was displayed on the 7-segment display initially was. Howver, as implemented this circuit and following my own configurations in my multisim simulation file, the counter reset and start/stop function works completely fine. The problem is that the counter when it counts up to "10" it stops and I have to press the start/stop button for it to continue counting and when the circuit counts up to 20, it resets to "00". The circuit I designed was supposed to count up to 60 and have it reset to "00". Does anybody know of any possible wiring errors or possible mistakes I could have made because I'm not sure what the error is or how to troubleshoot it. I need help.
 

Attachments

dl324

Joined Mar 30, 2015
17,228
Welcome to AAC!
Howver, as implemented this circuit and following my own configurations in my multisim simulation file, the counter reset and start/stop function works completely fine.

The problem is that the counter when it counts up to "10" it stops and I have to press the start/stop button for it to continue counting and when the circuit counts up to 20, it resets to "00". The circuit I designed was supposed to count up to 60 and have it reset to "00".
It would have been helpful if you made this a separate paragraph, or 2, so we didn't have to wade through a lot of irrelevant information to get to your question.

Does anybody know of any possible wiring errors or possible mistakes I could have made because I'm not sure what the error is or how to troubleshoot it. I need help.
When the counter gets to 10 and stops, check the logic levels on your clock gating logic.

The IC's aren't labeled and your breadboard is too messy for anyone to be able to help you find the problem.


In the future, please print to PDF and post a black and white schematic. Also, avoid unnecessary wire jogs, scenic routing, and wires over text.

Better component placement would make your schematic easier to read. As would reducing complexity. You don't need to use the flip flop for clock gating and the inversion of the reset button isn't necessary.

Those counter symbols are worthless because they don't have pin function labeled.

I had to create the LS93 component for the logic simulator I use, so I arrange the pins in a more logical order.
1702488484915.png
Note how I made the reset logic topology (gate placement) the same for both counters so only one needs to be analyzed.
 
Last edited:

MrChips

Joined Oct 2, 2009
31,209
What you have is a "bowl of spaghetti" jumper cables. It makes it very difficult to locate a wiring error.
1703000488837.png


My advice would be to get at least four spools of different coloured 22-24AWG and cut your own jumpers to length.
If you don't want to cut your own jumpers you can get a protoboard jumper wire kit with precut jumpers.
Keep all your jumpers as straight as possible and be consistent with your choice of colours.

1702998839279.png

You can imagine that trouble shooting this prototype layout would be a much easier task.

1703000904645.png
 

dl324

Joined Mar 30, 2015
17,228
If you make your own jumpers, use #22 wire. I used #24 from CAT5 cables and found that the wires pulled out too easily.

I'm not a fan of cutting jumpers to length and laying them flat on the breadboard (or color coded wires). Jumpers just need to be short enough to avoid the tangles in your breadboard. I find that laying the wires flat creates congestion that makes wire tracing in pictures more difficult.

This breadboard has 2 or 3 different circuits:
multipleBoards.jpg
When I decided to stop using #24 wire, I bought a 1000' spool of brown #22. I only use about half a dozen different lengths.

Buy, or make, a lead former:
jamecoLeadFormer.jpg
 
Top