 Facebook
 Google
 GitHub
 Linkedin
Hello,
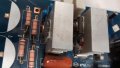
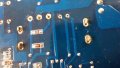
I am struggling to desolder a heatsink from a Behringer powered mixer PSU board (photos attached). I need to replace the power transistors which have shorted. I can't even unscrew the transistor from the heatsink on the right as the other heatsink is blocking it!
I have removed as much solder as I can from each of the tabs and component legs using flux and desolder wick.
The heatsink is still not budging?
Any tips/suggestions?
Attachments
-
 107.2 KB Views: 77
 -
 116.5 KB Views: 73


