Facebook
 Google
 GitHub
 Linkedin
Materials:
A CD case, some wood, 20 "UV" LEDs, a few resistors, cardboard, aluminium foil, stripboard.
The "UV" LEDs are not really UV, they are violet and fairly cheap on eBay - I got mine from Phenoptix. The wavelength is 400nm.
The pictures explain it fairly well, I'm using 12V from my bench power supply and the LEDs are connected in parallel chains of 3 and one of 2 with current limiting resistors. I measured and matched the forward voltages of the chains of 3 LEDs to hopefully reduce the brightness variation. As LEDs vary I'm not mentioning resistor values.
I printed on transparency paper with an inkjet and the density of the print isn't great but still ended up with usable results. I may experiment with a double layer of transparency. A book on top of the transparency and PCB holds it flat.
I get the best results with an exposure time of 3 minutes with the PCB I'm using.
If I was doing it again I would attach the LEDs to stripboard, it would save a lot of time.
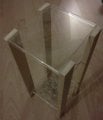
Hot glue is used to attach the CD case to the wood. It's about 30cm high to spread the beams from the LEDs out so they overlap.


I used epoxy putty (milliput) to hold the LEDs in place.

The surround is cardboard with a sheet of aluminium foil attached. It helps level the brightness out.

Fairly even coverage.

The result: not perfect but useable. The main traces are 20/1000 inch or about 0.5mm and the pad outline at the center right is 10/1000 inch or about 0.25mm

A CD case, some wood, 20 "UV" LEDs, a few resistors, cardboard, aluminium foil, stripboard.
The "UV" LEDs are not really UV, they are violet and fairly cheap on eBay - I got mine from Phenoptix. The wavelength is 400nm.
The pictures explain it fairly well, I'm using 12V from my bench power supply and the LEDs are connected in parallel chains of 3 and one of 2 with current limiting resistors. I measured and matched the forward voltages of the chains of 3 LEDs to hopefully reduce the brightness variation. As LEDs vary I'm not mentioning resistor values.
I printed on transparency paper with an inkjet and the density of the print isn't great but still ended up with usable results. I may experiment with a double layer of transparency. A book on top of the transparency and PCB holds it flat.
I get the best results with an exposure time of 3 minutes with the PCB I'm using.
If I was doing it again I would attach the LEDs to stripboard, it would save a lot of time.
Hot glue is used to attach the CD case to the wood. It's about 30cm high to spread the beams from the LEDs out so they overlap.
I used epoxy putty (milliput) to hold the LEDs in place.
The surround is cardboard with a sheet of aluminium foil attached. It helps level the brightness out.
Fairly even coverage.
The result: not perfect but useable. The main traces are 20/1000 inch or about 0.5mm and the pad outline at the center right is 10/1000 inch or about 0.25mm
Attachments
-
 30 KB Views: 990
 -
 21.5 KB Views: 958
 -
 22.1 KB Views: 974
 -
 43.6 KB Views: 956
 -
 31.4 KB Views: 934
 -
 20.1 KB Views: 988
")