Old BE console distortion

Thread Starter

robismod

Joined Sep 22, 2015
351
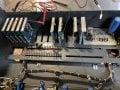
I acquired an old Broadcast Electronics 150 console a few years back and have never powered it up until recently. Power is fine, put some bulbs in the VU meters and they work fine. However when I injected some audio into a channel or two, I’m getting heavy distortion (overdrive?) outputs to either a speaker or headphones. Pots are best left at very low positions, and have very little range…
There are 5 mono pre-amp cards, 2 Line Amp cards, 1 Power Amp card, and 1 Mono Cue/headphone card. On the far right is a circuit board with 3 relay slots, with only 2 in place (leaving middle spot empty) some transistors, diodes, small caps, one large tall cap, etc…
Wondering if there’s a quick and easy “guess”? Maybe start with the Power Amp card?
I have schematics/manual I can dig up, but was hoping it might be something quick…I’m wanting to sell this and other stuff I’ve had for years…to make way for more stuff LOL
 

Ron314

Joined Mar 14, 2023
21
WOW! You cleaned it up very well. My advice is very generalized since the first steps to making electronics work after years of sleep would be the same answer here, maybe you've done some or all of these.

1. Remove all boards and connectors and re-seat them just to create a fresh connection between the mating surfaces.
2. Rotate the dials from left to right about 100 times each in order to wear through any oxidization or dust that might be on the carbon inside them.
3. Flick every switch on and off 100x as well just to wear through the oxidization on the surfaces inside the switches.
4. Same with the earphone/speaker jacks. . . . in and out several times.

I used to use contact cleaner for a lot of these repairs, but idk, it's not always my first goto these days. Just a note, do all of this with the unit unplugged. Let us know how it went ;)
 

Thread Starter

robismod

Joined Sep 22, 2015
351
WOW! You cleaned it up very well. My advice is very generalized since the first steps to making electronics work after years of sleep would be the same answer here, maybe you've done some or all of these.

1. Remove all boards and connectors and re-seat them just to create a fresh connection between the mating surfaces.
2. Rotate the dials from left to right about 100 times each in order to wear through any oxidization or dust that might be on the carbon inside them.
3. Flick every switch on and off 100x as well just to wear through the oxidization on the surfaces inside the switches.
4. Same with the earphone/speaker jacks. . . . in and out several times.

I used to use contact cleaner for a lot of these repairs, but idk, it's not always my first goto these days. Just a note, do all of this with the unit unplugged. Let us know how it went ;)
Thanks very much for your input. Yes, I gave almost all of that a workout—but…I haven’t done all the cards yet—just a couple that I thought were associated with a particular channel. I’ll try the rest hopefully later tonight…
I didn’t want to dig out the schematics, and thus begin the daunting task (for me ) of trying to makes sense of it all. In the past I’ve gotten along ok with them (blessed with the help of many folks on this site) but my mind is slowing down more so every day and too many other things I’m trying to get accomplished.
 
Top