I can not really see any components in that shadowy and out of focus picture. Also, I have some bad news which is that many components do not change their appearance when they fail. Only excess power dissipation burns components. Open circuit failures show nothing.
Hello Mr. Bill, Thank you for your response
This LCD is from a tractor,which display the gear ranges
The problem is that works only when i apply a little pressure
What that means?
Pressure where? On the LCD or board? If on the LCD, are there elastomer connectors ("Z" or Zebra) strips?
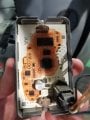
Where is the LCD connector? In post #3 is it the black area on the left in the first photo? If so, I am not surprises that a compression connector in a tractor has become sensitive given the environment in which it works. The very first picture in this thread looks like some liquid spill.
If those assumptions are correct, I would carefully clean both sides of the connector with 99% isopropyl alcohol (IPA) and reassemble. If that doesn't work, sometimes reassembly with a little surfactant (maybe a tiny bit of non-ionic spray adjuvant diluted in water) on the mating surfaces before reassembly may help.
EDIT: Are the connections springs against conductors as an alternative to elastomers? If so, be sure there is no corrosion on the springs.
If an electronic item works at all when some bit of pressure is applied then there are no burned components causing the failure. Intermittent failures are usually caused by mechanical problems, mostly connection issues that may even be inside a component. In this case, as already commented, it is a connection failure in the mechanical part of the elastomeric connection strip that connects the glass display to the circuit board. Vibration will cause the conductive surface to deteriorate a bit, and that leads to an inadequate connection. A gentle cleaning, followed by re-assembly, with that elastomeric strip also being gently cleaned and positioned centered on those black pads on the circuit board may get the display working again. There does need to be some compression of that strip to provide contact, and so the assembly process can be challenging.
That material was originally called "zebra strip", and if you want a better understanding of how it works that information is available. Presently it is made by a number of companies, some of the products are far better than others.
Hello members,Thank you for your response, i understand what you mean but there is another problem
The display has two 12V 1.2 Watts Bulbs for lighting and don't glow up
The display receive normally voltage
So, i think that the problem is from supply or ground
But how Bulbs are controlled Pin 1 is 12 V Power
Pin 6 is ground
But no connection between them and lamps
Generally speaking, such bulbs are for back lighting. You said the display "didn't work" unless you pressed on it. Many of us (including myself) consider the back lights separately. In fact, most (all) LCD displays are still readable with the proper lighting when the back lights go out.
1) Is the display still readable with reflected light?
2) If it is just the back light bulb, none of the stuff I wrote about elastomeric strips (post #4) and echoed by another member applies. Back lights are high current devices compared to digital devices. They will generally have a direct connection to the supply; although, they may be dimmable by a transistor or PWM.
This Bulbs work only if you press the Parklight switch to illuminate the instrument panel and this display
It is connected to ground along with signal pin
Pin 2,3 are CAN L CAN H
The display is not directly connected to the back lights. "Yes" what? Is the problem the back lights or the display? It's a little like a refrigerator when the light goes out. Sure, it's not working from some perspective. But if it is still cold, then the refrigeration part is still working.
When i check the circuit with multimeter on continuity Mode,from bulb socket to pin 1 or pin 6 seems no connection
But i think the display it haven't a dimmed backlight
Big soldering joints are from edge backlight
The display is not directly connected to the back lights. "Yes" what? Is the problem the back lights or the display? It's a little like a refrigerator when the light goes out. Sure, it's not working from some perspective. But if it is still cold, then the refrigeration part is still working.
If pressing on it makes it work, it is probably what is called a "cold solder joint" or a cracked solder joint. See if you can figure out the exact spot that you press to make it work. Get it to the smallest area possible. That will help you figure out where to look closer. The good news is, if it is a cracked solder joint, you can often fix it simply by re-melting (reflowing) the solder at the cracked joint. This happens frequently in circuit boards that get a lot of temperature changes, and/or a lot of vibrations.
If pressing on it makes it work, it is probably what is called a "cold solder joint" or a cracked solder joint. See if you can figure out the exact spot that you press to make it work. Get it to the smallest area possible. That will help you figure out where to look closer. The good news is, if it is a cracked solder joint, you can often fix it simply by re-melting (reflowing) the solder at the cracked joint. This happens frequently in circuit boards that get a lot of temperature changes, and/or a lot of vibrations.
Hello MrSoftware,Thank you for help
First of all, you are right about vibrations, this display is mounted on a tractor, So you understand the enviromental conditions
My customer says, that the problem starter when the monitor worked if he pressed it and have no illumination in night
Now,i want to ask you if these two 12v 1.2 Watt Bulbs used for backlight?
When i press the Parklight button, you understand that instrument panel is illuminating along with this monitor
Now, it isn't and also we have no display at all
Power supply is in its nominal values
So it used to work by pressing on it, but now pressing on it does not make it work, is that right?
Try plugging it in then gently pressing on things on the circuit board with your finger and see if it starts to work. Also gently press the power plug in different directions. The goal is to figure out which part might be loose. If you have someone who is good at soldering, ask them to put some flux on the through-hole parts and reflow the solder on those connections. That's relatively low risk, and those types of connections can crack. Also the row of holes on the back side next to the long black strip, does something connect to those? I cannot tell from these pictures alone if those LEDs are the screen backlight, but it is possible.
1) The two bulbs are used for night viewing. If the bulbs turn on when the parklight switch is on then it is working.
2) There is no display from the LCD. It used to work when pressure is applied.
Likely problem is bad contacts on the elastomer connector. Get cotton swabs and IPA (isopropyl alcohol) and clean the contacts on the PCB (printed circuit board), on the LCD and on the elastomer strip. Assemble the unit and examine how the assembly is able to apply light pressure between the LCD and the PCB.
 Facebook
 Google
 GitHub
 Linkedin
 53.4 KB Views: 25


