Facebook
 Google
 GitHub
 Linkedin
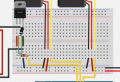
So I'm attempting to covert a breadboard project to a solderable prototyping board and in my experience it is best to have at least a second set of eyes. I was curious to see if there was a software program that can convert a breadboard project to a wiring schematic that I could then translate to a PCB. Atattched is a picture of the planned circut the other is my attempt at translating it to a PCB format.
Thanks ahead of time!

Thanks ahead of time!