Another 2-digit up/down counter...x2

Thread Starter

hobo_3

Joined Dec 10, 2014
13
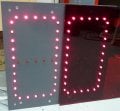
I've taken on a project that is making me stretch quite a bit, and thought I'd seek some wisdom about it. I'm pretty early on in my hobby electronics phase, so bear with me. It is very similar to this build, but simplified a little. Here is a quick sketch-up render I did.
counter render.png

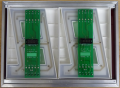
Essentially, 2 groups of 2 digit 7-segment displays, each one able to count up or down via green and red buttons. It will be used in our assembly shop to keep track of how many fixtures are done during the day. The left side will be the "active" number, and the right side being the "target" number. Functionally, though, they should act identically (mostly for simplicity).

I'm planning on using two separate boards for each side, and ideally using one power supply and one on/off switch (that would also act as a reset).

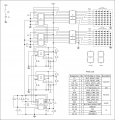
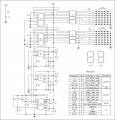
The closest circuit to what I think I need was also referenced in the noted thread, created by elec_mech and attached below.
Up_Down 2 Digit 7-Seg Counter Circuit, Rev 5.png

And now we get to my question. The 7-segment displays I was planning on using are from Jameco, Part Number 105591 and the counter IC was a CD40110B, also from Jameco. My inexperience is making it hard to understand exactly how much voltage and current those 7-segments are going to need. I assume I'll need Darlington transistor between the counter IC and the LEDs, but I'm lost as to figuring out which one.
I'm also wondering about a power supply. Since I'd like to use one to power both sides, will that need some additional circuitry to work? Or do I just need something with double the amps that a single side would require?

Thanks in advance for any help. I've been scouring away these forums and others for the past few days, and have learned much just from reading.

P.S. Assuming that I'm able to make one of these boxes happen, my employer will then be asking for 9 more. So hopefully I'm not driving myself off a cliff here.
 

Attachments

elec_mech

Joined Nov 12, 2008
1,500
Welcome to AAC.

First, let me be the first to thank you for writing an awesome first post and I'm not just saying that because you're using a circuit I designed. :) You've told us very clearly what you're trying to accomplish, provided pictures to better illustrate what you want to do, and provided links to parts/datasheets you plan to use. Kudos! If every first post looked like this, we could help members much faster.

My inexperience is making it hard to understand exactly how much voltage and current those 7-segments are going to need.
I think it's the datasheet, I'm scratching my head too. I think they're calling out the specs on each LED individually as opposed to one segment. If that is the case, then each segment (for the 40054-xx) is rated for 2.0V at 18mA. Since each segment is made up of five LED's in series, the current remains the same and each segment requires 5 x 2.0 = 10VDC @ 18mA. If all segments are lit, then 18mA x 7 (per digit) x 4 (digits) = 504mA. You should be able to get away with a 12VDC power supply rated at 1A which are fairly common and inexpensive. You don't want to push a power supply to its max rating, hence adding some cushion is always advised.

I assume I'll need Darlington transistor between the counter IC and the LEDs, but I'm lost as to figuring out which one.
Allow me to suggest using a common anode (CA) display instead. You are right, for anything above about 1" in height, you'll need some type of driver/amplifier to handle the current requirement (sometimes the voltage requirement if you're making something huge and beyond the limits of the IC's, but no worries in this case). This will allow you to use something like a common, fairly inexpensive ULN2004. The UDN2981 in my first design are for driving common cathode displays and are no longer made by the manufacturer. You can of course still find some or a similar substitute, but these are source drivers and they can get pricey. Sink drivers like the ULN2XXX series are much less expensive and readily available from most suppliers.

Since you stated you might need to build multiple units, you can save some scratch by looking here. They don't have a 4" in CA, but they do have a 5". Alternately, if you like building things, you can make your own display using standalone LED's as was done in the thread you linked to above. It'll be some work, but labor aside, they'll be less expensive and you can make each set of digits a different color, say green for the 'active' number and red for the 'target' number. Or whatever you'd like. Not hard to do, but time-consuming, so if you prefer to stick with an off-the-shelf display, I understand. You can also find some deals on eBay.

The circuit you posted is fairly involved and feature-rich. I can modify it to better suit your needs. Let me know which of the following you'd like to keep:
  • Flashing - requires another button; push the flash button once to have all digits continuously flash, press the button again to turn off the flash
  • Auto-repeat - by holding the increment or decrement button down, the display will quickly advance (thus avoiding pressing the button 50 times if you need to display 50 from zero
  • Reset - pressing the reset button resets the count to zero
  • Remote control - if you need to change the count from somewhere else wirelessly; you can use both the buttons at the display as well as a remote if you'd like
 

Thread Starter

hobo_3

Joined Dec 10, 2014
13
Thank you for the replies! I'm sort of relieved you took the bait, elec_mech. :rolleyes: And thanks for pointing me toward Futurlec; I scoured the web looking for large 7-segments and wasn't seeing a whole lot. I thought about making my own, but wiring that many leds (times 10) makes me think I'll save plenty of money in man-hours by buying pre-made. Unfortunately, I already placed an order through Jameco getting 4 of the 4" CC leds, so maybe those will have to sit on a shelf for a later project. Is there any way to make those work for a single unit, even if I use CA leds for the rest of the batch?

Let me know which of the following you'd like to keep:
The only thing that would be useful is the auto-repeat. I think everything else can go by the wayside. And again, I'm trying not to push myself too far in this project.

I was also curious about durability of these components. Assuming these boxes are lit up for 10 hours a day (or left on for 24 hours) in a dusty shop, is there any idea how much time will pass before the LEDs go out? I'm usually sort of an "overbuilder" when it comes to projects, but the only thing I can think of is to make sure the individual numbers can be changed out if needed.

Thanks again for your reply. At the end of this, I hope to have a much stronger grasp on a lot of this stuff.
 

elec_mech

Joined Nov 12, 2008
1,500
Yes, making several displays would require a lot of time, so it makes sense to just buy them pre-made.

Since Jameco still offers the UDN2981 (UDN2982 will also work), let's just stick with that. Futurlec has far more options in common cathode displays than common anode, so you'll actually be saving money in the long run if you'd prefer 4" ($4.90 USD) over 5" ($11.90 USD).

I'll update the schematic with just the features you want.

Regarding durability, LED's are said to last about 10,000 hours or 10 years, depending on use. They'll very gradually fade over time. You can help increase their lifespan by not running them at their full current. Looks like I read the current rating above wrong. 18 is the mcd (brightness). Oops! The full running current is 30mA. This will allow them to shine brightest safely. If you can get away with 20 or 25mA (which will dim the display some), you can reduce wear on the LED's and thus improve their lifespan.

Since I screwed up the running current number, let's run that again: 30mA x 7 segments x 4 digits = 0.84A. A one amp supply should be okay. If you plan to use the decimal points, this is increased to 0.96A, in which case I'd suggest at least a 1.5A supply. If you determine the displays are still bright enough at 20mA without the decimal place, then you just need 0.56A, still great for a one amp supply.

If these will be viewed up close, you may want to consider adding a filter, otherwise it will be hard to tell a lit segment from an unlit one. This can be a piece of transparent colored plastic, either acrylic or a thin sheet from a hobby shop. Attached are a couple of comparisons. You'll notice you can easily see the unlit segment on the digit without the filter while it's much easier to see 0 and not 8 in the filtered digit.

EDIT: Added pictures.
 

Attachments

Last edited:

elec_mech

Joined Nov 12, 2008
1,500
Playing the devil's advocate, I've made two schematics. One is a purely hardware solution, just like we've been discussing. You buy the parts, build the circuit and viola!

The other is a software solution if you want to reduce parts count and have a desire to learn software. I'd write the program then you could modify or tweak it later if you'd like. Other than parts count or easily adding features down the road, e.g., buzzer, LED's, etc., there isn't a pressing reason to go this route, but I thought I'd mention it anyway. Always wanted to showcase a purely hardware solution against a software one.
 

Attachments

Thread Starter

hobo_3

Joined Dec 10, 2014
13
Wow! That is fantastic! I think I'll probably stay on the hardware side, but thank you for running both scenarios. I was initially thinking going software route, partially because I've wanted to learn more about coding. Part of the reason for homebrewing this system was because we couldn't find anything like it for under $200 ready-made, and my first thought was just hooking up a raspberry pi to a cheap computer monitor. BAM! But this will turn out to be a FAR more elegant solution, and one that I'm very eager to get my hands on.

As mentioned, I already placed an order through Jameco for some of the stuff, and I'll get another one placed (probably through Futurlec) for the rest. My goal is to have the prototype done sometime during Christmas break; fingers crossed I don't fry every IC on the board while playing around.

I'll definitely pick up some filter material for the displays. My original plan was using 3/4" particleboard or mdf for the face of the box and mounting everything in somehow, but I somehow forgot about our new laser cutter in our shop. :D So now I'll probably just have the whole face cut out of steel and affix that to a wood frame. I'm sure all the buttons will be much more secure that way. I'm toying with the idea of actually cutting the individual segments out of the metal for the ultra-clean look, but that could be more trouble than it's worth to make sure everything gets aligned.

Regarding the schematic, can I assume the CD4093 is used for advancing the count when the button is held down? Reading the data sheet for that chip leaves me confused. Actually, the data sheets for everything leaves me confused; but I usually have an idea of the general purpose of the chip...

I'm almost sorry that you've put the whole schematic together for me. I was expecting to spend time in the basement surrounded by books and be pulling my hair out trying to understand everything. I still plan on really making sure I understand every lead and connection, and I suppose this way it will actually get finished. So thank you elec_mech; I really appreciate it.
 

elec_mech

Joined Nov 12, 2008
1,500
It may help if I got the part number right in the parts list. :rolleyes: It is a CD4093.

Let's step it through the circuit briefly, shall we?

The CD4093 is a NAND gate Schmitt trigger. It is being used here to remove bounce from the mechanical contacts of the switches. Without this, you could see the count jump randomly whenever you press a button.

The 555's are set up in astable mode. When the up or down button is pressed, the reset pin of the corresponding 555 is pulled high, effectively turning the 555 on. In astable mode, the 555 outputs a signal that goes from high to low and back again, simulating a button being pressed, then released, then pressed again for as long as the button is held down. I've selected the timing of this signal such that pressing and releasing a button quickly will only move the count by one (one button press). Holding the button down will allow the count to advance at a moderate rate - not super fast, but hopefully fast enough that someone won't prefer to repeatedly pound on the button. Come to think of it, you may be able to get away without the 4093 altogether - the 555's should add a level of debounce by themselves. However, this is an untested assumption.

The CD40110 is a wonderful IC. It has separate inputs for counting up and down as well as a reset to zero and output to 7-segment displays directly. They can't provide a lot of current, hence the UDN2981/2's.

If you decide to do a PCB, I've made a PCB for the 3" and 4" Futurlec displays that has an IDE connector. This simply goes on a 10-lead ribbon cable and you can then add to you main PCB design. If you're planning to stick with proto boards and not a custom PCB, then it's probably not worthwhile.

If you decide to explore embedded hardware (hardware with software) down the road, take a look at the PICAXE. It uses BASIC language which is extremely easy to learn, the software is free, and the IC's don't cost much at all. If you're planning to get into video displays and high-end stuff, then certainly look into the Raspberry Pi.

EDIT: Corrected HW schematic to include missing connection points.
 

Attachments

Last edited:

Thread Starter

hobo_3

Joined Dec 10, 2014
13
Guess what came in the mail today! Got the big 7-segments, the CD40110's, some 555's, and a few other odds and ends. Still waiting on the UDN2981's, along with the 4093, but this should be enough to get started playing. I also got some tiny 7-segments to do some tests with; so even though I can't light up the big ones yet, I can still have some fun.

Come to think of it, you may be able to get away without the 4093 altogether - the 555's should add a level of debounce by themselves. However, this is an untested assumption.
I'll play around with not using the 4093; I'm interested to see what happens too!

If you decide to do a PCB, I've made a PCB for the 3" and 4" Futurlec displays that has an IDE connector. This simply goes on a 10-lead ribbon cable and you can then add to you main PCB design. If you're planning to stick with proto boards and not a custom PCB, then it's probably not worthwhile.
Yeah, I'll stick with proto boards for now. I'll also have to figure out how I'll mount the large 7-segments to the panel. Maybe just glue? One day down the road I'll dive into etching and PCB design, but one step at a time.

This should be a fun weekend!
 

elec_mech

Joined Nov 12, 2008
1,500
It's not super pretty, but one way to mount the displays is to drill through the filter and display and use fasteners (picture below). I chose a dark red acrylic filter, countersunk the holes, and used black flat head screws to minimize their appearance. Another way could be to silicone glue the corners where the display edge meets the filter face. Yet another is to press fit them into something - since you have access to a laser cutter, you cut out a piece of 1/4" or so wood or plastic and press fit them into it, then use the wood/plastic to mount to your enclosure. Just some thoughts.
 

Attachments

Thread Starter

hobo_3

Joined Dec 10, 2014
13
I'm finally getting down to figuring out the transfer from schematic to strip board. Again, this is my first time figuring out the physical layout of things, and it's difficult...but extremely useful. If this step was already done I probably wouldn't really learn anything, and that is why I'm doing this! Currently using the free version of VeeCAD, and I'm glad I am. Started on graph paper - I don't own enough erasers for that.
Anyway, my current question (no pun intended) is this: if I don't plan on using the reset function, how much of the circuit can I get rid of? Will it impact anything if the reset pins are open? My guess is highlighted in the schematic; I still don't quite grasp exactly how the 4093 works. I also included what I have so far for the stripboard layout.
Counter 2014 - HWnoreset.png doublecounter.PNG
 

elec_mech

Joined Nov 12, 2008
1,500
if I don't plan on using the reset function, how much of the circuit can I get rid of?
If you don't need the reset, you can eliminate the parts you've highlighted plus R6, BUT keep C6 - this is used to dampen noise. All CMOS IC's produce some level of electrical noise and need a 0.1uF capacitor as reasonably physically close to the power pins as possible. Also connect pin 8 to pin 9 (which is connected to Vcc) on the CD4093. You always want to ensure unused input pins are pulled high or low and not left floating. For the same reason, connect pin 5 on both the CD40110's to GND.

If you find the 555's add enough debounce and you don't need the CD4093 AND you want to keep the reset function, keep R1 and SW4 and get rid of the CD4093, R4-R6, and C6-C9. Won't matter if the reset switch bounces because the result will be the same.
 

Thread Starter

hobo_3

Joined Dec 10, 2014
13
Well, I'm on my way. I populated the board today, wired up the first 7-segment, and voila! It lights! And counts! Unfortunately, I need to troubleshoot some things. I'll go over all the connections, but it looks like I'll need the CD4093. The numbers jump around quite a bit when pushing the button. However, when I hold it down, they do auto-advance nicely. Also, count down button does nothing at all.
All in all, I'm very happy with how this is going. I was worried that everything would go perfectly the first time; that always makes me nervous. I'll start going over everything and make sure I didn't bridge anything. I thought I was OK at soldering, but this is a little tighter than anything I've done. How some of y'all do SMD by hand is befuddling to me.
 

Thread Starter

hobo_3

Joined Dec 10, 2014
13
Ok, I think I've hit a wall. If I'm not using the 4093 to debounce, where would the push-button switches go? Right now, they are going from Vss to pin 4 on the 555. It counts up automatically, but holding the switch makes it stop. Also, I'm using these switches. Just want to make sure I don't need the "reverse" of them.
And finally; I perhaps made a faulty assumption that when this system powers up, the CD40110's would default to 01, or 00. As I'm playing with it now, it starts at some weird numbers. Sometimes it'll start at 90 5 times in a row, sometimes mid 80's, sometimes a totally random number. Is that why having a reset switch is so important, instead of just powering off the unit and back on?
Here is a picture of the final layout; not sure if it is helpful.
doublecounter.PNG
 

elec_mech

Joined Nov 12, 2008
1,500
I've checked your stripboard design. Looks good except for the following:
  1. SW2 and SW3 should be connected to Vdd not Vcc (see schematic below).
  2. Connection from U1, pin 7 to U2, pin 11 is missing.
  3. C3 is missing.
  4. I assume R11-R24 is off the board.
You can add a 'reset to zero on power-up' by including R1 and adding what is now C6 in the schematic below. When power is first applied, C6 acts like a short and a high (reset) signal is sent to the reset pins. Shortly afterward, R1 keeps the reset pins pulled low (reset disabled during operation).

I need to update the pin numbers to account for the missing ones, but attached is an updated schematic. Good luck!
 

Attachments

Thread Starter

hobo_3

Joined Dec 10, 2014
13
Well, changes have been made. I still can't get the counter to count individual clicks. BUT, I just breadboarded a version that has the CD4093, but NO 555 timers...and it works pretty darn good. I think I'll go with this for a few reasons. First, it'll save quite a bit of time in the long run by removing the 555's, and (correct me if I'm wrong), but I can use the CD4093 to run all four switches (assuming no reset switch). This way, I believe I can even cram everything for four lights on one board, instead of having two duplicate boards which should save even more time. Also, it seems like I can advance the count rather rapidly manually, and with a count-down and count-up, getting to any number should be pretty easy.
 

elec_mech

Joined Nov 12, 2008
1,500
Sounds good - no problem using the CD4093 for both sets of switches. You can still add the reset switch if you'd like without going through the CD4093. Alternately, if you add R1 and C6 as shown in my last post, you can simply cycle power to reset the count to zero without adding an additional switch.
 

Thread Starter

hobo_3

Joined Dec 10, 2014
13
I'm close! I've managed to get everything onto one board, and everything is wired up and turning on nicely. I'm running into an issue, though. At first, one of the four switches (driven by pin 3 of 4093) was advancing by 2 jumps, instead of 1. I used a different output from the CD4093 (pin 11), and it worked as it should. Then I decided to just wire it so the double-jump pin went to "clock down" on the 40110. I switched a few jumpers around, and now the whole left side of the chip is wonky. Neither switch works (on the left side) unless the other is depressed. I can't really figure out how they would interact with each other like that...

I see on the data sheet for the CD4093 that "DC INPUT CURRENT, ANY ONE INPUT is +/- 10 mA". My power supply is actually a 12V 3A. Is it possible I'm frying this chip? (To make matters worse, I didn't have any DIP 14 sockets to use, so I soldered the chip directly to the board. D'oh! o_O ) I've gone through and thoroughly checked for any bad joints, jumps, etc. I also changed the physical switches; no difference.

I am hoping to use the 3A supply (and maybe even a 5A, as we have a surplus of them at work right now) to drive an extra LED ribbon on top. Will all that amperage give me problems?
 

elec_mech

Joined Nov 12, 2008
1,500
I am hoping to use the 3A supply (and maybe even a 5A, as we have a surplus of them at work right now) to drive an extra LED ribbon on top. Will all that amperage give me problems?
No, that won't affect the CD4093.

It sounds like either the switch has a lot of bounce or the timing of that 555 is too short. Are you using a 100k ohm resistor and a 0.1uF capacitor to feed the respective input pin the switch is connected to?

Are you using a 0.047uF capacitor connected to pin 6 of the 555? Are the resistors connected to pin 7 of the 555 4.7M ohm and 1M ohm?

What happens if you bypass the CD4093 and connect the switch directly to pin 4 of the 555? Remember the other end of the switch should be connected to Vcc (12VDC) not ground when you do this.

Can you post a few good, clear pictures of your circuit?
 
Top