Wiring of a vacuum cleaner motor

Thread Starter

Jeanne Munro Ladner

Joined Dec 27, 2015
3
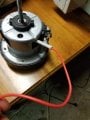
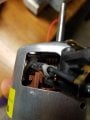
Newbee to DIY appliance repair. Old vacuum motor had 2 wires and the replacement whose part number I got from manufacturer has only one wire. Dont I need 2? I dont want to hurt the motor as the supplier wont take it back if I have tested it, and I damage it. The photos I've attached might help explain. The first 2 are old vac motor and last 3 are new vac motor. Your thoughts, wrong motor? Wired a special way? I should bring to vac repair shop?
 

Attachments

MaxHeadRoom

Joined Jul 18, 2013
28,686
Looks like it shows one wire to the fields and the other is the brush Spade Terminal which would be normal for a Universal vacuum motor.
Your old one may just need new brushes?
 

LesJones

Joined Jan 8, 2017
4,190
If you trace the two wires from each field coil you should find that one wire from the field coil connects to one of the brush holders.the other end of that field coil will be one of the power supply connections. This may be a wire or a push on tab connector.The other field coil will be wired in the same way but to the other brush holder and the other power connector.
You may also find a small value capacitor connected between the power connections. this is to reduce electrical noise from the commutator being fed back into the mains. It is also possible that there are two RF chokes wired in series with the field coils.

Les.
 

MaxHeadRoom

Joined Jul 18, 2013
28,686
If you have a meter, measure from the spade (push-on) terminals and the red conductor. it will be fairly low resistance and is most likely the connections you apply the power to.
 

Dodgydave

Joined Jun 22, 2012
11,302
Connect the other terminal on the spade here.... You can verify it by connecting the terminal and the Red wire to an Ohms meter and measure the resistance and spin the motor by hand, the resistance should vary up and down.Polish_20211106_143917492.jpg
 

MaxHeadRoom

Joined Jul 18, 2013
28,686
Re the old motor, I have found it is usually either bearings or brushes on those Universal motors.
If the Commutator appears OK and the windings have not burned, they can often be revived for just a few $$.
 

Thread Starter

Jeanne Munro Ladner

Joined Dec 27, 2015
3
Thank you for all your help. I now have my vacuum back. The dog hair is no longer tumbleweeding around my kitchen. Really appreciate you helping me learn as a newbee that I could do it.
 

Thread Starter

Jeanne Munro Ladner

Joined Dec 27, 2015
3
It would be useful to others to say what you did to get it working again.
I was a bit nervous about how to wire it, I followed the instruction from the posts. I was able to get an extra piece of wire with a spade connector to one of the connectors on the brushes and the red wire which as suggested by post was connected to the other side brush was my second connection. As both wires from the switch were both black I was not sure which to use for red and which to use for the new black wire w/spade. I was a little concerned about the vacuum roller spinning the wrong way but figured I could switch wires if that was the case. (These connections were crimped using a butt connector.) Luckily it spun correctly so I didnt have to. The remaining issue which slightly concerns me is the motor was a little shorter than the original, so I held the shaft distance and used my old rubber disk from my old motor around the fan portion on the new motor which seemed to have it's own rubber already and that seemed to wedge it in tight even though it was about a half inch too short lengthwise to fit the chamber where the motor sat. It seems to form a nice seal for the vacuum and it seems to work. I would ask that you continue to mentor and pass your knowledge on to others especially females as their access to these experiences while getting better has in the past been lacking. And ladies you can do this! Don't be afraid to ask for help. Sorry I should have taken photo but was so excited to get it running I didn't. If I have to go back in I will add to this post.
 
Top