What did you repair today ?

MisterBill2

Joined Jan 23, 2018
27,977
Repaired a Bearcat scanner receiver with a bad IC pin contact. Works good now.
I was given a "Bearcat" scanner a while back because the membrane keypad was destroyed. The concept was to replace the keypad with those tiny N.O. push-buttons. The challenge/show-stopper is discovering which contacts connected to where. Quite a bother. So it is still sitting on a shelf.
 

Thread Starter

Externet

Joined Nov 29, 2005
2,662
Look for a donor in the thrifty sales on the net, as Craigslist, FBmarketplace. Once I had to make a keyboard for a fiber optic joining machine. Result was ugly but the $16K machine worked. Operators sink fingernails into the modern wimpy keyswitches
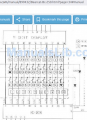
Or, its schematic will tell the matrix :

1735251980959.png
 

MisterBill2

Joined Jan 23, 2018
27,977
OK!!! And many thanks to "Externet"!! That looks like a straight-forward interconnect scheme indeed. Now I will need to see where on which shelf that scanner is hiding. That circuit was not available on the internet when I was searching, which was quite a few years back.
 

nsaspook

Joined Aug 27, 2009
16,430
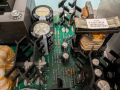
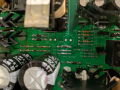
UHV vacuum gauge controller repair. The gauge tube grid voltage is about 60V low (reads 120 instead of 180) and the opamp supply voltages are unbalanced. (+20 -18 when it should be +18 and -18). It's about 20+ years old and a few caps show signs of failure. No schematic but the circuit is pretty easy to trace and compare as there is a working power supply unit in the gauge set.
1736996842845.png
Dual controllers and power supplies for these types of gauge tubes: https://www.idealvac.com/en-us/MKS-...-Glass-Ion-Vacuum-Gauge-PN:-274002/pp/P104328
1736997790430.png
1736996885400.png
1736996911882.png
I love old circuit boards with test points and important circuit descriptions.

1736996988090.png
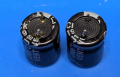
Left has leakage on the bottom
1736997064843.png
and pressure bulges on the top. WIll replace the suspect ones first, then continue on the hunt.
 
Last edited:

wayneh

Joined Sep 9, 2010
18,133
Today I repaired my MacBook by replacing a damaged display. This was by far the most complex and tense repair I've ever done. Thankfully successful in the end.

My usual DIY repair approach is to take something apart best I can and see if it can be fixed. This was not that! Over the years my skills have improved, both in overcoming various fastener types and also in recognizing faults. For this job I would have been stumped at step one. But I had a detailed, step-by-step guide and a rental toolkit with high precision tools for all the tiny fasteners, all as specified by Apple. It was still an intense process due to the large number of ridiculously small screws and the ribbon cables with their on-board connectors. Gosh those things make me nervous. Got it all done with no lost screws and none left over.

Here's the crazy part of the story. The display was damaged while I was in vacation in Florida. I found a tiny pin on the bathroom floor. Having once had a pin jam into my toe so hard I needed needle nose pliers to yank it out, I picked up this pin and placed it on the dresser. Some time later I came along and set my laptop down on the dresser. I speculate that the pin jumped up onto the magnetic area that detects lid closure. However the pin got there, it aligned with the edge of the screen and when the lid was closed, the head of the pin put a tiny dimple into the side of the glass. That barely-visible dimple was enough to bring down the screen. Horrible experience.

Once I got back home, I confirmed that everything worked fine with an external monitor. I also made a full backup before cracking it open. So glad everything is back to normal.
 

cmartinez

Joined Jan 17, 2007
8,830
Today I repaired my MacBook by replacing a damaged display. This was by far the most complex and tense repair I've ever done. Thankfully successful in the end.

My usual DIY repair approach is to take something apart best I can and see if it can be fixed. This was not that! Over the years my skills have improved, both in overcoming various fastener types and also in recognizing faults. For this job I would have been stumped at step one. But I had a detailed, step-by-step guide and a rental toolkit with high precision tools for all the tiny fasteners, all as specified by Apple. It was still an intense process due to the large number of ridiculously small screws and the ribbon cables with their on-board connectors. Gosh those things make me nervous. Got it all done with no lost screws and none left over.

Here's the crazy part of the story. The display was damaged while I was in vacation in Florida. I found a tiny pin on the bathroom floor. Having once had a pin jam into my toe so hard I needed needle nose pliers to yank it out, I picked up this pin and placed it on the dresser. Some time later I came along and set my laptop down on the dresser. I speculate that the pin jumped up onto the magnetic area that detects lid closure. However the pin got there, it aligned with the edge of the screen and when the lid was closed, the head of the pin put a tiny dimple into the side of the glass. That barely-visible dimple was enough to bring down the screen. Horrible experience.

Once I got back home, I confirmed that everything worked fine with an external monitor. I also made a full backup before cracking it open. So glad everything is back to normal.
How much did the display replacement part cost in percentage compared to a new MacBook?
 

wayneh

Joined Sep 9, 2010
18,133
The new lid holding the display (plus a small angle sensor) is ~$665 after return of the old one. The tool rental is $49 after return of the deposit.

The laptop is worth $1,600 to $2,000 or so. I thought about selling it damaged and moving to a new one but that would have cost quite a bit more. I should get at least 5 more years out of this one.
 

KeithWalker

Joined Jul 10, 2017
3,614
Inn 1976, I built an O scale, narrow gauge locomotive out of brass sheet, tinplate and wire, for my daughter. I re-discovered it recently when I cleared out a storage area. It had been banged around and was in pretty bad shape. One side frame was broken, the gears were damaged, wheel couplings and cowcatcher were missing and there were a number of dents and scratches on it.
I decided to take up the challenge and repair it. After a lot of work, I got it all repaired and running beautifully. Here it is:

General 005.jpg
 
Last edited:

killivolt

Joined Jan 10, 2010
836
Whirlpool Gas Oven, replaced ignitor. Based on it glowing and not igniting, plus me using it for heat sometimes in the morning to take the chill out of the air put stress on the ignitor. Just a guess but it works now, this time I won’t be using it for heat just the top burners.

kv
 

wayneh

Joined Sep 9, 2010
18,133
I hope you have a carbon monoxide detector nearby. Most gas ovens are not properly vented. They're supposed to be, but often are not installed properly.
 

killivolt

Joined Jan 10, 2010
836
.
I hope you have a carbon monoxide detector nearby. Most gas ovens are not properly vented. They're supposed to be, but often are not installed properly.
As long as I have a blue flame and not yellow, it’s ok in an open area with appropriate air movement orange flame I think is worse

kv
 
Top