Very first repair attempt

Thread Starter

tzo_123

Joined Nov 1, 2025
7
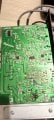
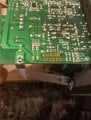
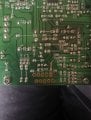
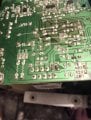
Hello, I have a pair of Mackie cr4bt monitors. I tried to remove the TDA7265 IC, and in the process, I almost destroyed the PCB. From the image below, can you tell if it’s repairable?
I had trouble with the solder wick—it didn’t absorb the solder properly, which caused a mess that I then tried to fix but only made worse.
If I order a new TDA7265, is there a chance it will work? Would jumper wire work here or is it permanently damaged?
 

Attachments

ericgibbs

Joined Jan 29, 2010
21,390
hi tzo,
Welcome to AAC.
From the low quality images, it is difficult to see all the damage.
The one burnt PTH hole could be a problem, but I would say it is repairable.
Check with an ohm meter the state of the PTH [ plated through holes]

E
A quick tip when de-soldering a multi-pin component, flood the area with a liquid flux.

EG 1809.png
 

abrsvc

Joined Jun 16, 2018
159
To answer the original question, yes it can be repaired. You have removed the pads which will make the repair a little more interesting. From the 2nd picture, you can see where the pads and traces go. Replace the pad with a small wire to its target. It won't look pretty, but it will work just fine.
To prevent this in future repair attempts, remove the solder from the pins with a solder sucker or braid, or perhaps use "low melt" solder. There are many videos on the net that demonstrate this. Do some research to see different techniques and practice on some spare boards.
-Dan
 

Thread Starter

tzo_123

Joined Nov 1, 2025
7
Thank you. I used plenty of flux, but the soldering wick didn’t absorb anything, and everything went wrong. I only have a basic soldering iron with no temperature control. While the solder was melting, the wick wouldn’t pull anything.
How can I check the pth pins?
I’m just starting to learn about circuits, current, and resistances, so please forgive me if some of my questions are very basic—or even sill. Can you give me the polymeter steps to follow? And what measurements should I get?
I will try to re-upload better pictures.
 

Attachments

ericgibbs

Joined Jan 29, 2010
21,390
hi tzo.
When using desoldering wick, soak the wick length which you are going to use, in liquid flux just before you use it.
I find that the wick tends to 'corrode' slightly, which makes it difficult for the wick to absorb the old solder.

Most modern circuit PCB's have PTH holes, which means the copper track on one face of the PCB is connected to the copper track on the other side of the PCB via a copper tin plated through hole.
This PTH plating can be damaged when removing a difficult component.
Use an ohm meter and measure the resistance, which should be zero Ohms, between the ends of the PTH holes, from either side of the PCB.

E
 

DickCappels

Joined Aug 21, 2008
10,661
You might have too much crud (metal oxides mainly( on your solder wick, If so, replace the solderwick. You might need new flux, through I have never encounter a problem with old flux.
 

Thread Starter

tzo_123

Joined Nov 1, 2025
7
Huge thanks to all.
Following the path from each pin, I measured continuity. While I had the probe on the hole of the pad, there was no beep. As soon as I touched the exposed copper (visible due to the green layer peeling off), I got a beep.
Does that mean I can bridge my new tda pin with the exposed copper and it will work?
 

MrChips

Joined Oct 2, 2009
34,626
Everyone learns by doing and you have to start somewhere. You learn by doing and you learn from your mistakes.

The copper tracks were lifted off the PCB because the temperature of the soldering iron was too hot and you stayed too long at the solder joint.

What kind of soldering iron do you have?
If it is a soldering gun, that is used for heavy electrical work. Don't use this for PCB work or rework.

1761996880439.png

Many DIY hobbyists might use a cheap soldering iron with no temperature control. That is ok in a pinch but you have to be careful not to overheat the joint. What is the wattage of your soldering iron?
1761996984029.png

If you intend to do this again, do yourself and the PCB a favour and buy a temperature controlled iron.

Solder wick needs a higher temperature in order to get the solder out from the holes. I prefer to use a solder sucker.
But again, don't take too long and don't overheat the joint. You can use the solder wick afterwards to clean up the pad, not the holes.

1761997319232.png

As eric says, use solder flux ahead of the desoldering attempt. Many PCBs today are manufactured using lead-free solder. This requires a higher temperature. I add more tin-lead solder to each joint before applying the solder sucker. If this does not free up the pin I add more solder again.

The trick is the pin must be able to move freely away from the hole. If the hole is large enough, applying heat to the pin (not the pad) and moving the pin around may free up the pin.

Another technique is to use a hot air gun to release all the pins at once.
If the hole is a tight fit, your only solution is to use the hot air gun.

If you are going to replace the component anyway, snip all the pins and remove them one at a time.
 

Thread Starter

tzo_123

Joined Nov 1, 2025
7
I have been watching the videos but in practise I messed up!
I have a basic 30w solder iron (pencil) with no temperature control.
Is it possible for you to upload a picture of a successful IC removal? Before and after? How the pads should look like if I had done it correctly .
Or one that you have repaired damaged traces/pads?

What way do you suggest I follow for this fixable? Jumper wire between the pads and the exposed copper area?
 

Thread Starter

tzo_123

Joined Nov 1, 2025
7
Thank you all! Your instructions are very well structured! Thanks!
Does the solder diameter matter? I have 1 mm; should I use 0.6 mm or 0.8 mm for these kinds of tasks?

Would you suggest a starter kit for testing soldering and desoldering? I want to start getting my hands around understanding the issue at PCB s and repairing it!
 

BobTPH

Joined Jun 5, 2013
11,463
How did you use the desoldering braid? It sounds like you melted the solder and then applied the braid to it. That is not correct.

Put the braid on top of the solder you are removing, then heat the braid, not the solder.
 

Thread Starter

tzo_123

Joined Nov 1, 2025
7
I p
How did you use the desoldering braid? It sounds like you melted the solder and then applied the braid to it. That is not correct.

Put the braid on top of the solder you are removing, then heat the braid, not the solder.
l placed the braid on top of the solder and applied heat on the braid. Although the solder was melting below it was not getting absorbed.
 

dl324

Joined Mar 30, 2015
18,216
Does the solder diameter matter? I have 1 mm
1mm should be fine.
Would you suggest a starter kit for testing soldering and desoldering?
What equipment do you have now? I'd recommend getting a solder sucker (the last time I used solder braid was about 50 years ago).
1762009869581.png
They sell, and I have, an ESD safe variant, but I haven't used it or had an issue with ESD damage.

Practice on scrap boards with the type of components you want to remove.
 

Thread Starter

tzo_123

Joined Nov 1, 2025
7
1mm should be fine.
What equipment do you have now? I'd recommend getting a solder sucker (the last time I used solder braid was about 50 years ago).
View attachment 358078
They sell, and I have, an ESD safe variant, but I haven't used it or had an issue with ESD damage.

Practice on scrap boards with the type of components you want to remove.
I do have the solder sucker, but apparently I need to train myself! It was not getting off, I thought the pen was defective. To be honest, I bought quite cheap items to begin with, so me being an amateur, I am not always sure if it is the tools or me!
 

MrChips

Joined Oct 2, 2009
34,626
Using a solder sucker successfully requires the right technique and lots of practice.

You cannot melt the solder, remove the soldering iron tip, and then apply suction. You need to apply suction while the soldering iron tip is still on the solder pad. It takes no more than 2 seconds and it requires you to use both hands.

Firstly, apply a bit of extra rosin core tin-lead solder to the pad.
Apply the soldering iron tip to the pad and suction immediately once the solder melts.
For best suction action, the tip of the solder sucker must be vertical and pressed against the pad so as to surround the entire pad and hole. Remember, you are trying to suction the solder from the hole, not just from the surface of the pad. It's tricky to do but it takes practice.
 

Rockettfuel

Joined Sep 17, 2025
29
I p

l placed the braid on top of the solder and applied heat on the braid. Although the solder was melting below it was not getting absorbed.
There is great advice in this thread and to add something I learned
and maybe you were already doing this.

Cut the solder wick to the needed length because solder wick has a
high thermal conductivity. Using one continuous length may cause
significant heat dissipation and as a result the heat can be drawn
away from your target area reducing the wick's effectiveness.

And yes flux is important because it helps solder flow.
 
Top