Thanks to everyone who helped me out with my LED project! Results inside

Thread Starter

JaredSD

Joined Apr 3, 2017
22
Big thanks to all of you who helped me out with the math and specifics regarding LED lighting. Because of you I was able to complete my project, and also learn about how LED lighting is powered. It's amazing the help I received here; I am humbled by your knowledge and kindness.

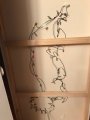
Attached are the pics of how the project turned out. I was trying to embed LED lighting into a painting. I will take better pics later, but you get the idea. The camera phone adds a glow to the LEDs, but we know how they really look in person.

Thanks again!

Jared
 

Attachments

Thread Starter

JaredSD

Joined Apr 3, 2017
22
Ah! This is only the begging.
Now you have to do the blinking.
Then followed by fading effect.
Haha, I feel a rabbit hole in my future. To do fading and blinking, I would imagine you are getting into some programming at that point huh? Raspberry PI 2 type of stuff perhaps?
 

shteii01

Joined Feb 19, 2010
4,644
Haha, I feel a rabbit hole in my future. To do fading and blinking, I would imagine you are getting into some programming at that point huh? Raspberry PI 2 type of stuff perhaps?
It is ridiculously simple.
All you need is Arduino Uno. You can get Chinese one from ebay for 3.50 USD.

I have done led blinking before.
I did not realize how simple the fading is.

The blinking is actually one of the examples they provide you. So you don't even have to write any code.
Or you can copy and paste from their website: https://www.arduino.cc/en/tutorial/blink

The fade effect is also simple. Their example is actually more complicated: https://www.arduino.cc/en/Tutorial/Fade
I just did a simple half brightness, full brightness and back to half brightness.
 

Thread Starter

JaredSD

Joined Apr 3, 2017
22
It is ridiculously simple.
All you need is Arduino Uno. You can get Chinese one from ebay for 3.50 USD.

I have done led blinking before.
I did not realize how simple the fading is.

The blinking is actually one of the examples they provide you. So you don't even have to write any code.
Or you can copy and paste from their website: https://www.arduino.cc/en/tutorial/blink

The fade effect is also simple. Their example is actually more complicated: https://www.arduino.cc/en/Tutorial/Fade
I just did a simple half brightness, full brightness and back to half brightness.
In short, how does it work? I see the little interface. Do you hook that up to your computer to put the code in or program what you want to? Is there a max number of LEDs it can handle? Will it program different areas separately or would you need extra units for that? Thanks for any info. Very cool.
 

shteii01

Joined Feb 19, 2010
4,644
In short, how does it work? I see the little interface. Do you hook that up to your computer to put the code in or program what you want to? Is there a max number of LEDs it can handle? Will it program different areas separately or would you need extra units for that? Thanks for any info. Very cool.
1. Yes, you hook it up to computer to put code on the chip. Chip has flash type memory to hold the code. The code is the program that tells the micro what to do.

2. Uno, due to its design, can handle 8-11 regular led. By regular led I mean the kind that takes 2-3 volts to turn on and uses 10-20 mA of current. I am not talking about super bright led that are used in the lamps. If you want to use super bright led, you will need additional circuitry to power them.

3. Your painting used a lot more than 11 led. In this case you can use multiple Uno boards, or use Due board. Due board has a lot more pins that can control led. Looks like Chinese Due on ebay is 16 USD, their normal price is around 25-30 USD.

The very basic interface is:
1, Connect to pc, load the code/program. Unplug from pc.
2. Plug a wall wart into the power socket on the board, the board start running the code/program. The board has voltage regulators on board, so any wall wart that you plug into wall outlet that produces 7-19 volts DC is fine. You probably have some old warts lying around, maybe from a printer or scanner or radio, or get new one from ebay or buy something in thrift store for cheap that comes with suitable wall wart.

The possibilities in your case are mind boggling. I already mentioned blinking led, fading led. I just thought of another. Some kind of proximity (PIR?) sensor tucked in discreetly somewhere on the surface that would start blinking or fading the led (or more than one) when someone comes close.

A couple of weeks ago someone was asking about fading LEDs for automotive project and I got interested and was bread boarding the effect they were looking for. I will pull it out and post it for simple demonstration. Should be up by tomorrow morning. That way you can see how easy it is.
 

shteii01

Joined Feb 19, 2010
4,644
Well. I discovered very important fact. I don't have any cameras that take good digital video.

Uno has six PWM pins that are good for fade effect. I used all of them. I don't think the fade effect comes across in the video. So you just see the lights chasing each other. Oh well. Good enough for led demonstration. There are six more digital pins that can be used for blinking LEDs, but they can not do the fade effect. The six PWM pins can do both.

Uno is powered by the wall wart from the wall outlet. This one is 9 VDC, 300 mA. For a lot of led you will want something in 1 A (1000 mA) range.

You don't see pc because I only used it to program the Uno. However, pc can do two functions:
1. Porgram.
2. Power.


Code:
void setup() {
  pinMode(3,OUTPUT);
  pinMode(5,OUTPUT);
  pinMode(6,OUTPUT);
  pinMode(9,OUTPUT);
  pinMode(10,OUTPUT);
  pinMode(11,OUTPUT);
}

void loop() {
  analogWrite(11,10);
  analogWrite(10,0);
  analogWrite(9,0);
  analogWrite(6,0);
  analogWrite(5,0);
  analogWrite(3,0);
  delay(250);

  analogWrite(10,10);
  analogWrite(11,127);
  delay(250);

  analogWrite(9,10);
  analogWrite(10,127);
  analogWrite(11,255);
  delay(250);

  analogWrite(6,10);
  analogWrite(9,127);
  analogWrite(10,255);
  analogWrite(11,0);
  delay(250);

  analogWrite(5,10);
  analogWrite(6,127);
  analogWrite(9,255);
  analogWrite(10,0);
  delay(250);

  analogWrite(3,10);
  analogWrite(5,127);
  analogWrite(6,255);
  analogWrite(9,0);
  delay(250);

  analogWrite(3,127);
  analogWrite(5,255);
  analogWrite(6,0);
  delay(250);

  analogWrite(3,255);
  analogWrite(5,0);
  delay(250);

  analogWrite(3,0);
  delay(250);
}
 
Last edited:

a Rob

Joined May 14, 2017
151
Looks like android java language similar anyways easy to understand and write but why bother just buy board i guess
 
Top