Soldering 0603 LEDs and Resistors

Thread Starter

MrAl

Joined Jun 17, 2014
13,667
Hello there,

I've soldered a few of these in the past but only maybe two or three, maybe 10 at the most.
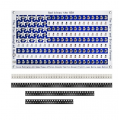
One of my neighbors got an American Flag kit that has a PC board with some 180 LED pads on one side and another 180 resistor pads on the other side. They are all 0603 size SMD parts. That's a lot of SMD parts to solder and they are a little close together (see attachment). We were talking about the assembly procedure.

My question is, how would you go about soldering all these components. It looks very tedious to have to place over 360 SMD 0603 components after wetting each pad and placing each LED very carefully onto a pad, then doing the same on the other side with the resistors.
So how do you think you would approach this soldering all these components?

See the photo. Thanks.
BTW, this is the smaller of the two flag kits. The larger one has quite a few more SMD LEDs and SMD resistors.
 

Attachments

Thread Starter

MrAl

Joined Jun 17, 2014
13,667
Hello again,

Can it be true that nobody here solders SMD parts anymore?
Although I would not blame you :)
 
I paste the pads using a syringe loaded with solder paste then hot air to reflow it. Works fairly well (being both relaxing and frustrating at the same time). Resistors are fairly easy, LEDs a little more difficult so that you don't melt them, caps tend to blow around (since they are taller). Just takes some practice.
 

Jon Chandler

Joined Jun 12, 2008
1,560
Solder paste and hot air is your best bet at this point.

Since you don't have a stencil, that means putting a small dot of solderpaste on each pad (best done with a pneumatic solder paste despenser) and using hot air to reflow the solder. Work in small areas, as the solder should be reflowed within maybe 30 minutes of being applied.

This is a crap design for a kit. Since there are components on both sides of the boars, using a oven or hotplate to reflow the solder isn't practical.

Watch the polarity of the LEDs. It's not always easy to tell.
 

Thread Starter

MrAl

Joined Jun 17, 2014
13,667
Hi again,

Thanks for the replies from you three members.

So between you all, what do you think is the likelihood this will be a successful endeavor?
The kit was around $13 USD so not a big waste if ruined, but then it most likely goes into the garbage which does seem like a waste.
There are SO many parts (close to 400) and as you say, double sided so you can't use a hot plate, and also can not heat from the back with the hot air tool either. That really sucks.
So I have to wonder about the possible failure of this project. Just one LED gets burned and it will look like crap unless some new LEDs and possibly new resistors are ordered. That's assuming no pads get ruined either.

What else seems likely is if one of the parts is placed just slightly up or down, that pad gets shorted out.
 

nsaspook

Joined Aug 27, 2009
16,251
The parts will generally flow to the center of the pads, so shorts shouldn't be an issue.
It certainly looks doable, although challenging. Definitely practice on a simpler board (or prepare to scrape one) first.
 

panic mode

Joined Oct 10, 2011
4,866
i do it all the time, 0603 is not a problem if you have a steady hand. there are different ways to go about it but since this is a practice board - better start practicing...

one way that is pretty straight forward is to tin one of the pads on the pcb. leave tiny blob of solder... if too big or too small, rework it... even more than once if needed... and if you make a mess clean it. squirt of alcohol and a brush will be enough. when working with sensitive parts, use ESD safe tools but resistors and leds are not sensitive. now the preparation is done...

next, remove any excess solder from the iron. little blob on the pad should be enough to secure the part. part of practice is to get good at controlling amount of solder dispensed and how to remove excess. fine tip may be comforting at first but with enough of practice you can do anything using just about any soldering tip. i often use mid size chisel tip even on very fine pitch parts. flattened tip has some advantages, it can be used to control how much heat is transferred - press flat side and you get more heat. use only corner - less heat. and flat design allows one to pull blob of solder away from part - something that with fine tip just does not work...

now hold part so that it is touching the tinned pad and make sure your wrist is resting down to avoid vibrations or movement. this method relies on you controlling part, rather then letting surface tension of the liquid solder make part float to the right place. this allows you to solder tiny parts even on boards/pads that are not designed to have that part or boards that have no solder mask like most DIY boards.

while holding part in position, use the other hand to touch the joint with the soldering iron. voila... clean and simple, part is attached. if the part moved or does not sit right, touch the pad with iron again and make sure it is correct. Do not solder any more joints until you get part aligned. Do not overheat part either, if something did not work at first give it a few seconds to cool off before you attack it again....

then all that is left is to solder the other side but that is easy now that part is fixed in correct position and both hands are free.
 
Last edited:

MisterBill2

Joined Jan 23, 2018
27,186
0603 parts are not bad at all, it is those 0201 diodes that are miserable because of the invisible polarity markings. Both pads need to be tinned in advance but only one with that very small amount of excess solder. and an iron at the right temperature and the very thin solder wire and an iron that is at the correct temperature. AND a good magnifier. Good tools are important as well. Tweezers that can grip the LED so it does not shift positions. And most important is lots of patience and the willingness to move a bit slower.
 

Thread Starter

MrAl

Joined Jun 17, 2014
13,667
i do it all the time, 0603 is not a problem if you have a steady hand. there are different ways to go about it but since this is a practice board - better start practicing...

one way that is pretty straight forward is to tin one of the pads on the pcb. leave tiny blob of solder... if too big or too small, rework it... even more than once if needed... and if you make a mess clean it. squirt of alcohol and a brush will be enough. when working with sensitive parts, use ESD safe tools but resistors and leds are not sensitive. now the preparation is done...

next, remove any excess solder from the iron. little blob on the pad should be enough to secure the part. part of practice is to get good at controlling amount of solder dispensed and how to remove excess. fine tip may be comforting at first but with enough of practice you can do anything using just about any soldering tip. i often use mid size chisel tip even on very fine pitch parts. flattened tip has some advantages, it can be used to control how much heat is transferred - press flat side and you get more heat. use only corner - less heat. and flat design allows one to pull blob of solder away from part - something that with fine tip just does not work...

now hold part so that it is touching the tinned pad and make sure your wrist is resting down to avoid vibrations or movement. this method relies on you controlling part, rather then letting surface tension of the liquid solder make part float to the right place. this allows you to solder tiny parts even on boards/pads that are not designed to have that part or boards that have no solder mask like most DIY boards.

while holding part in position, use the other hand to touch the joint with the soldering iron. voila... clean and simple, part is attached. if the part moved or does not sit right, touch the pad with iron again and make sure it is correct. Do not solder any more joints until you get part aligned. Do not overheat part either, if something did not work at first give it a few seconds to cool off before you attack it again....

then all that is left is to solder the other side but that is easy now that part is fixed in correct position and both hands are free.
That sounds like a good idea I'll past it along. Thanks much. I have not done this myself in a long while now so I forgot a lot about how I did it myself.
 

Thread Starter

MrAl

Joined Jun 17, 2014
13,667
0603 parts are not bad at all, it is those 0201 diodes that are miserable because of the invisible polarity markings. Both pads need to be tinned in advance but only one with that very small amount of excess solder. and an iron at the right temperature and the very thin solder wire and an iron that is at the correct temperature. AND a good magnifier. Good tools are important as well. Tweezers that can grip the LED so it does not shift positions. And most important is lots of patience and the willingness to move a bit slower.
Hi,

Yes slower, there are so many parts to be mounted though it seems like it will take several days to complete :)
 
Top