 Facebook
 Google
 GitHub
 Linkedin
My son has just purchase a 3D Resin printer. This uses UV setting resin, not melting plastic filament like my printers.
One accessory that is very handy is a UV curing enclosure used to finish setting the print.
I my "treasures" was an old microwave oven. Th old oven has the RF stuff removed, and gives a fine enclosure with timer, turntable and safety interlock.
And I had a number of UV flashlights bought for another project that did not go ahead.
So....

A length of Aluminum angle is the LED heat sink.

It is mounted to shield the direct UV from the front.

Quality engineering was employed to mount the constant current supply!

OOPS! Looking at this picture, I just realized the Tant caps are in backwards! I will have to fix that!
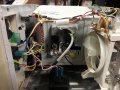
Here is an overall view. The plug pack is secured with a cable tie, and the spade terminals that went to the original power transformer fit the mains pins quite well.

Here is what it looks like without the UV LEDs running.

Here is the circuit...

One accessory that is very handy is a UV curing enclosure used to finish setting the print.
I my "treasures" was an old microwave oven. Th old oven has the RF stuff removed, and gives a fine enclosure with timer, turntable and safety interlock.
And I had a number of UV flashlights bought for another project that did not go ahead.
So....
A length of Aluminum angle is the LED heat sink.
It is mounted to shield the direct UV from the front.
Quality engineering was employed to mount the constant current supply!
OOPS! Looking at this picture, I just realized the Tant caps are in backwards! I will have to fix that!
Here is an overall view. The plug pack is secured with a cable tie, and the spade terminals that went to the original power transformer fit the mains pins quite well.
Here is what it looks like without the UV LEDs running.
Here is the circuit...
Attachments
-
 561.3 KB Views: 11
Last edited:
")


