Facebook
 Google
 GitHub
 Linkedin
Hello AAC forum,
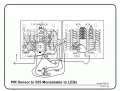
Working on a circuite that uses a PIR sensor to turn on some LEDs for about ten seconds.
I bread boarded the schematic

This circuit works on the bread board.
The circuit was then built on prototype boards.

When the prototype board is powered the LED above C2 and the five LEDs on right side board come on,
but they never go off.
Except the five LEDs on right side board dim just a little after about 4 seconds, about the time that the
PIR is sending a signal.,
I am pretty sure the problem is in the 470 uf capacitor and the 100k resistor between the power rail and ground.
and how they are controlling (or failing to control) the timer.
This has been driving me nuts for ten days because the breadboard, which was built as a temporary proof of the of the
circuit logic works, but the more permanent implementation, the prototype boards, are killing me.
Any idea where the mistake is in the prototype?
Thanks.
Allen in Dallas
Working on a circuite that uses a PIR sensor to turn on some LEDs for about ten seconds.
I bread boarded the schematic
This circuit works on the bread board.
The circuit was then built on prototype boards.
When the prototype board is powered the LED above C2 and the five LEDs on right side board come on,
but they never go off.
Except the five LEDs on right side board dim just a little after about 4 seconds, about the time that the
PIR is sending a signal.,
I am pretty sure the problem is in the 470 uf capacitor and the 100k resistor between the power rail and ground.
and how they are controlling (or failing to control) the timer.
This has been driving me nuts for ten days because the breadboard, which was built as a temporary proof of the of the
circuit logic works, but the more permanent implementation, the prototype boards, are killing me.
Any idea where the mistake is in the prototype?
Thanks.
Allen in Dallas
Attachments
-
 86.7 KB Views: 15
 -
 86.7 KB Views: 15