 Facebook
 Google
 GitHub
 Linkedin
Hello I’m new here but I’m in need of someone more experienced than I am.
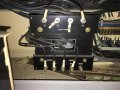
I’m working on a Japanese CNC mill from the early 1980s for my boss and I cannot figure out how this transformer is supposed to be wired. It has two inputs either 220v or 480v. We are feeding it 220 and that comes out true when testing the primary voltage at the top. But when I test the secondary I keep getting half the voltage I need. Any ideas?
I’m working on a Japanese CNC mill from the early 1980s for my boss and I cannot figure out how this transformer is supposed to be wired. It has two inputs either 220v or 480v. We are feeding it 220 and that comes out true when testing the primary voltage at the top. But when I test the secondary I keep getting half the voltage I need. Any ideas?
Attachments
-
 2.4 MB Views: 74


