Micro Joysticks In Place Of Dial On Servo Testers

Ya’akov

Joined Jan 27, 2019
10,355
I agree that it is very logical to expect to have better results with a small industrial quality chip than with a product of recreational quality.

As far as the price of the build, there will be multiple user interface control devices along with multiple speed controllers. Would it be necessary to use an Arduino or other solution for each 4 in 1 ESC, for each motor, or only one to program all of the chips

If the answer is that it's only one for all of the chips, is it plausible that an issue with the Arduino or other solution could cause an issue with all of the chips that it programs, and lead them all to fail at the same moment

In this build, it is acceptable for one or even a couple or perhaps a few of the chips to fail, but it would almost certainly cause a massive and catastrophic problem for someone if they fail all at once.
The programming effectively turns the ATTINY85 into a custom hardware solution and the programmer will never be needed again unless you want to make changes.
 

KeithWalker

Joined Jul 10, 2017
3,625
I agree that it is very logical to expect to have better results with a small industrial quality chip than with a product of recreational quality.

As far as the price of the build, there will be multiple user interface control devices along with multiple speed controllers. Would it be necessary to use an Arduino or other solution for each 4 in 1 ESC, for each motor, or only one to program all of the chips

If the answer is that it's only one for all of the chips, is it plausible that an issue with the Arduino or other solution could cause an issue with all of the chips that it programs, and lead them all to fail at the same moment

In this build, it is acceptable for one or even a couple or perhaps a few of the chips to fail, but it would almost certainly cause a massive and catastrophic problem for someone if they fail all at once.
You have not explained what you are using this for, so it is difficult to make recommendations using the scraps of information you have given us.
You could build a controller for up to eight motors using a single Arduino Nano, Mini, Uno or an ATMega328 chip. Is that what you need?
If you are concerned with the possibility of them all failing at the same time, you could build a number of single channel controllers, each using an ATTINY85.
 

Thread Starter

DragonTheta

Joined Feb 6, 2022
89
Yes I prefer it to have maximum redundancy. It sounds like making it using the single channel setups is a good way to go
 

djsfantasi

Joined Apr 11, 2010
9,237
How do I start programming an ATTINY85 and is there a specific kind I should get
The ATTiny85 is the specific type of ATTiny chip.

Do you know any programming? You can start with the Arduino IDE and the Arduino sample programs. That’s free.

Optional but recommended. Get an Arduino Uno and follow the tutorials on the official Arduino page.

Get the Sparkfun ATTiny programmer which plugs into your PC and uploads your program from the IDE on your PC to the ATTINY85. Then test in your circuit.
 

Ya’akov

Joined Jan 27, 2019
10,355
How do I start programming an ATTINY85 and is there a specific kind I should get
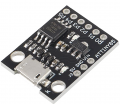
While you will ultimately want to use the ATTINY85 without a fancy bootloader on it, I think a really good way to get started, and even for prototyping, is to use a DigiSpark. They are cheap, simpler to start with, and they are based on the ATTINY85 so everything you learn, save a few steps, will transfer over.

I just bought some of these, and they work as expected. You can just plug them in to USB for power and programming, and a serial port if want. They expose the pins you'll need, and make things a little easier to get started.

1644275229796.png​
 

Thread Starter

DragonTheta

Joined Feb 6, 2022
89
Thank you

I'll try the DigiSpark. I don't know programing but I'll learn.

So it sounds like there were not any remarks about one setup per motor pad on the ESC which makes me think it should be ok, is that true

How do I program the DigiSpark to make a PWM signal in response to a micro joystick like the ones on Amazon
 

djsfantasi

Joined Apr 11, 2010
9,237
The ATTiny85 has two pins with the PWM function built-in. In the Arduino programming language, a subset of C++, there is a command that uses these pins to generate a PWM signal with just one line of code. That approach is your best bet if your just learning to program.

My suggestion of learning from the Arduino tutorials can mostly be done with the Digispark development board instead of the Arduino Uno.
 

Thread Starter

DragonTheta

Joined Feb 6, 2022
89
The ATTiny85 has two pins with the PWM function built-in. In the Arduino programming language, a subset of C++, there is a command that uses these pins to generate a PWM signal with just one line of code. That approach is your best bet if your just learning to program.

My suggestion of learning from the Arduino tutorials can mostly be done with the Digispark development board instead of the Arduino Uno.
Thank you

Since I can make the PWM signal with one line of code, what is the idea behind Arduino tutorials or starting with the DigiSpark

Could I simply use the ATTINY85 with that line
 

djsfantasi

Joined Apr 11, 2010
9,237
No, and that’s the reason you need the tutorials. Sketches require several standard sections of code. And one of those sections, the setup() function defines the pins you are using and what you’re using them for. Then, in each section, you need to define all the parameters and variables you’ll use. Plus, with one line, you couldn’t vary the PWM signal.

You just need one steering wheel to drive a car. That doesn’t mean the rest is unnecessary nor does it mean you don’t need driving lessons.
 

MisterBill2

Joined Jan 23, 2018
28,505
do not recall reading what type of control signal the brushles motor driver requires. But it is probably not the same as the signal generated by the RC servo control test box. Possibly similar , but certainly a different frequency.
 

Thread Starter

DragonTheta

Joined Feb 6, 2022
89
In the Arduino online tutorial it says that it supports only official Arduino / Genuino boards and a few certified and at heart boards. How does the DigiSpark relate with that

Is there a way to edit the title of the thread
 
Last edited:

Ya’akov

Joined Jan 27, 2019
10,355
In the Arduino online tutorial it says that it supports only official Arduino / Genuino boards and a few certified and at heart boards. How does the DigiSpark relate with that

Is there a way to edit the title of the thread
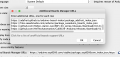
It's misleading. There are a huge number of third-party boards that are compatible. Arduino keeps a list of them here. The URL after the titles are the files that contain the information the IDE needs to install the support files for the board. They show up in the list of boards to select. Below is the Digistump section from the list. A note about the Digispark: you need a driver if you are using Windows but it gets installed during the IDE update; also, unlike most boards, you plug in the board to be programmed after the program has compiled. It prompts you and gives you 60 seconds to do it.

1644288120002.png
​
One more thing, this is the preferences dialog where you enter additional board URLs. You can have as many as you like.

1644288486321.png​
 

Ya’akov

Joined Jan 27, 2019
10,355
Thank you and to double check will it work to run each ATTINY85 to a single pad on the 4-in-1 ESCs
Think of the ATTINY as a little IC that you can design yourself. You get to choose what the pins do, and you get to choose how other pins change that. You are going to end up with pins that accept your potentiometer and pins that produce a PWM signal proportional to the value of the porentiometer.

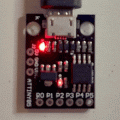
At that point you can use as many of them as you have inputs for the PWM signal. It's your choice. For a little insight, I write a program that is only slightly less complicated than the one you will eventually write, that fades the Digispark on-board LED on and off using PWM. The first code block is without comments so you can see the simplicity, the second is the same code with some comments to give you an idea of that it is doing. You will have to learn some things to do this but it will be less than you'd have to know if you tried to build a discrete circuit and far batter than bodging together random modules.

PWM-LED-loop.gif

(please excuse the poor quality video)
​
PWM Demo:
int pwmLevel = 0;
int fadeDelay = 5;

void setup() {

  pinMode(1, OUTPUT);

}

void loop() {

  for (pwmLevel = 0; pwmLevel < 256; pwmLevel++) {
    analogWrite(1, pwmLevel);
    delay(fadeDelay);
  }

  for (pwmLevel = 255; pwmLevel > -1; pwmLevel--) {
    analogWrite(1, pwmLevel);
    delay(fadeDelay);
  }

}
PWM Demo (with comments):
//The Digispark has onboard LED connected to pin 1
//so we can use it to see the effect of the PWM by
//looping through the values and watching it "throb".

int pwmLevel = 0;           // to store the current PWM value from the loop
int fadeDelay = 5;          // a small delay (in ms) to enhance the effect

void setup() {              // anything inside this loop is executed once at start up
  pinMode(1, OUTPUT);       // tell the ATTINY85 to make pin 1 work for output
}

void loop() {               // anything inside this loop is executed for the life of the program

  // Each of these loops assigns a value to pwmLevel, then checks to make sure it
  // is either not too large (first loop), or too small (second loop)
  // then it does the stuff inside the loop and repeats incementing or decrementing
  // pwmLevel until the condition in the middle is met, and it bails out.

  for (pwmLevel = 0; pwmLevel < 256; pwmLevel++) {
    analogWrite(1, pwmLevel); //write a value to pin 1
    delay(fadeDelay);         //wait fadeDelay ms so we can see the effect
  } // repeat until pwmLevel reaches 255

  for (pwmLevel = 255; pwmLevel > -1; pwmLevel--) {
    analogWrite(1, pwmLevel);
    delay(fadeDelay);
  }
} // repeat loop()
[EDIT: Added animated GIF for illustration]
 
Last edited:

Thread Starter

DragonTheta

Joined Feb 6, 2022
89
I appreciate it

I understood pretty much all of that code

So the micro joysticks, are you saying that that one specific listing has potentiometers or they all have potentiometers

The first one I posted seems to say in one of the pictures that they don't go back to center on their own. Like I said before that's what I'm looking for.

Is there a way to know by looking at it if it centers itself

And is there a way to remove the self-centering mechanism

And are there any micro joysticks that would work for this that are higher quality than others
 
Top