Measure low voltage value with arduino nano/uno

Thread Starter

majdi

Joined Jun 22, 2011
23
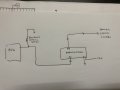
Hello and good day. I have project to read engine ECT sensor, as monitor with multimeter. Lower temperature have higher voltage high temperature.

For example 0'C - 60'C i have voltage result 5V to 3V,
70'C - 115'C i have voltage result 1.2V1 - 0.65V


The problem is, by using arduino nano/uno... the lowers Analog pin can read voltage is 1.2V, lower than that it will read 0V. I have try Non inverting Amplifier LM358, TL084 and UA741... it work half way.. if i adjust feed back resistor to low, i can go higher voltage output, if feedback resistor to high i only can get lower minimum voltage.

It always too low or high output i get... Is there any simple microcontroller like arduino can read lower analog voltage value like 1mV to 5V? or is there a way used amplifying circuit to solve the problem?
 

ronsimpson

Joined Oct 7, 2019
2,985
Arduino.com
arduino said:
Reads the value from the specified analog pin. The Arduino board contains a 6 channel (8 channels on the Mini and Nano, 16 on the Mega), 10-bit analog to digital converter. This means that it will map input voltages between 0 and 5 volts into integer values between 0 and 1023. This yields a resolution between readings of: 5 volts / 1024 units or, .0049 volts (4.9 mV) per unit.
the lowers Analog pin can read voltage is 1.2V
Something is wrong. I think I put a POT from 0 to 5V and measured values from 0 to 5V.
Please show us your circuit.
 

djsfantasi

Joined Apr 11, 2010
9,156
First, the default settings allow reading a voltage as low as 4.9mV

Second, using the function analogReference(), you can adjust the highest reference voltage. With this function (and depending on the Arduino model), you can measure down to 1mV.

I suggest you research the function analogRefetence() and the associated analog functions on an Arduino.
 

Thread Starter

majdi

Joined Jun 22, 2011
23
The circuit is simple, direct input to A0 pin from ecu. I write serial write to monitor the value.. multi meter show around 1.21V but in serial display 0V or ADC 1023 will be zero too.

In the Honda cluster indicator also will reset to Zero Bar led display.
 

Attachments

Thread Starter

majdi

Joined Jun 22, 2011
23
hi majdi,
Have you programmed the Arduino input pin for Analog input.?
Post your program.
E


Here the program loaded:

Code:
//ECT converter from civic eg sensor to s2000 cluster
//Version 1.0
//read.the.disclaimer@gmail.com

#include <TimerOne.h> //this library will allow us to use pwm signals with custom period

int ectOut = 9;
int ectIn = A0;
int adcValue=0; //ect voltage in range between 0 and 1023

unsigned long ectBars[7]={1500000,1100000,700000,400000,300000,220000,150000}; //microseconds from 1 to 7 segments

int ectADC[6]={600,568,434,250,40,10}; //correspondence between bars and temperature (in adc units) (71,82,93,104,115,126 celsius) int ectADC[6]={203,156,122,84,53,19};
                                      // 39'C  100'C  110'C  123'C  130'C
                                      // 2.9v  0.38v  0.16v  0.02v  0.01v
                                      // 2900  380    160    20     10

long waitUntil=0; //timer
int update = 5000; //reading ect sensor only every 5 seconds

void setup(){
  Serial.begin(9600);
  pinMode(ectOut, OUTPUT); //sets the pin as output
  pinMode(ectIn, INPUT); //sets the pin as input   
 
  Timer1.initialize(); //initializing the Timer1, so we can use pwm function
  Timer1.pwm(ectOut,20,1530000); //we set the new custom pwm on vssOut pin
}

int ectReadandUpdate(){
  adcValue = analogRead(ectIn); //read the ect voltage
  float voltValue = adcValue * (5.0 / 1023.0);
      Serial.println(voltValue);
    
  //we match the voltage to his microseconds that represents x segments 
  if (adcValue == 0){
    Timer1.pwm(ectOut,20,ectBars[0]+30000); //we set the new custom pwm on ectOut pin
  }
  else if(adcValue < ectADC[5]){
    Timer1.pwm(ectOut,171,ectBars[6]+30000); //we set the new custom pwm on ectOut pin
  }
  else if(adcValue < ectADC[4]){
    Timer1.pwm(ectOut,122,ectBars[5]+30000); //we set the new custom pwm on ectOut pin
  } 
  else if(adcValue < ectADC[3]){
    Timer1.pwm(ectOut,93,ectBars[4]+30000); //we set the new custom pwm on ectOut pin
  }   
  else if(adcValue < ectADC[2]){ 
    Timer1.pwm(ectOut,71,ectBars[3]+30000); //we set the new custom pwm on ectOut pin
  }
  else if(adcValue < ectADC[1]){
    Timer1.pwm(ectOut,42,ectBars[2]+30000); //we set the new custom pwm on ectOut pin
  }
  else if(adcValue < ectADC[0]){
    Timer1.pwm(ectOut,27,ectBars[1]+30000); //we set the new custom pwm on ectOut pin
  }
  else{
    Timer1.pwm(ectOut,20,ectBars[0]+30000); //we set the new custom pwm on ectOut pin
  }


}
 
void loop(){
 
  //we read ect sensor every 5 seconds
  if (millis() >= waitUntil){ ;
    ectReadandUpdate();
    waitUntil = millis() + update;
  }
 
}
 

Thread Starter

majdi

Joined Jun 22, 2011
23
First, the default settings allow reading a voltage as low as 4.9mV

Second, using the function analogReference(), you can adjust the highest reference voltage. With this function (and depending on the Arduino model), you can measure down to 1mV.

I suggest you research the function analogRefetence() and the associated analog functions on an Arduino.

Thank you very much, i will read and do some research about analogReference()
 

Thread Starter

majdi

Joined Jun 22, 2011
23
These project convert ECT sensor value, from old model honda civic OBD1 to Honda S2000 cluster. Every thing work fine, just when arduino analogpin 0 start read 1.2v lower, arduino will give zero value. And the cluster temperature bar led will reset back to zero display.

As ecu datalog, there no problem in ect reading, ecu will display correct temperature..

If normal pot can read a voltage as low 4.9mV maybe the code do some interference ?
 

sagor

Joined Mar 10, 2019
903
Maybe try to float the adcValue when doing any math with it....
I've seen one reference in another blog that the Arduino "implied" float did not work, the programmer had to force float for each variable in the equation.
 

djsfantasi

Joined Apr 11, 2010
9,156
Maybe try to float the adcValue when doing any math with it....
I've seen one reference in another blog that the Arduino "implied" float did not work, the programmer had to force float for each variable in the equation.
Good catch. The equation will be interpreted as this. Start with the equation:

float voltValue = adcValue * (5.0 / 1023.0);​

adcValue is an int. So the division result will also be converted to an int, resulting in 0. The int value of 0 will be converted to a float.

Try this instead. First, instead of dividing, since the numerator and denominator are constants, hardcode the value in the equation.

float voltValue = (float) adcValue * 0.0004887​
 

MrAl

Joined Jun 17, 2014
11,389
Hello,

Also, sometimes you have to use an amplifier to amplify a low voltage to a higher one so that you can measure a low voltage without loss of resolution.

You will note that if you measure a voltage as low as 5mv with a 5v reference and 10 bit resolution that the 5mv is approximately just 1 count. That means there is the possibility of very large error percentage in the measurement, and you could never measure 2.5mv for example and certainly not 1.25mv.
The idea here is to amplify the voltage maybe 10 or more times before the measurement. That boosts the top end up to nearly 5v so you can measure small voltages.
If you amplify the signal by 10 times then 2.5mv because 25mv which is about 5 counts, and if you amplify it by 100 times it becomes 250mv which is about 50 counts, and of course if you amplify it by 1000 times 2.5mv becomes 2500mv which is about 500 counts. So you can see then you have greater resolution.
Doing this you obviously lose the top end, so you may have to incorporate a switching network to be able to change ranges programmatically. That is, change the amplification factor on the fly. You may also incorporate an on the fly offset adjustment for measuring higher voltages that need better resolution.

One final note is that if you are measuring DC voltages only or low frequency AC you can use a low input offset op amp to minimize errors. A chopper amplifier works pretty good for this when the sample rate doesnt have to be too high.
 
Top