Facebook
 Google
 GitHub
 Linkedin
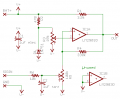
6 Mouser #:294-10K-RCMfr. #:294-10K-RCDesc.:Carbon Film Resistors 10Kohms 0.05
100 100 0
10 10 0
25 25 0
20 20 0
100 100 0
$0.05
$5.00
7 Mouser #:294-470-RCMfr. #:294-470-RCDesc.:Carbon Film Resistors 470ohms 5% 10 10 0
$0.14
$1.40
8 Mouser #:512-1N751AMfr. #:1N751ADesc.:Zener Diodes 5.1V 0.5W Zener 25 25 0
$0.05
$1.18
9 Mouser #:755-LM2903DTMfr. #:LM2903DTDesc.:DAC (D/A Converters) 2 circuits; 2 to 36V -40 to +125 Op Temp 20 20 0
$0.39
$7.80
") , maybe I should start on volume 2.
, maybe I should start on volume 2.