LCD replacement in a Borg automotive clock

Thread Starter

sijanna

Joined Jun 24, 2019
6
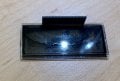
The clock is out of an Alfa Romeo Spider from 1990. Its common for the screens to wash out. I'd like to fix the clock I have as replacements are few and far between and the aftermarket ones are not backlit.

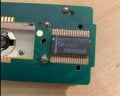
My question is where can I get a replacement screen? There are no pins coming out of it just contacts as seen in the photo.

38.5 X 18mm

Any help is appreciated.
 

Attachments

narkeleptk

Joined Mar 11, 2019
586
I see similar displays with the rubber contact strip in many Mercedes parts. I wonder if in a worst case scenario you could dig a compatible display from a more common make/model around the same years? I'm no expert on displays but it may be a somewhat standardize pinout system. You should be able to see your displays pinout if you remove the rubber strip from it.


https://en.wikipedia.org/wiki/Elastomeric_connector
 
Last edited:

jpanhalt

Joined Jan 18, 2008
11,087
Get a picture of the whole indicator's back. If there are 16 pins, it is probably very easy. But other pin numbers are also equally easy to deal with. In other words, you need to know how the MCU communicates with the LCD. It might be a very common character LCD.

What you show is the conductive "zebra" strip that connects the raw LCD to its controllers. That is very difficult for a DIY'er to replace and get good electrical contact on all umpteen "pins."
 

jpanhalt

Joined Jan 18, 2008
11,087
Actually, the datasheet for the PCF1172 is available. I looked it up after you posted the pictures.

I am not sure what you looked at on DigiKey. It does not have any "raw" LCD's that connect with a zebra conductive polymer strip. That is basically a factory-only (clean room) task. However, it does have LCD's that have fine, solderable pins attached to the glass. In theory, if you found one the approximate size or a little smaller and right pinout, you could solder it to the zebra pads on the PCB. While one cannot say anything like that is impossible, it is extremely unlikely most people here could do it. The first hurdle would be to find the same pinout and characters, which would require considerable work on your part to match the zebra contacts with the pins of the PCF1172 chip. I consider that almost impossible.

I think your most practical solutions are to find a working one in a compatible, junked Alpha or, as you suggest, just get a 12V substitute and make it fit.
 

Thread Starter

sijanna

Joined Jun 24, 2019
6
That show's my naivety. I was forcing the BT suffix on getting the datasheet.

Probably incorrectly, I assumed the zebra connector was just a series of straight shot conduits in a flexible package.

I appreciate all the input.

Best,
Si
 

jpanhalt

Joined Jan 18, 2008
11,087
The zebra strip is like you describe. The stripes are a conductive rubber-like compound. I don't know if it is carbon-filled rubber or a conductive polymer. The best I have done after disassembly is to get most of the contacts to work and all to work if I press on it a little. I think reassembly could be done if one used a little alcohol or surfactant on the surfaces. I just didn't mess with it.
 

narkeleptk

Joined Mar 11, 2019
586
Usually in the older clusters I work on the zebra strips are not attached to anything but just squeezed together between the pcb and lcd. I always just assumed they where glued around the edges and in between contacts. Maybe its just the age and the connecting compound has come off? Tho If memory serves some where found in not so old vw's. Either way the lcd's still worked.
 

jpanhalt

Joined Jan 18, 2008
11,087
Many rubbers and other polymers when new and pressed against a clean surface will tend to stick a little, particularly if applied wet or with some surfactant. Example: rubber stoppers in clean glassware. I have not seen traces of adhesive on zebra strips.
 

narkeleptk

Joined Mar 11, 2019
586
I have been a bit confused then about why you keep saying its complicated to place them back. I have not experienced any complications or issue's dissembling and reassembling these strips. What is it that makes it complicated for a DIY'er and/or requires it to be done in a clean room?
 
Top