Instant Vortex Air Fryer Works but Fails to Heat After Transformer Burnout and Brief 220V Connection

Thread Starter

nobtiba

Joined Oct 30, 2023
15
I bought an Instant Vortex air fryer from the US and I am using it in Singapore with a step-down transformer. My first transformer was only 300W, and when I used the air fryer, I heard a noise and smelled burning, so the transformer was damaged. I may have briefly plugged the air fryer directly into a 220V socket after that, but I unplugged it immediately before using it.


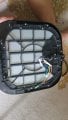
Later, I bought a proper 4000W transformer. The air fryer powers on normally — the control panel works, it preheats, starts, cancels, and all settings appear fine. But when I actually cook, the food only becomes very lightly warm, and the basket is barely hot even when set to 200°C. However, the top of the unit becomes extremely hot.


What is likely damaged in the air fryer, and how can I fix it?

Here are some photos:
The power cord wires from the bottom:
PowerCordWires.jpg

The circuits and wires from the top :
TopView2.jpg
(Yellow is nature, blue and brown are the 2 power lines).

Circuit Top view:
BoardTop2.jpg
IC1.jpg
IC2.jpg
BoardTop.jpg
Circuit Back view:
BoardBack.jpg

Other unit:
Unit.jpg
HeaterWire.jpg
 

Attachments

rsjsouza

Joined Apr 21, 2014
425
It is hard to say, since I don't see anything charred or burnt. However, air fryers usually operate with one or two heating elements and a fan circulating air around its chamber. I think the fan might be damaged (its close up picture shows some bubbles on the label) or the lower heating element (if there is one) might be damaged.

Having the controls operating correctly is a good indication the more sensitive electronics were spared from the overvoltage. Also, since it seems the high power switching devices are simple relays, they tend to be pretty sturdy against overvoltage/overcurrent, but I would test their coils to see if they are still intact. You can do this test simply by listening to the relays' "clicks" when starting the airfryer operation.

If a resistive element is not operational, then you have to verify if its thermal protection fuse is damaged (they might have one inside a white sleeve). They usually look like that:
20220921190505_12283.jpg

The fan itself might have a fuse as well, but it would be more conventional.

Good luck with your repair!
 

twohats

Joined Oct 28, 2015
609
Hi,
I'm thinking fan too.
It may be revolving slowly, just to fool you.
Nice pictures.
Please keep us updated.
Good luck...........
 

Thread Starter

nobtiba

Joined Oct 30, 2023
15
I believe it is right to assume that the fan is not functioning properly. When I turn on the power, I hear a ticking sound, and the heating coils heat up very quickly. However, there’s no sound coming from the fan. I’m unable to locate the thermal protection to replace it. It doesn’t seem to be within the white sleeve of the blue wire. Could you help identify where the thermal fuse might be located based on the photo?
Whole top View.jpg

Here is the in-action video:
Air Fryer in action
 
Last edited:

rsjsouza

Joined Apr 21, 2014
425
Your description indicates the fan is indeed not operational.

I can't locate a fuse from the pictures, but get an ohmmeter and check if the red and blue wires of the fan have some resistance across them - I would expect a few hundred or thousand ohms. This will indicate if its coil survived the surge or not.

Sometimes the fuse is embedded into the fan motor, which would also show no resistance. In this case, unfortunately you would need to remove the motor and disassemble it to find the fuse.

There are videos around youtube showing a few examples of how to disassemble a fan motor and replace its thermal fuse. I am pretty sure you can also find some spare parts to buy at sites such as Aliexpress of Banggood.

Good luck!
 

Thread Starter

nobtiba

Joined Oct 30, 2023
15
Thank you for your input. @rsjsouza , I’m unable to measure the resistor because there are no accessible contact points—it appears to be sealed. I might need to cut the cover to take measurements. However, I’ve taken detailed videos and photos, so perhaps we can find another way to evaluate it. @twohats , I appreciate the recommendation. I’d prefer minimal replacement if possible, both to reduce costs and shipping time, as well as to keep disassembly and reassembly as simple as possible.
For instance, if simply replacing the thermal protection sensor is the best option, I would go with that. Otherwise, I could replace it along with the copper wire ring, although I’m unsure how to separate it from the steel coin.
Here is the video:
Thermal Sensor Finding
Some photos:
Open the copper cover:
Open1.jpg
Open2.jpg
Close up look:
CloseUp.jpg
Thermal sensor:
ThermalSensor.jpg

Seems to have burning mark on the copper wires but not sure if they are still intact or if some of them are cut by burning, will it still be functioning?
HeatingMark.jpg
 

rsjsouza

Joined Apr 21, 2014
425
The photos give a much clearer idea on what happened. The charred windings indicate that an event with excessive heat happened at that point. The fan is probably shot. Your second picture shows a piece of wire stuck to the external insulating tape, which is not good.

Regrettably I think this fan was a victim of a terrible design that I see too often on appliances that might not have been thoroughly tested by a third party certification/safety agency: the thermal fuse was overdimensioned and allowed the fan to burn.

I can see the red and blue connections to the other systems on the air fryer, therefore you can simply pull the fast-on connectors and test the resistance. But, with the images shown, I don't think you will have any positive news.

You can try to carefully unwind the coil of the fan, counting the number of windings and re-wind it with new enameled wire of the same size. Keep in mind this will take you a very long time. I have done this quite a few times since I also used to live on a 220V area and it was not uncommon to have the occasional blown appliance/equipment. If you are very lucky, you could get away with simply unwinding just a layer or two and clearing the area of the damaged wires. But keep in mind that reducing the amount of wiring can lead to higher speed and temperature.
No matter what you do, get a thermal fuse rated for a lower temperature from a reputable manufacturer (100 or 90°C perhaps) and test everything thoroughly before reassembling the set.
 

Thread Starter

nobtiba

Joined Oct 30, 2023
15
I have to agree that this is a poorly designed system. It’s obvious to know that in the case of overheating, the fuse blows, and it should never be placed near or in contact with any components, as it could damage them.
Regarding rewinding the fan coil, I remember seeing my parents do it a few times in their younger days. I haven’t tried it myself yet.

My first approach would be to bypass the connection to skip the faulty thermal sensor. If that works, it’s great news—I’ll simply replace the thermal sensor with the new one I bought (which has a lower temperature threshold). If it doesn’t work, I’ll have to unwind the coil to remove the broken wires and then use the remaining wires. I’m not sure how much this will affect the fan’s operation, but this task seems much more challenging. From what I’ve observed, they usually use a simple rotation device to spin the core while winding the wire, which makes the process easier.
 

Thread Starter

nobtiba

Joined Oct 30, 2023
15
I wanted to share an update on the progress I made, which might help anyone facing a similar issue. I managed to fix it for less than $10. Here's how:

I ordered a replacement part from the Taobao app (English version). Search for "air fryer motor coil 110V." This option is very affordable and includes the motor, though I only needed the coil. Once it arrived, I removed the motor and used the coil alone.

Keep in mind, they only sell the 4-wire version, but I only needed 2 wires. I used the Black and Red wires from the new coil to connect to the Blue and Red wires of my old motor. To do this, I cut off the old motor coil wires and removed the old coil entirely. Don’t worry about the extra 2 wires—they are meant for motor control, but we only need the coil to rotate the motor and fan.

Photo of the spoilt motor coil:
WhatsApp Image 2026-01-16 at 12.58.59 PM.jpeg

Photo of the newly replaced item inside:
WhatsApp Image 2026-01-16 at 12.58.59 PM (1).jpeg

Tabao link and photos for anyone who need it:
https://intl.taobao.com/sk/_b.5bn7X2

WhatsApp Image 2026-01-16 at 1.08.15 PM.jpegWhatsApp Image 2026-01-16 at 1.08.15 PM (1).jpeg

The air fryer is now fully operational, distributing heat evenly and cooking food perfectly as intended. It delivers delicious results every time, just as expected from a fully functional new air fryer.
Thank you all for your help! The guide and information you provided were incredibly useful in helping me resolve the issue. :)
 

Thread Starter

nobtiba

Joined Oct 30, 2023
15
Hi everyone, it's me again! Apologies for bringing up this issue after such a long time, but it has turned out to be more challenging (and interesting) than I initially expected!

The motor coil I purchased isn't exactly the same as the original one. I believe the original was a YJ60, while the one I bought is a YJ61. The size, thickness, and hole dimensions/positions are almost identical, but there’s one key difference: the original motor coil has only two wires, whereas the new one has four. As I mentioned in my earlier post, the seller advised that I could simply use two of the wires for power and ignore the other two, which are intended for control purposes. I tried this, and it worked perfectly on the first run, as I mentioned before—I even managed to cook my first batch of chicken wings successfully.

However, my flatmate used it afterward and noticed the food wasn’t cooking evenly. Additionally, there was a burning smell. When I disassembled the unit to investigate, I found that the motor coil appeared to be burned. Its color had changed from silver to an orange-like hue, and the copper wires had also discolored. Some parts of the plastic casing seemed slightly melted, likely due to the high temperature.

Based on my observations, I suspect that for this type of 4-wire motor coil, all four wires need to be connected to properly control the fan’s rotation direction. If only two wires are used, the fan may rotate inconsistently, sometimes in the wrong direction. This is problematic because the fan is supposed to blow air in one direction only—downwards. If the rotation reverses, the air is sucked upward instead of pushing heat downward as intended. This could lead to overheating, which might have caused the damage to the motor coil.

To address the issue, I found a spare 220V motor coil (YJ61) with only two wires. I replaced the damaged motor coil with this new one and tried connecting it in two ways: first, directly to a 220V power supply, and second, using a step-up transformer to connect my air fryer’s 110V board to the 220V motor coil. Unfortunately, in both cases, the fan didn’t work.
I have 3 questions:
1) Will the fan motor operate simply by placing a motor coil and supplying the appropriate voltage to it?
2) Is my hypothesis regarding the failure of the 110V, 4-wire YJ61 motor coil I purchased correct?
3)What steps can I take to get the air fryer working again? I tested it, and all the functions appear to be operational except for the fan. The heater coil, programming, and controller seem to work, but the fan is not rotating.

Thanks all for your attention!
 

Thread Starter

nobtiba

Joined Oct 30, 2023
15
Update: I wanted to provide a final follow-up on this issue. I should have posted this sooner, but I hope it helps anyone searching for a solution to the same problem. I finally figured out the issue and now have both air fryers working perfectly (including the one I used for parts).

The problem wasn't what I initially suspected. Using 2 wires from the 4-wire motor coil works completely fine. The reason the fan wasn't rotating was actually due to the alignment being extremely sensitive. You need to align the coil very precisely—balancing the spacing so it doesn't touch the rotor—to allow it to spin. Once it rotates freely, keep it in that exact position and be careful not to over-tighten the screws, as that can shift the alignment.

After adjusting the positioning, both air fryers are back in service and working great. If you are facing a similar issue, pay close attention to the physical alignment of the motor components!
 

Michael42

Joined Apr 20, 2026
5
I’d say the heating element or its control circuit got partially damaged when you ran it through the undersized transformer (and possibly that brief 220V plug-in).
Since it still powers on and the controls work, but the basket barely heats, it’s very likely the main heater isn’t getting full power anymore (or is only partially working). The top getting extremely hot also points to heat building up in the wrong area instead of being properly transferred to the cooking chamber.
Honestly, I don’t think this is a practical repair - I’d just replace the unit. Opening and fixing the heating/PCB parts usually isn’t worth it for air fryers.
 

rsjsouza

Joined Apr 21, 2014
425
@nobtiba , thanks for returning with the solution for this issue - not many return here after finding the solution to educate the larger audience. Indeed the mechanical alignment is quite critical on motors and I am glad you found the root cause of this.

As for repairing versus buying new, that is a much more complicated decision. In my opinion, in this case it was worth it: not only the OP has now two air friers repaired, he has learned something along the way, even due to the fact there was a chance the repair was unsuccessful.

Also, I know these appliances can be very expensive in certain countries, so that can also offset the cost of repair.
 
Top