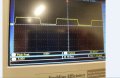
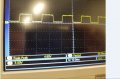
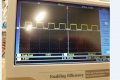
Inductor measurement - wind meter

philba

Joined Aug 17, 2017
959
With a large enough pulse on the pickup coil you can feed it directly into an arduino or other micro input pin. If it's too low, add more turns to the coil. If it's still too low, I'd look at using a transistor or opamp. I would use clamp diodes to protect the input pin.
 

Thread Starter

Episkopianos

Joined Nov 18, 2017
13
With a large enough pulse on the pickup coil you can feed it directly into an arduino or other micro input pin. If it's too low, add more turns to the coil. If it's still too low, I'd look at using a transistor or opamp. I would use clamp diodes to protect the input pin.
Ok, I just ordered a opamp and and I will add more turns on the coil but, which will be the output of my circuit, I have an inductor and a resistor in series. Will I connect want pin to gnd and the other one to the arduino Input ?
 

Kjeldgaard

Joined Apr 7, 2016
476
As I see it in the pictures, the coil points in the direction that gives the smallest signal, perpendicular to the core.

Try turning / lifting the coil, so that the top points directly to the magnet.

Also try without resistance or a much greater resistance parallel to the coil.
 

philba

Joined Aug 17, 2017
959
For the μP based one I built, it was more suited to use a digital device than an analogue type.
Max.
If I was designing from scratch, I'd probably use HE but the TS was trying to retrofit something and was following the coil path. For manufacturing an inexpensive device, I think the coil makes the most sense (pun somewhat intended...). Plus, for experimenting, mixing analog and digital is always fun.
 

MaxHeadRoom

Joined Jul 18, 2013
30,671
From what the OP says he is designing from scratch, not retrofitting?
A slot opto does not add any weight to the impeller as when a magnet etc is used.
Also eliminate the other 6 components added.
Max.
 

Thread Starter

Episkopianos

Joined Nov 18, 2017
13
We'll tackle one thing at a time. Let's see what the signal looks like on an oscilloscope.
Yes it will be AC, but that doesn't mean that it has to go positive and negative. We can amplify and level shift it so that it goes between 0V and 5V (assuming that the Arduino board accepts 0-5V signals). We can input that to the Arduino chip (Atmel ATmega chip).
Hi again, so I made the circuit on the reply below and I have attached some photos of the oscilloscope. While blowing harder on the fan the square waves were smaller, more pulses. Do you find it good ? And now I just have to connect it to arduino and measure the pulses and translate it to numbers right? Amount of pulses in time.

Uploaded my circuit with fan as well.


Attachments

Thread Starter

Episkopianos

Joined Nov 18, 2017
13
Hi again, so I made the circuit on the reply below and I have attached some photos of the oscilloscope. While blowing harder on the fan the square waves were smaller, more pulses. Do you find it good ? And now I just have to connect it to arduino and measure the pulses and translate it to numbers right? Amount of pulses in time.

Uploaded my circuit with fan as well.


I mean I'm counting the pulses with pulseIn() but how do I translate it fast slow?
 

MrChips

Joined Oct 2, 2009
34,823
Your pulses are not getting smaller. What you mean to say is the peak-to-peak amplitude is 4.6V and the cycle period goes from 38ms to 6ms as you blow on the fan.

Since the signal is the output of a comparator, you can connect the signal directly to the Arduino input and measure the duration of the HIGH signal using the pulsein(pin, value) function.

This is just a first step. Ideally, you want to measure the duration (i.e. period) of one complete cycle or you want to count the number of pulses over a fixed time.
 

MrChips

Joined Oct 2, 2009
34,823
The number you get from the pulsein( ) function is a time duration.
Let us say the value you get is t.
Calculate
wind speed = k / t

where, k is a constant value that you play around with until you get the right answer. To get the right value of k you need to calibrate the instrument against a known wind speed.
 

Tonyr1084

Joined Sep 24, 2015
9,744
Just out of curiosity, what does the input to the comparator look like? Does the amplitude change with the frequency? Can you estimate the MAX wind speed you'll be measuring? Reason why asked is because the output from your sense coil might exceed the limits of the comparator. No sense in building something that can sense wind speeds from 0 to 5 MPH (just an exaggerated example) and anything greater than 5 MPH can burn out your chip. Remember, my numbers are fictitious. Looks like you're coming along nicely. Good approach.
 

Thread Starter

Episkopianos

Joined Nov 18, 2017
13
Your pulses are not getting smaller. What you mean to say is the peak-to-peak amplitude is 4.6V and the cycle period goes from 38ms to 6ms as you blow on the fan.

Since the signal is the output of a comparator, you can connect the signal directly to the Arduino input and measure the duration of the HIGH signal using the pulsein(pin, value) function.

This is just a first step. Ideally, you want to measure the duration (i.e. period) of one complete cycle or you want to count the number of pulses over a fixed time.
Hi MrChips, So I have this program and I measure the pulses (rising of pulses) in a fixed time. I attached the output. It half works, meaning when I blow on the fan the count rises, my problem now is that count 1 is 1.47mph , count 2 .94mpg etc , so I have fixed numbers but not a nice ramp with numbers, do you know how to do that?

Code:

#define mph_var 2.23
#define kph_var 3.6

double windRate, ms, Mph, Kph; //This is the value we intend to calculate.
volatile int count; //This integer needs to be set as volatile to ensure it updates correctly during the interrupt process.

void setup() {
attachInterrupt(0, Wind, RISING); //Configures interrupt 0 (pin 2 on the Arduino Uno) to run the function "Wind"
Serial.begin(9600); //Start Serial
}
void loop() {
count = 0; // Reset the counter so we start counting from 0 again
interrupts(); //Enables interrupts on the Arduino
delay (100); //Wait
noInterrupts(); //Disable the interrupts on the Arduino
count = map(count, 0, 20, 0, 10);
//Start the math Calculate for mph or kph or both
windRate = (count * 11.00) * 60; //Take counted pulses in the last second and multiply by 5.0 and then convert it to minutes
windRate = windRate / 1000; //Convert windrate, giving you Velocity/ Hour

ms = windRate;
Mph = ms * mph_var;
Kph = ms * kph_var;

// Serial.println(count); //Print the variable windRate to Serial
Serial.print(count);
Serial.print("\t");
Serial.print("m/s: ");
Serial.print(ms);
Serial.print("\t");
Serial.print("mph: ");
Serial.print(Mph);
Serial.print("\t");
Serial.print("km/h: ");
Serial.println(Kph);
}

void Wind()
{
count++; //Every time this function is called, increment "count" by 1
}
 

Attachments

philba

Joined Aug 17, 2017
959
You really should use tags for posting code. Click on the + icon.

From what I can tell, you are counting pulses over a 200 mS period. In that 200 mS period, how many pulses are you getting? Suppose for a given speed of wind the number of rotations in 200 mS is 5.7. You will get either 5 or 6 pulses so you will get 5/5.7 or 6/5.7 error. You will have a pretty big range of error depending on whether you get 5 or 6 pulses.

Think about how you could minimize your error. You could tune your approach and improve it. But maybe you should think about inherently more accurate ways to determine speed with the same hardware.
 

Reloadron

Joined Jan 15, 2015
7,891
This was the code I provided you in another forum:
Code:
int windPin = 2;    //This is the input pin on the Arduino
double windRate;    //This is the value we intend to calculate.
volatile int count; //This integer needs to be set as volatile to ensure it updates correctly during the interrupt process. 

void setup() {
  // put your setup code here, to run once:
  pinMode(windPin, INPUT);           //Sets the pin as an input
  attachInterrupt(0, Wind, RISING);  //Configures interrupt 0 (pin 2 on the Arduino Uno) to run the function "Wind" 
  Serial.begin(9600);  //Start Serial
}
void loop() {
  // put your main code here, to run repeatedly: 
  count = 0;      // Reset the counter so we start counting from 0 again
  interrupts();   //Enables interrupts on the Arduino
  delay (1000);   //Wait 1 second
  noInterrupts(); //Disable the interrupts on the Arduino
 
  //Start the math Calculate for mph or kph or both
  //windRate = (count * 5.00);        //Take counted pulses in the last second and multiply by 5.0
  //windRate = windRate * 60;         //Convert seconds to minutes, giving you Velocity / Minute
  //windRate = windRate / 1000;       //Convert windrate, giving you Velocity/ Hour
  Serial.println ("The Wind Speed Is"); // Print a heading
  Serial.println(count);  //Print the variable windRate to Serial
  Serial.println("Miles Per Hour");
}

void Wind()
{
   count++; //Every time this function is called, increment "count" by 1
}
Take note of these lines:
interrupts(); //Enables interrupts on the Arduino
delay (1000); //Wait 1 second
noInterrupts(); //Disable the interrupts on the Arduino

This is what you have:
attachInterrupt(0, Wind, RISING); //Configures interrupt 0 (pin 2 on the Arduino Uno) to run the function "Wind"
Serial.begin(9600); //Start Serial
}
void loop() {
count = 0; // Reset the counter so we start counting from 0 again
interrupts(); //Enables interrupts on the Arduino
delay (100); //Wait
noInterrupts(); //Disable the interrupts on the Arduino

The idea of a 1000 milli-second delay was using interrupts to create a 1 second sample period. Why was that changed to 100 mSec? The code needs to have a flow. If you work from the basic code you will have something that works. What was missing when I gave you that sample was how many pulses you get for various calibrated wind speeds, making sure your pulses are linear. Meaning if you get 20 PPS (Pulses Per Second) for a 10 MPH wind you should get 40 PPS for a 20 MPH wind speed. One suggested calibration method was to drive on a windless day at various speeds and note the pulse counts.

Also if you recall within the final lines of code:
//Start the math Calculate for mph or kph or both
//windRate = (count * 5.00); //Take counted pulses in the last second and multiply by 5.0
//windRate = windRate * 60; //Convert seconds to minutes, giving you Velocity / Minute
//windRate = windRate / 1000; //Convert windrate, giving you Velocity/ Hour

Those lines are remarked out so you can put in your own math functions.

Ron
.
 

MrChips

Joined Oct 2, 2009
34,823
You can get only integer number of counts from your sensor.
When you multiply this number by a fractional number you will get fractional results.
Adjust your sampling period so that the integer number of counts received from the sensor gives an integer value of wind speed (or whatever speed resolution you desire).
 

Thread Starter

Episkopianos

Joined Nov 18, 2017
13
This was the code I provided you in another forum:
Code:
int windPin = 2;    //This is the input pin on the Arduino
double windRate;    //This is the value we intend to calculate.
volatile int count; //This integer needs to be set as volatile to ensure it updates correctly during the interrupt process.

void setup() {
  // put your setup code here, to run once:
  pinMode(windPin, INPUT);           //Sets the pin as an input
  attachInterrupt(0, Wind, RISING);  //Configures interrupt 0 (pin 2 on the Arduino Uno) to run the function "Wind"
  Serial.begin(9600);  //Start Serial
}
void loop() {
  // put your main code here, to run repeatedly:
  count = 0;      // Reset the counter so we start counting from 0 again
  interrupts();   //Enables interrupts on the Arduino
  delay (1000);   //Wait 1 second
  noInterrupts(); //Disable the interrupts on the Arduino

  //Start the math Calculate for mph or kph or both
  //windRate = (count * 5.00);        //Take counted pulses in the last second and multiply by 5.0
  //windRate = windRate * 60;         //Convert seconds to minutes, giving you Velocity / Minute
  //windRate = windRate / 1000;       //Convert windrate, giving you Velocity/ Hour
  Serial.println ("The Wind Speed Is"); // Print a heading
  Serial.println(count);  //Print the variable windRate to Serial
  Serial.println("Miles Per Hour");
}

void Wind()
{
   count++; //Every time this function is called, increment "count" by 1
}
Take note of these lines:
interrupts(); //Enables interrupts on the Arduino
delay (1000); //Wait 1 second
noInterrupts(); //Disable the interrupts on the Arduino

This is what you have:
attachInterrupt(0, Wind, RISING); //Configures interrupt 0 (pin 2 on the Arduino Uno) to run the function "Wind"
Serial.begin(9600); //Start Serial
}
void loop() {
count = 0; // Reset the counter so we start counting from 0 again
interrupts(); //Enables interrupts on the Arduino
delay (100); //Wait
noInterrupts(); //Disable the interrupts on the Arduino

The idea of a 1000 milli-second delay was using interrupts to create a 1 second sample period. Why was that changed to 100 mSec? The code needs to have a flow. If you work from the basic code you will have something that works. What was missing when I gave you that sample was how many pulses you get for various calibrated wind speeds, making sure your pulses are linear. Meaning if you get 20 PPS (Pulses Per Second) for a 10 MPH wind you should get 40 PPS for a 20 MPH wind speed. One suggested calibration method was to drive on a windless day at various speeds and note the pulse counts.

Also if you recall within the final lines of code:
//Start the math Calculate for mph or kph or both
//windRate = (count * 5.00); //Take counted pulses in the last second and multiply by 5.0
//windRate = windRate * 60; //Convert seconds to minutes, giving you Velocity / Minute
//windRate = windRate / 1000; //Convert windrate, giving you Velocity/ Hour

Those lines are remarked out so you can put in your own math functions.

Ron
.
Thanks for your answer, the sample time of one second was to big, I mean the delay was to long to wait for 1 second, that's why I put 100 ms.
 
Top