Facebook
 Google
 GitHub
 Linkedin
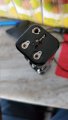
I picked up a battery holder with solder lead tabs. Very similar to this

What is the proper method of soldering connector wires here? I tried to solder the wire to the metal, but even when I made no contact with the plastic casing, enough heat transferred through the tab that it melted the plastic case.
I had a spare, so I pushed the wire through it and wrapped it back and twisted, and then soldered the wire to itself. But now the wire still hangs loose and flops around. Seems like you're supposed to be able to solder the wire directly to the tabs, but I can't get it hot enough without melting the plastic.