Help with using a PIR to trigger a NE555

Thread Starter

AllisonAmg

Joined May 18, 2020
71
Yes,
Do you want the ability to 'adjust' the period over a given time range, if yes, what are the limits.?
E
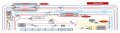
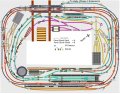
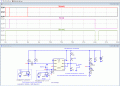
10 seconds to 30 seconds would be ideal.... its based on a train triggering the block then approximately the time to reach the end of the block... where i dont have a exit IR detector. Hope that makes sense.
Allison
 

ericgibbs

Joined Jan 29, 2010
18,766
hi.
OK, Approx 10 Sec thru 30 Sec.
Make R7 = 100k and the RV1 trim pot a 200k and this will give that range.

I have disconnected the RESET module, use a push button to reset if required.

The Top plot shows the Time Period as that RV1 is stepped in 50k steps,,,

If you have a query, ask..:)
E
 

Attachments

Thread Starter

AllisonAmg

Joined May 18, 2020
71
hi.
OK, Approx 10 Sec thru 30 Sec.
Make R7 = 100k and the RV1 trim pot a 200k and this will give that range.

I have disconnected the RESET module, use a push button to reset if required.

The Top plot shows the Time Period as that RV1 is stepped in 50k steps,,,

If you have a query, ask..:)
E
Thank you so much for that x
Allison
 

allenpitts

Joined Feb 26, 2011
163
Hello Allison,

Spent some weeks developing and testing just such a circuit.
Motion-sensor-light-circuit_200302_w_extension.gif

The schematic was tested using a breadboard and then developed into a PCB.
Let me know if you would like the PCB.

Allen Pitts, Dallas TX
 

Thread Starter

AllisonAmg

Joined May 18, 2020
71
hi.
OK, Approx 10 Sec thru 30 Sec.
Make R7 = 100k and the RV1 trim pot a 200k and this will give that range.

I have disconnected the RESET module, use a push button to reset if required.

The Top plot shows the Time Period as that RV1 is stepped in 50k steps,,,

If you have a query, ask..:)
E
Can i ask what would happen if C2 was ommited ?
A
 

ericgibbs

Joined Jan 29, 2010
18,766
hi.
Without C2, it would not work as required, for your application.
C2 helps generate the low going pulse [ from +5v to 0v] which the 555 requires on the Trigger pin in order to start the timer period.
E
Update:
Sim show the Low going pulse on the Trig.
 

Attachments

Last edited:

Thread Starter

AllisonAmg

Joined May 18, 2020
71
hi Allison,
To help you understand C2's function.
One simulation with C2, the Timing period is independent of the Vset Period
next sim is without C2
The Timing Period will be equal the Vset period, which you do not want.
OK.?
E
Next Step....... Having studied the circuit you so helpfully designed, i wonder could you make it a little more complicated to perform the following logic.. (it may already do this, if so ignore my ramblings).

1. Train triggers 'Sensor 1' it will set a RED LED ON then depending on a 'board jumper' setting, it can do either
a) Wait till 'Sensor 2' is triggered or
b) Wait till a Preset Time has elapsed, set by a Potentiometer
2. Then set GREEN LED ON and wait for Step 1.

Only 1 LED can be ON at a time.

I hope you dont mind me asking, I am learning a lot.

Thank you again.
Allison
 

Audioguru again

Joined Oct 21, 2019
6,673
Hello Allison,

Spent some weeks developing and testing just such a circuit.
View attachment 208911

The schematic was tested using a breadboard and then developed into a PCB.
Let me know if you would like the PCB.

Allen Pitts, Dallas TX
Your transistor has no series base resistor to limit the base current. How do you know the PIR output current? Two tutorials I looked at said, "digital 3.3V" but did not say its current and one showed a 220 ohm series resistor to a 1.8V red LED to limit its current.
 

Bernard

Joined Aug 7, 2008
5,784
Allen, that is an old drawing & does not match your new PCB.
PIR has internal pull up R so no additional base R is needed.
A PIR is not used in present circuit, just a slip of the pen.
 

ericgibbs

Joined Jan 29, 2010
18,766
hi Allison
Ref your specification:

1. Train triggers 'Sensor 1' it will set a RED LED ON
The circuit already works that way.

then
depending on a 'board jumper' setting, it can do either


a) Wait till 'Sensor 2' is triggered
This would mean that the On Period, triggered by Sensor1 would have to be preset to be longer, so that Sensor2 could End the Timer Period.
If the Timer period, triggered by Sensor1, timed out and then Sensor 2 triggered the 555 Reset pin, nothing would happen as the Timer period has already expired. No problem.
or
b) Wait till a Preset Time has elapsed, set by a Potentiometer
The circuit already works that way.

2. Then set GREEN LED ON and wait for Step 1.
The circuit already works that way.

Only 1 LED can be ON at a time.
The circuit already works that way.

You have said you want a adjustable Timer period of ~10 Secs thru 30 Secs.
We could add a Jumper so that the Timer, once Set, would never time out, until a Reset push button is pressed.

E

Added Timing Sims, showing Jumper Off and Off
 

Attachments

Last edited:

Thread Starter

AllisonAmg

Joined May 18, 2020
71
hi Allison
Ref your specification:

1. Train triggers 'Sensor 1' it will set a RED LED ON
The circuit already works that way.

then
depending on a 'board jumper' setting, it can do either


a) Wait till 'Sensor 2' is triggered
This would mean that the On Period, triggered by Sensor1 would have to be preset to be longer, so that Sensor2 could End the Timer Period.
If the Timer period, triggered by Sensor1, timed out and then Sensor 2 triggered the 555 Reset pin, nothing would happen as the Timer period has already expired. No problem.
or
b) Wait till a Preset Time has elapsed, set by a Potentiometer
The circuit already works that way.

2. Then set GREEN LED ON and wait for Step 1.
The circuit already works that way.

Only 1 LED can be ON at a time.
The circuit already works that way.

You have said you want a adjustable Timer period of ~10 Secs thru 30 Secs.
We could add a Jumper so that the Timer, once Set, would never time out, until a Reset push button is pressed.

E

Added Timing Sims, showing Jumper Off and Off
Your a genius ... Thank you so much for your help
Allison
 

ericgibbs

Joined Jan 29, 2010
18,766
hi A,
As you can see the LED currents are lowish, so use high efficiency LED's to get the maximum possible light.
The project works on a 5V supply. [ If required it could be modified to work with a higher supply voltage]

Do you have a Solder-less Bread boards on your work bench, if yes, I would use that method to build and debug.
When you have built it, post some images of the project.
E
 

Thread Starter

AllisonAmg

Joined May 18, 2020
71
hi A,
As you can see the LED currents are lowish, so use high efficiency LED's to get the maximum possible light.
The project works on a 5V supply. [ If required it could be modified to work with a higher supply voltage]

Do you have a Solder-less Bread boards on your work bench, if yes, I would use that method to build and debug.
When you have built it, post some images of the project.
E
I will be building a prototype this weekend (time permitting, hubby is home this weekend !!)... I will then be building the physical signals after i have finished wiring the control panels (1st panel front & wiring pic is enclosed), i am in the midle of wiring the 2nd panel.

I have enclosed a pic of the 2nd Panel and the layout schematic just to give you a flavour of the work i am doing,

Allison

Panel A (Front).jpgPanel A (Inside).jpg
 

Attachments

Last edited by a moderator:
Top