Best Label Maker for Project Case

Thread Starter

hexreader

Joined Apr 16, 2011
581
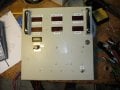
I have a few hobby project cases to make, but I have yet to learn how to provide neat labels for switches, dials and LEDs.

I was very interested in the mention of Bill's Label Maker in post #2 here:

Homebrew Function Generator

What label maker can I buy in UK Please?

I would hope to get something worthwhile for maybe £50, to £120 - or up to £200 if it is something amazing.

Ideally the labels would look pretty and be easy to make. I would guess that I might need PC connection to make graphics possible?

Google finds methods for creating one big laser-printed label for a whole front panel, but this looks like a fiddly way to do it.

How do others provide neat appearance to their home-made project boxes please?
 
Last edited:

Wendy

Joined Mar 24, 2008
23,429
They can be had for under $100 at almost any office supply, usually for less. As with printers the money is in the cartridges that feed them.

I would look for one with a USB input, so you can program some custom graphics. I don't have one, but would like to. They would be handy for things like triangle waves, square waves, sine waves, Ω, and what not.
 

jpanhalt

Joined Jan 18, 2008
11,087
Hi Bill,

I vaguely remembered you describing your label printer (CriCut?) , but couldn't find it in a search. Did you ever describe it here?

John
 

Wendy

Joined Mar 24, 2008
23,429
The one I'm currently using is a 20 year Brother that is both AC/DC powered (wall wart). Over the years I've found loads of cartridges for it at flea markets, so I'm not getting rid of it anytime soon. The modern ones are much more capable, but even a crude one is very useful IMO. A hobbiest must.

Look at the various projects I've released on the Completed Projects forum if you want an idea what the final result looks like.

As for project boxes, those same flea markets have given me a glut. Nowadays I use a 3D printer, which makes the case with holes already in place (no drilling). On future releases in the Completed Projects forum I will include the plans. Sketchup is my current model program, but it has bugs. They show up badly if you try to put text into the model for example, so the labeler still has uses.
 

Thread Starter

hexreader

Joined Apr 16, 2011
581
@MaxHeadRoom - Nice idea - I will give that a try for the odd project that I am especially proud of. - Certainly gives very nice appearance.

@Bill_Marsden - This sounds more practical for the more every-day projects, but I am unsure of what kind of maker you mean. - something like one of these?

http://www.staples.co.uk/label-make...0666&Effort_Code=WW&Find_Number=421749&cm_sp=

http://www.staples.co.uk/plug-n-pla...0666&Effort_Code=WW&Find_Number=408820&cm_sp=

Many thanks to both of you for the ideas.
 

jpanhalt

Joined Jan 18, 2008
11,087
I also use a Brother with the thin tape. My faulty memory. I thought you were using a CriCut for stencils. I have an ancient Roland stencil cutter (Dr. STIKA) and have used it for labels (cut the labels, strip it to get a negative, spray paint, remove stencil), but it doesn't go very small.

John
 

Wendy

Joined Mar 24, 2008
23,429
Close enough, but don't limit yourself. There are huge makes and models out there. Like I said, the cartridge is probably more important. I have black on clear (the dominant tape), gold on clear, gold on black, blue on clear, etc.

I use scissors to cut them down to size, and a xacto knife to peel them from their backing. Tweezers to place them, and they usually look really good.
 

Thread Starter

hexreader

Joined Apr 16, 2011
581
Brother with thin tape sounds like the way to go. Thin black on clear tape presumably.

I just wish there was something just a tiny bit neater, but still easy to use. But I guess there is no point wishing for what doesn't exist :)

I will think some more....

Many thanks
 

jpanhalt

Joined Jan 18, 2008
11,087
Black on clear, water-transfer decals can be treated with a diethyl ether ("ether") solution to make the edges disappears. That method was used more than 30 years ago for making decals look like they were "painted on" models. I believe Papilo is still selling something similar (http://www.papilio.com/laser water slide decal paper original pas.html). Papilo probably sells the clearing agent too. Many motor starting fluids are mostly ether in a propellant. Ether has a very characteristic smell and is relatively non-toxic.* A little experimentation might get you a good result.

John

*Shortly after ether was discovered, it was used recreationally as a substitute for ethanol. It's main advantage was you could get drunk at noon and be sober by 1:00 PM. There were even legal bars that sold drinks made with it. Starting fluid, while containing ether, also contains denaturants, such as isopropyl alcohol. DO NOT experiment with it as an intoxicant.
 

Thread Starter

hexreader

Joined Apr 16, 2011
581
Thanks Guys,

Lots of great ideas in one thread. I am feeling much better informed.

I think I will buy a label maker and black-on-clear labels for the day-to-day projects...
Papilo water-slide paper looks interesting - think I will buy some to try.
Maybe I will chat a local sign-maker to see whether he can convert a graphic file to reverse-printed plastic for me - where appearance matters more.

I will let you know how it goes.... and maybe post pictures so you can all have a laugh :)
 

djsfantasi

Joined Apr 11, 2010
9,163
Decals can be used for labeling. You can buy blank decal paper and print your desired labels on it. A seal coat is then applied.

When applying, use a decal setting solution to snug the decal tightly to its position. Google "decal setting solution". Micro Scale Micro Sol and Walthers Solvaset are two such products.

There are YouTube videos on using these solutions. (I'm not endorsing the quality, but it looks pretty good)
There are also tutorials, of which this is a non-endorsed sample.
http://www.scalemodelguide.com/painting-weathering/decals/apply-waterslide-decals/
 

KMoffett

Joined Dec 19, 2007
2,918
I've used a graphics program to layout the entire panel labeling, then print it out on overhead projector film with a laser printer. Spray the panel with 3M 77-adhesive. Place the panel face up and press the film on top of it. Press down with a rubber roller on the film to make sure it completely adheres. Then trim the outer edge and all openings with an Exacto knife.

Ken

TIG Pulser front.jpg
 
Top