Project: Resistor Parts Storage

Thread Starter

Wendy

Joined Mar 24, 2008
23,421
A couple of years ago I decided I was tired of buying resistors piecemeal, and started a resistor kit. This leads to the question, when you have over 150 different resistors, how do you store them? Shelfs really do take too much space, and can be hard to maintain. Lord help you if you drop one and scatter the contents to the 4 winds.

My answer at the time was custom made bags made with an impulse sealer. If you've never seen an impulse sealer, think plastic welder. They work on static bags and just about anything plastic, by using a nichrome strip and Teflon coated tape to melt and weld two pieces of plastic together. Here is my impulse sealer, which I bought from Harbor Freight for around $20. I think they've discontinued this particular make/model, but they are available elsewhere. Mine is an 8" sealer, if I had it to do over again I would probably get longer (maybe not).


Any bags will work, but I use either sandwich bags or snack bags, each of which makes 2" x 3¼". I am aware of a certain French invented system out there, but I'll be using inches throughout. Here is a before and after shot in the same picture.


And I ended up with a kit that looked something like this...


There were about 7 big bags full of small bags. This was awkward and made for hard to find parts, but IMO still better than shelves. My boy Jim had a better idea, which I tried out and am sharing here.

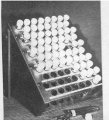
Instead of a big bag of randomly placed parts, how about a big bag with organized parts? The end result looked something like this, with plenty of room for later changes. Notice how easy it is to take inventory with the new layout.

 
Last edited:

Thread Starter

Wendy

Joined Mar 24, 2008
23,421
Continued from previous page...

This in turn folded pretty neatly into the previous bag.


I made this bag starting from a large 1 gallon storage bag, and dividing it up into 6 parts 1¾" wide with a indelible marker. I cut a piece of cardboard from a coke box 1½" X 10½" for an insert later in the process. I slide this cardboard into the first slot I was making, and seam sealed it in. None of the dimensions are critical, in fact the whole layout can be pretty sloppy.


I then slide the cardboard as far up as it would go and used it as a backing to allow cutting on only one plastic side, leaving the other intact.


I repeated this until I had all the panels sealed and cut, then removed the zip lock seal from the top of the bag.


Dang belly, keeps getting in the way!
 
Last edited:

Thread Starter

Wendy

Joined Mar 24, 2008
23,421
The only thing left for that panel at this point was to divide it into 1/3 sections. I marked the plastic and seam sealed accordingly, to form the individual pockets.


There was still one problem, there weren't enough pockets for all the resistor bags. Remember though, a seam sealer is a welder, so I made another one and attached it. Wallah! One down, 7 to go.


I take all the bags and store them in one large storage bag. To bad I can't do this with capacitors, but the variations in size are a killer.
 
Last edited:

Thread Starter

Wendy

Joined Mar 24, 2008
23,421
Finishing Up

Materials needed:

Impulse Sealer
Box of 1 Gallon Storage Bags
Sharpie (indelible marker)
Ruler with metal edge for cutting
Good pair of scissors
Sharp knife
Cardboard (I used a Coke box)
Scotch Tape (it will not seam weld, so is useful holding two panels together for welding)


Notes:

I took 20 minutes to make a panel, 45 for a whole sheet using 2 panels. This is not an evening project, and it takes longer if you get tired due to stupid mistakes. When I say this isn't precision, don't be surprised at ¼" variation from the manufacturer themselves. I went through 3 sharpies, mostly because they were used to begin with, and dried out during use.

I started trimming the cardboard inserts edge at the beginning of each panel, since it will get sliced up. The cardboard insert was pretty handy for handling, since the plastic just flops around otherwise. I gave up using the boxes shown in the pictures to line things up, they helped but were more in the way overall.

My kit has 8 ranges, starting at \(10^{-1}\) (1 - 9.9 Ω) and ending with \(10^{6}\) (10-99 MΩ). Not all used 2 panels, but the usual number of resistor bags was 21 (each panel has 18 slots).

*****************

One last thought, after using this a little while, I wish I had made the pockets deeper. The little bags are about right, but if I had it to do over I would have made the pockets 3½" X 2" instead of 3½" X 1¾". Not worth redoing, but 5 X 3 pockets per panel with the new dimensions would still be 10½" X 10" and would still give enough spaces to use, when figured between 2 panels.

2" X 5 = 10", 1¾" X 6 = 10½"

A longer impulse sealer would have speed things up a little too, since I could have done 1 seal per line instead of the 2 seals per line I was doing.
 
Last edited:

Thread Starter

Wendy

Joined Mar 24, 2008
23,421
Bill, do you think the bag-matrix could be glued to a card and put in a binder? I have visions of a "library" of parts...
Don't see why not, though the deeper pockets would almost be required. It would be easy to dump too, so maybe some foam to press everything in place when the binder is closed. Maybe a large flap seam welded when you make the initial panels?

Actually, small envelopes made of paper combined with the small bags might even be better, as envelopes have flaps. The thin plastic used in bags is way too flexable, plastic static stickies perhaps? If you are ever looking for high quality double sided tape think carpet tape, it ages well, simply will not let go (don't slip when using it), and cuts well with scissors. I've used it to make home made decals along with my ink jet printer with excellent results.

There are a ton of solutions thinking about it, I like the book idea.

Small capacitors would be a logical canidate, as are zener diodes (and some other small type diodes).

Resistors were my bugaboo though, you can compensate for almost anything design wise with a nice selection of resistors.
 
Last edited:

SgtWookie

Joined Jul 17, 2007
22,230
Interesting method, Bill ;)

I started using 3"x 4.5" coin envelopes about 25 years ago. I write the resistance value and wattage along the flap hinge on the opposite side in pencil; and have them all standing up in a couple of boxes that are 3 1/4" wide, 3" tall and a foot long. If I take an envelope out, I just lift up the one right behind it and raise the flap so I can easily spot the place where the envelope I have out goes. Taking a ruler and drawing a diagonal line across the top edges of the envelopes with a colored Sharpie makes it a snap to spot an envelope that was errantly filed (this is a trick I learned when using IBM punched cards for ensuring the card decks were in sequence.)

I use pencil for the markings because ink would run if water or isopropyl were splashed/spilled on it.

About a year ago, I bought a 1/4W E24 8,400 piece resistor assortment on Ebay for around $19. It came with the resistors in 24 plastic bags, labeled "1R0 - 10M", "1R1 - 1M1",... "9R1 - 9M1". In each bag, there are 7 strips of 50 resistors that came off a tape reel. They store fairly compactly in a 7"x7"x6" box, and I can locate the value I need in just a few moments by reading the multiplier band.
 

Thread Starter

Wendy

Joined Mar 24, 2008
23,421
I just got through buying around 801 resistors, in groups of 20. Tanner's had 1 20MΩ resistor (DANGIT). My current spread is 10, 11, 12, 13, 15, 16, 18, 20, 22, 24, 27, 30, 33, 36, 39, 43, 47, 51, 56, 62, 68, 75, 82, and 91, or 24 per range. It starts at 1Ω and goes to 10MΩ. Looks like I'll just have to live without a full pack on the 10-99MΩ range. I'm not sure what I'll use 1.1Ω or 1.3Ω for, but I'll think of something. I wound up buying 11, 13, and 16 for every range, I hadn't originally added those to my basic range set.

I like plastic bags, other than their ESD liablilities. Cheap, easy to replace if they wear out, and extremely portable. Add a seam welder and it gets interesting.

Any ideas on relatively cheap sources for the high end megohm scale? I figure 20 of everything is enough, other than a few basics (I like large quantities of 1KΩ and 10KΩ, they are my personal default values).

Isopropal lets me reuse the bags. In the big bag their pretty safe.
 

SgtWookie

Joined Jul 17, 2007
22,230
Well, seems like my suppliers for the really large values have dried up. The fellow I bought the E24 assortment from hasn't had them since not long after I got mine - and the largest values in that assortment was 10M.

But using really high resistance values isn't typical, unless you're building HV probes or working with HV tube sets or something like that. They were easier to get about 10 years ago.

High value resistors are handy to use as forms for winding small inductors on, BTW.
 

Thread Starter

Wendy

Joined Mar 24, 2008
23,421
This kit is 5% ¼W, so their pretty much the same size, pretty irregular cylinders. I've used ½W and 1W to make inductors, especially the nice cylindrical units. They're getting less common from what I've seen.
 
Last edited:

SgtWookie

Joined Jul 17, 2007
22,230
The "nice cylindrical ones" are things of the past now, come to think of it. Good reason for that, too - all of the NOS of that kind that I have, even mil-spec 1% resistors, have shifted wildly in value over the past 20+ years. The newer type that look more like coated miniature dumbells seem to be steady as a rock.

If you have some particular values in mind, E-mail me a list of what you need. I'll check my favorite haunts next time I head that way.
 

Thread Starter

Wendy

Joined Mar 24, 2008
23,421
OK, finished kitting up my latest aquisitions, and had to make another panel (probably the last). I wound up making the pockets 2 1/8" X 3 1/2", it helped a lot but still isn't perfect. If anyone else trys this out you might think about flaps. I drew the panels up for reference.


My \(10^{7}\) kit looks like it will never truely by finished, the only values I have for it are 10MΩ, 15MΩ, 22MΩ, and 82MΩ. I'll keep my eyes open, but it's not a biggie. Values this large are used to tweak test selects IMO.
 
Last edited:

studiot

Joined Nov 9, 2007
4,998
Here is a storage method, courtesy a now defunct magazine Electronics Today International (Jan 1973).

Their version was all sheet metal work but mine was made from thin plywood.
The tubes were plastic pill tubes, obtainable at the local chemist for £1 per hundred. Film canisters are also good.

Sorry about the scan quality.
 

Attachments

Thread Starter

Wendy

Joined Mar 24, 2008
23,421
Lets see, slightly over 8 ranges (X10E-1 to X10E6) X 24 resistors = 200+ values. (Yes, I actually bought them over time).

I count 75 slots in that unit, need more shelves.... :p
 

vetterick

Joined Aug 11, 2008
35
I liked this so much I joined the forum just to tell you about it:)

I used the 3 ring sheet protectors (Avery #PV119XL-10), made 2 vertical seams at 3" and 6" (9" wide), marked the horizontals every 2 1/4" (sound familiar?) and cut slits 1/4" down from the lines before welding on the lines, I also welded across the top for a little more support.

This is very easy to layout if you use one of those sliding paper cutters.

It took about 1 1/2 hours to do and will take much longer to fill the 150 spaces, and its easily expandable.

Thanks very much for the idea, keep em commin.

Rick
 

thingmaker3

Joined May 16, 2005
5,083
Here is a storage method, courtesy a now defunct magazine Electronics Today International (Jan 1973).

Their version was all sheet metal work but mine was made from thin plywood.
The tubes were plastic pill tubes, obtainable at the local chemist for £1 per hundred. Film canisters are also good.

Sorry about the scan quality.
Hmmm... my wife buys bulk beads in tubes... I've even used them as parts storage in the past...
 

iONic

Joined Nov 16, 2007
1,662
Seems a bit time consuming, but very handy. Could save the effort sorting and looking for the right resistor in a hurry. If you could find Horizontally orientated zip-loc bags the right size you could save a lot of time in construction. I will be on the lookout for some now!
 
Top