Peltier Plate Current Reversing and Controlling the Current with Arduino Uno

  • Thread starter Deleted member 496780
  • Start date

Thread Starter

Deleted member 496780

Joined Dec 31, 1969
0
Buy that H bridge And I'll show you It's 8 amps and made right.
It's using a driver for tops side like Bertus said
I bought it but I'm getting it tomorrow since I need it urgently D:, so a 12V battery would be enough to supply this and a peltier plate?

If you could show me how it would be wired asap that'll be great! Thank you so much again
 

Thread Starter

Deleted member 496780

Joined Dec 31, 1969
0
You really need to post what you really want to do. links to all the parts you want to use.
I want to reverse current of peltier plate, and also with the ability to control the current so I can control only hotness once I reverse the current, or control only coldness if I did not reverse the current.

Peltier Plate: https://leeselectronic.com/en/product/73911.html

The H-Dual Bridge Motor you suggested: http://www.robotshop.com/en/dual-h-...hZjfE_z5YlB2o_UzcICMq_2LwddUU-cBoC3F8QAvD_BwE

An Arduino Uno

12V AA Batteries
https://leeselectronic.com/en/category/2559-aa
 

be80be

Joined Jul 5, 2008
2,395
The guy in the video was doing something else. The drivers going to get hot you could't run it long.
I'd get the H-bridge i posted for you.
I'll post how to hook it all up when i get home from work.
 

Thread Starter

Deleted member 496780

Joined Dec 31, 1969
0
The guy in the video was doing something else. The drivers going to get hot you could't run it long.
I'd get the H-bridge i posted for you.
I'll post how to hook it all up when i get home from work.
Thank you so much I ordered it and it's coming tomorrow
 

be80be

Joined Jul 5, 2008
2,395
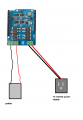
This is how you hook up the peltier and power supply
unopeltier.png

These control your peltier
Code:
  digitalWrite(6, HIGH);
  digitalWrite(4, LOW);
  digitalWrite(5, HIGH);  // Set the output current polarity
  analogWrite(9, val);    // set the output current
 
Last edited:

be80be

Joined Jul 5, 2008
2,395
Code:
I'm not sure how to program this with the Arduino would it be the exact same?
Give it a shot I'll help you fix it. Just want make sure you learn something your code you posted wasn't
bad at all.
 

Thread Starter

Deleted member 496780

Joined Dec 31, 1969
0
Code:
I'm not sure how to program this with the Arduino would it be the exact same?
Give it a shot I'll help you fix it. Just want make sure you learn something your code you posted wasn't
bad at all.
Okay! Thanks man
 

be80be

Joined Jul 5, 2008
2,395
Here the code for how a motor would work with the h-bridge.
It's there sample.
Don't get hung up on the motor you do about the same thing to use the peltier
You power the wires one side high one low and pwm the power to set how cold you want.

Code:
int i=0;
void setup() {               
  // Motor_1 controll pin initiate;
  pinMode(4, OUTPUT);    
  pinMode(5, OUTPUT);   
  pinMode(9, OUTPUT); // Speed control
 
  // Motor_2 controll pin initiate;
  pinMode(7, OUTPUT);    
  pinMode(8, OUTPUT);   
  pinMode(10, OUTPUT);  // Speed control
 
  //Enable the Motor Shield output; 
  pinMode(6, OUTPUT);
  digitalWrite(6, HIGH); 
}

void loop() { 
  digitalWrite(6, HIGH); 
  digitalWrite(4, HIGH);  
  digitalWrite(5, LOW);  // Set the rotation of motor_1
  digitalWrite(7, HIGH); 
  digitalWrite(8, LOW);  // Set the rotation of motor_2
  for(i=20;i<250;i=i+5)
{
      analogWrite(9,i);    // set the motor_1 speed ;
      analogWrite(10,i);    // set the motor_2 speed ;
      delay(200);
}
  Serial.println("stop 3s");
  digitalWrite(6, LOW); 
   analogWrite(9,0);    // set the motor_1 speed ;
  analogWrite(10,0);    // set the motor_2 speed ;
  digitalWrite(4, LOW);  
  digitalWrite(5, HIGH);  // Set the rotation of motor_1
  digitalWrite(7, LOW); 
  digitalWrite(8, HIGH);  // Set th  e rotation of motor_2
  delay(3000);

  digitalWrite(6, HIGH); 
  digitalWrite(4, LOW);  
  digitalWrite(5, HIGH);  // Set the rotation of motor_1
  digitalWrite(7, LOW); 
  digitalWrite(8, HIGH);  // Set the rotation of motor_2
  for(i=20;i<250;i=i+5)
  {
      analogWrite(9,i);    // set the motor_1 speed ;
      analogWrite(10,i);    // set the motor_2 speed ;
      delay(200);
  }
    Serial.println("stop 3s");
  digitalWrite(6, LOW); 
   analogWrite(9,0);    // set the motor_1 speed ;
  analogWrite(10,0);    // set the motor_2 speed ;
  digitalWrite(4, LOW);  
  digitalWrite(5, HIGH);  // Set the rotation of motor_1
  digitalWrite(7, LOW); 
  digitalWrite(8, HIGH);  // Set th  e rotation of motor_2
  delay(3000);
    
}
 

Thread Starter

Deleted member 496780

Joined Dec 31, 1969
0
Here the code for how a motor would work with the h-bridge.
It's there sample.
Don't get hung up on the motor you do about the same thing to use the peltier
You power the wires one side high one low and pwm the power to set how cold you want.

Code:
int i=0;
void setup() {            
  // Motor_1 controll pin initiate;
  pinMode(4, OUTPUT); 
  pinMode(5, OUTPUT);
  pinMode(9, OUTPUT); // Speed control

  // Motor_2 controll pin initiate;
  pinMode(7, OUTPUT); 
  pinMode(8, OUTPUT);
  pinMode(10, OUTPUT);  // Speed control

  //Enable the Motor Shield output;
  pinMode(6, OUTPUT);
  digitalWrite(6, HIGH);
}

void loop() {
  digitalWrite(6, HIGH);
  digitalWrite(4, HIGH);
  digitalWrite(5, LOW);  // Set the rotation of motor_1
  digitalWrite(7, HIGH);
  digitalWrite(8, LOW);  // Set the rotation of motor_2
  for(i=20;i<250;i=i+5)
{
      analogWrite(9,i);    // set the motor_1 speed ;
      analogWrite(10,i);    // set the motor_2 speed ;
      delay(200);
}
  Serial.println("stop 3s");
  digitalWrite(6, LOW);
   analogWrite(9,0);    // set the motor_1 speed ;
  analogWrite(10,0);    // set the motor_2 speed ;
  digitalWrite(4, LOW);
  digitalWrite(5, HIGH);  // Set the rotation of motor_1
  digitalWrite(7, LOW);
  digitalWrite(8, HIGH);  // Set th  e rotation of motor_2
  delay(3000);

  digitalWrite(6, HIGH);
  digitalWrite(4, LOW);
  digitalWrite(5, HIGH);  // Set the rotation of motor_1
  digitalWrite(7, LOW);
  digitalWrite(8, HIGH);  // Set the rotation of motor_2
  for(i=20;i<250;i=i+5)
  {
      analogWrite(9,i);    // set the motor_1 speed ;
      analogWrite(10,i);    // set the motor_2 speed ;
      delay(200);
  }
    Serial.println("stop 3s");
  digitalWrite(6, LOW);
   analogWrite(9,0);    // set the motor_1 speed ;
  analogWrite(10,0);    // set the motor_2 speed ;
  digitalWrite(4, LOW);
  digitalWrite(5, HIGH);  // Set the rotation of motor_1
  digitalWrite(7, LOW);
  digitalWrite(8, HIGH);  // Set th  e rotation of motor_2
  delay(3000);
 
}
Is there anything I should be aware to prevent from damaging the peltier plate in the code??
Here the code for how a motor would work with the h-bridge.
It's there sample.
Don't get hung up on the motor you do about the same thing to use the peltier
You power the wires one side high one low and pwm the power to set how cold you want.

Code:
int i=0;
void setup() {              
  // Motor_1 controll pin initiate;
  pinMode(4, OUTPUT);   
  pinMode(5, OUTPUT);  
  pinMode(9, OUTPUT); // Speed control

  // Motor_2 controll pin initiate;
  pinMode(7, OUTPUT);   
  pinMode(8, OUTPUT);  
  pinMode(10, OUTPUT);  // Speed control

  //Enable the Motor Shield output;
  pinMode(6, OUTPUT);
  digitalWrite(6, HIGH);
}

void loop() {
  digitalWrite(6, HIGH);
  digitalWrite(4, HIGH); 
  digitalWrite(5, LOW);  // Set the rotation of motor_1
  digitalWrite(7, HIGH);
  digitalWrite(8, LOW);  // Set the rotation of motor_2
  for(i=20;i<250;i=i+5)
{
      analogWrite(9,i);    // set the motor_1 speed ;
      analogWrite(10,i);    // set the motor_2 speed ;
      delay(200);
}
  Serial.println("stop 3s");
  digitalWrite(6, LOW);
   analogWrite(9,0);    // set the motor_1 speed ;
  analogWrite(10,0);    // set the motor_2 speed ;
  digitalWrite(4, LOW); 
  digitalWrite(5, HIGH);  // Set the rotation of motor_1
  digitalWrite(7, LOW);
  digitalWrite(8, HIGH);  // Set th  e rotation of motor_2
  delay(3000);

  digitalWrite(6, HIGH);
  digitalWrite(4, LOW); 
  digitalWrite(5, HIGH);  // Set the rotation of motor_1
  digitalWrite(7, LOW);
  digitalWrite(8, HIGH);  // Set the rotation of motor_2
  for(i=20;i<250;i=i+5)
  {
      analogWrite(9,i);    // set the motor_1 speed ;
      analogWrite(10,i);    // set the motor_2 speed ;
      delay(200);
  }
    Serial.println("stop 3s");
  digitalWrite(6, LOW);
   analogWrite(9,0);    // set the motor_1 speed ;
  analogWrite(10,0);    // set the motor_2 speed ;
  digitalWrite(4, LOW); 
  digitalWrite(5, HIGH);  // Set the rotation of motor_1
  digitalWrite(7, LOW);
  digitalWrite(8, HIGH);  // Set th  e rotation of motor_2
  delay(3000);
   
}
Sorry to bother but I need urgent help :// since this project is almost due how would I make it so that the power goes to the peltier plate until I turn off the system?
 

wayneh

Joined Sep 9, 2010
18,181
Is there anything I should be aware to prevent from damaging the peltier plate in the code??
I haven't looked at the code at all but I'd be nervous about switching current direction at full power, because of the potential for thermal shock that might damage the TEC. I don't know how serious a problem this is and have no recommendation for the proper time to allow between switching states. It just seems to me that a time of zero might be a problem.
 

be80be

Joined Jul 5, 2008
2,395
wayneh I'm with you on that.
I've looked not found much telling a set time.
This is what I have found you read the plate temp and when it's at it normal state
you switch the current.
http://www.analog.com/media/en/tech...cles/37488110918229TEC_Application_Brief2.pdf

There using Temperature Acquisition and Closed-loop Control

First off make sure you hook it up Like i showed in post 49

I'll post you code to test that and then you can go from there.

Don't run the code you posted you want test it first.
 
Last edited:

Thread Starter

Deleted member 496780

Joined Dec 31, 1969
0
wayneh I'm with you on that.
I've looked not found much telling a set time.
This is what I have found you read the plate temp and when it's at it normal state
you switch the current.
http://www.analog.com/media/en/tech...cles/37488110918229TEC_Application_Brief2.pdf

There using Temperature Acquisition and Closed-loop Control

First off make sure you hook it up Like i showed in post 49

I'll post you code to test that and then you can go from there.

Don't run the code you posted you want test it first.
Thanks man I appreciate it
 

be80be

Joined Jul 5, 2008
2,395
This is all you need to use for the one h-bridge on A
It stops 3 seconds between changes you maybe need more time.

Code:
int i=0;
void setup() {            
  // TEC112703  controll pin initiate;
  pinMode(4, OUTPUT);
  pinMode(5, OUTPUT);
  pinMode(9, OUTPUT); // Speed control
//Enable the Motor Shield output;
  pinMode(6, OUTPUT);
  digitalWrite(6, HIGH);
}
void loop() {
  digitalWrite(6, HIGH);
  digitalWrite(4, HIGH);
  digitalWrite(5, LOW);  // Set the current direction of TEC112703
   for(i=20;i<250;i=i+5)
{
      analogWrite(9,i);    // set the current of TEC112703
   
      delay(200);
}
  Serial.println("stop 3s");
  digitalWrite(6, LOW);//Turns it all off
   analogWrite(9,0);    //  Set the current direction of TEC112703

  digitalWrite(4, LOW);
  digitalWrite(5, HIGH);  //  Set the current direction of TEC112703
  delay(3000);
  digitalWrite(6, HIGH);
  digitalWrite(4, LOW);
  digitalWrite(5, HIGH);  // set the current of TEC112703
  for(i=20;i<250;i=i+5)
  {
      analogWrite(9,i);    //  set the current of TEC112703
     delay(200);
  }
    Serial.println("stop 3s");
  digitalWrite(6, LOW);
   analogWrite(9,0);    // set the current of TEC112703
  digitalWrite(4, LOW);
  digitalWrite(5, HIGH);  // set the current of TEC112703
delay(3000);
}
 

Thread Starter

Deleted member 496780

Joined Dec 31, 1969
0
This is all you need to use for the one h-bridge on A
It stops 3 seconds between changes you maybe need more time.

Code:
int i=0;
void setup() {           
  // TEC112703  controll pin initiate;
  pinMode(4, OUTPUT);
  pinMode(5, OUTPUT);
  pinMode(9, OUTPUT); // Speed control
//Enable the Motor Shield output;
  pinMode(6, OUTPUT);
  digitalWrite(6, HIGH);
}
void loop() {
  digitalWrite(6, HIGH);
  digitalWrite(4, HIGH);
  digitalWrite(5, LOW);  // Set the current direction of TEC112703
   for(i=20;i<250;i=i+5)
{
      analogWrite(9,i);    // set the current of TEC112703
  
      delay(200);
}
  Serial.println("stop 3s");
  digitalWrite(6, LOW);//Turns it all off
   analogWrite(9,0);    //  Set the current direction of TEC112703

  digitalWrite(4, LOW);
  digitalWrite(5, HIGH);  //  Set the current direction of TEC112703
  delay(3000);
  digitalWrite(6, HIGH);
  digitalWrite(4, LOW);
  digitalWrite(5, HIGH);  // set the current of TEC112703
  for(i=20;i<250;i=i+5)
  {
      analogWrite(9,i);    //  set the current of TEC112703
     delay(200);
  }
    Serial.println("stop 3s");
  digitalWrite(6, LOW);
   analogWrite(9,0);    // set the current of TEC112703
  digitalWrite(4, LOW);
  digitalWrite(5, HIGH);  // set the current of TEC112703
delay(3000);
}


My code
Code:
int i=0;
void setup() {           
  // TEC112703  controll pin initiate;
  pinMode(4, OUTPUT);
  pinMode(5, OUTPUT);
  pinMode(9, OUTPUT); // Speed control
//Enable the Motor Shield output;
  pinMode(6, OUTPUT);
  digitalWrite(6, HIGH);
  Serial.begin(9600);
  digitalWrite(4, LOW);
  digitalWrite(5, LOW);
}
void loop() {
  char option;
  Serial.print("please input a voltage\n");
  if(Serial.available())
{
  digitalWrite(6, HIGH);
 
  option = Serial.read();
 
  if(option == 'a')
  {
   digitalWrite(5, LOW);
   digitalWrite(4, LOW);
   digitalWrite(6, LOW);
   analogWrite(9,0);
   delay(5000);
   digitalWrite(6, HIGH);
   delay(2000);
    digitalWrite(4, HIGH);
    digitalWrite(5, LOW);  // Set the current direction of TEC112703
     for(i=20;i<200;i=i+5)
    {
        analogWrite(9,i);    // set the current of TEC112703
        delay(500);
    }
  }
 

  else if(option == 'c')
  {
      digitalWrite(5, LOW);
      digitalWrite(4, LOW);
      digitalWrite(6, LOW);
      analogWrite(9,0);
      delay(5000);
     digitalWrite(6, HIGH);
     delay(2000);
     digitalWrite(4, LOW);
     digitalWrite(5, HIGH);
     for(i=20;i<200;i=i+5)
    {
        analogWrite(9,i);    // set the current of TEC112703
        delay(500);
    }
  
  }
}
It's not working as expected, I want the user to be able to input a or c. A is for hot. C would be for cold

I want to make sure that it doesnt break my peltier plate
 

be80be

Joined Jul 5, 2008
2,395
What did it do not working means nothing
that code just runs cool then hot for 3 sec.
I don't have one to test with.
 
Top