LM675 non-inverting gain amplifier not working

Thread Starter

jolene998

Joined Sep 3, 2021
7
Hi all. I'm currently using the LM675 from TI to construct a non-inverting gain amplifier. I'm currently using the non-inverting gain amplifier schematics provided in the datasheet.

1630702235975.png
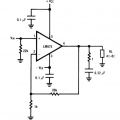
For the +Vcc and -Vee, I'm powering it via two 24V DC power supplies connected in series, hence giving me +24V and-24V respectively. Hence because I'm directly connecting the power rails to the 24V DC power supplies, I didn't include the 0.1microFarad capacitors (as seen in the picture above). For Vin, I'm using my Arduino DUE to supply a 40kHz square wave( from Vmin= -2.72V to Vmax= 2.72V). I'm hoping to amplify this 2.72V input to a higher voltage (preferably to about 20V).

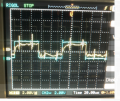
This is the output that I'm getting (measured by my oscilloscope at pin 4(from the figure above), referenced to ground (from the arduino). I'm not sure why my output signal is smaller than my input signal of 2.72V from the Arduino. I've double checked the input signal (from the Arduino), and it is giving me the correct signal.

1630703018395.png

I've also realized that this output (from the picture above), does not seem to change whether or not the two 24V DC power supplies are turned on. Does this mean that there's an issue with the way I connected my power rails?

Any help would be much appreciated, thank you.
 

Attachments

Papabravo

Joined Feb 24, 2006
21,159
You have several errors:
  1. The capacitors are meant to decouple the power supply pins from any high frequency noise which might affect the opamp output. You have no valid reason to ignore them.
  2. You have not specified the relationship between opamp ground where the bypass capacitors and the 1K & 22K resistors are connected, and the Arduino ground. Hint: they should be the same point electrically.
  3. I wonder how an Arduino can produce a 5.4 VP-P signal, centered on ground (± 2.72 volts).
  4. Did you AC couple a 0-5V signal to the opamp input
  5. Since you copied and pasted a "partial schematic" instead of drawing a complete one with reference designators, I'm going to guess that you have wiring errors.
Doing electronics requires a level of care, precision, and skill. These traits must be learned, they cannot be absorbed by osmosis.
Only by looking at a COMPLETE schematic of what you have built can we hope to help you troubleshoot this problem.
 

panic mode

Joined Oct 10, 2011
2,715
first of all why are you using such high frequency? this thing is meant for <=20kHz analog, not 500kHZ digital. digital has much steeper slopes.

next, what load is connected to it?

and why don't you compare input and output wave forms?

finally how are you generating the negative voltage with Arduino?
 

Thread Starter

jolene998

Joined Sep 3, 2021
7
You have several errors:
  1. The capacitors are meant to decouple the power supply pins from any high frequency noise which might affect the opamp output. You have no valid reason to ignore them.
  2. You have not specified the relationship between opamp ground where the bypass capacitors and the 1K & 22K resistors are connected, and the Arduino ground. Hint: they should be the same point electrically.
  3. I wonder how an Arduino can produce a 5.4 VP-P signal, centered on ground (± 2.72 volts).
  4. Did you AC couple a 0-5V signal to the opamp input
  5. Since you copied and pasted a "partial schematic" instead of drawing a complete one with reference designators, I'm going to guess that you have wiring errors.
Doing electronics requires a level of care, precision, and skill. These traits must be learned, they cannot be absorbed by osmosis.
Only by looking at a COMPLETE schematic of what you have built can we hope to help you troubleshoot this problem.
Hi. Thank you for your response, I appreciate your time.

1. okay, I'll implement these capacitors to my circuit.
2. yes, in regards to the 1k and 22k resistors are connected, I've followed exactly like the circuit above and they are all connected to the common ground of the arduino
3. I'm using the Arduino Due digital pwm port (port7) to generate the 5.4 VP-P signal. This is what it looks like.
1630705039183.png
4. Do you mean by adding a coupling capacitor ? No I have not included that. Thanks for the suggestion. It was not put inside the circuit (from the datasheet), so I didn't know that it was necessary.
5. Regarding the wiring errors, I crossed checked it and I'm quite sure that wiring issue are not causing the problem.
 

Thread Starter

jolene998

Joined Sep 3, 2021
7
first of all why are you using such high frequency? this thing is meant for <=20kHz analog, not 500kHZ digital. digital has much steeper slopes.

next, what load is connected to it?

and why don't you compare input and output wave forms?

finally how are you generating the negative voltage with Arduino?
hi. Thank you for your reply.

1. Even after trying with a lower frequency (10kHz) from my Arduino, the output from the amplifier is still not correct. Btw, the 500kHz that you're referring to is from the output of the LM675 amplifier, not my signal input. I'm not sure why its giving me such a high frequency.

2. There currently isn't any load connected to it yet, I'm just measuring the output of the amplifier using a digital oscilloscope, would this cause any issues in reading my output?

3. The blue one is the input, whereas the yellow is the output from the amplifier. I'm sorry for not including this earlier.
1630706449500.png
4. As mentioned, I'm using the digital pwm port from the Arduino due to supply a 40kHz square wave signal.

Thanks for your time
 

Attachments

Papabravo

Joined Feb 24, 2006
21,159
I don't have a model of the LM675, so I picked one that I did have and put together a simulation highlighting some of the points in post #2
Power supply voltages are ±18 volts. C1 & C2 are they bypass capacitors and the have little or no effect on the simulation. They are important in actual circuits. Because my supply voltages are less than yours I had to limit the input, Vi, to 0-1.5V, which AC coupled gives ≈ ±750mV at the non-inverting input, which you can see in the green trace.
V3 is a voltage source which puts out a square wave of frequency 500 Hz, and simulates the Arduino digital output. This parameter can be changed to run simulations at different frequencies as required.


1630707808776.png±
 

Audioguru again

Joined Oct 21, 2019
6,673
Your 1st 'scope photo shows the amplifier missing important stability parts and oscillating at the radio frequency of 500kHz.
Your 2nd 'scope photo shows 108.7kHz from an Arduino.
Your 3ed 'scope photo shows 40kHz.
Why is your frequency so high and what is the load resistance?
 

Thread Starter

jolene998

Joined Sep 3, 2021
7
Your 1st 'scope photo shows the amplifier missing important stability parts and oscillating at the radio frequency of 500kHz.
Your 2nd 'scope photo shows 108.7kHz from an Arduino.
Your 3ed 'scope photo shows 40kHz.
Why is your frequency so high and what is the load resistance?
Thank you for your reply.

Even after adding the circuitry (like suggested by papabravo), I'm still getting the same outputs and there are no improvements in terms of my amplifier output. I'm really not sure what I'm doing wrong at this point.

Yes, my 2nd scope photo was trying to show the input that I'm feeding into my amplifier as it was asked how I managed to generate a +-ve supply from the Arduino.

Sorry, I didnt specify that the 3rd scope photo I was trying to work with lower frequency input from the Arduino. I just wanted to show the comparison of the output and input.

For the purposes of my circuit, I'm trying to amplify 40kHz and 100kHz square waves (coming from my Arduino) by using a LM675 amplifier. Currently I'm not using any load, I'm just connecting the oscilloscope to pin 4 (output) of the amplifier , referenced to common ground with the arduino. I'm really sorry if its a stupid question, but would the absence of a load or the high frequencies cause an issue with my amplifier output?

I'm sorry if the mistakes that I'm making are really stupid, I'm trying my best to learn and I deeply appreciate all the help that I can get. Thank you.
 

Papabravo

Joined Feb 24, 2006
21,159
I decided to look for an LM675 model to convince you that this is the wrong part for your application. With a gain of 21-22, the output no longer looks like the input because the output is slew rate limited. The gain is not what you want it to be either. The swing is no longer symmetrical about 0 VDC because the input signal is just to fast for it to keep up. You want an opamp with a faster slew rate AND a higher GBW (Gain Bandwidth Product)

1630727902854.png
 
Last edited:

Audioguru again

Joined Oct 21, 2019
6,673
Repeat; Why are your input frequencies to the LM675 amplifier so darn high? What load will it have for those frequencies?
Did you add the important zobel network to the output as on the datasheet (1 ohm and 0.22uF ceramic capacitor)?
Did you try it at a much lower frequency that it works with (the LM675 is spec'd to have a power bandwidth of 75kHz then it should produce a fairly good 7.5kHz squarewave)?
Did you build the circuit neatly on a proper pcb or in a mess of wires all over the place on a solderless breadboard?
 

Papabravo

Joined Feb 24, 2006
21,159
Repeat; Why are your input frequencies to the LM675 amplifier so darn high? What load will it have for those frequencies?
Did you add the important zobel network to the output as on the datasheet (1 ohm and 0.22uF ceramic capacitor)?
Did you try it at a much lower frequency that it works with (the LM675 is spec'd to have a power bandwidth of 75kHz then it should produce a fairly good 7.5kHz squarewave)?
Did you build the circuit neatly on a proper pcb or in a mess of wires all over the place on a solderless breadboard?
As you might expect, those components don't make the waveforms at 108.7 kHz look any better. More like an exponentially shaped asymmetrical triangle wave. Yeeech!
 

Thread Starter

jolene998

Joined Sep 3, 2021
7
I decided to look for an LM675 model to convince you that this is the wrong part for your application. With a gain of 21-22, the output no longer looks like the input because the output is slew rate limited. The gain is not what you want it to be either. The swing is no longer symmetrical about 0 VDC because the input signal is just to fast for it to keep up. You want an opamp with a faster slew rate AND a higher GBW (Gain Bandwidth Product)

View attachment 247227
hi. But even with trying the circuit under lower frequencies, I'm not getting the correct output. So I don't really understand what you mean by the signal is too fast for my amplifier to catch up.

for the application to amplify signals that are from the 40kHz- 100kHz, what properties should I be looking out for when searching for a more suitable amplifier? Such as, what value of slew rate and gain bandwidth product should I be aim for? I'm not really sure how to relate these values to cater for my signal processing needs. Again, I'm sorry for the stupid questions, I'm trying my best to learn.
 

Thread Starter

jolene998

Joined Sep 3, 2021
7
Repeat; Why are your input frequencies to the LM675 amplifier so darn high? What load will it have for those frequencies?
Did you add the important zobel network to the output as on the datasheet (1 ohm and 0.22uF ceramic capacitor)?
Did you try it at a much lower frequency that it works with (the LM675 is spec'd to have a power bandwidth of 75kHz then it should produce a fairly good 7.5kHz squarewave)?
Did you build the circuit neatly on a proper pcb or in a mess of wires all over the place on a solderless breadboard?
As replied previously, the signal is used to drive an ultrasonic transducer.
Yes, I did add that important zobel network.
Yes, I also tried with much lower frequencies like you suggested, but it is still not working
Yes, it is soldered onto a veroboard.
 

Papabravo

Joined Feb 24, 2006
21,159
The goal of an amplifier is to produce an output, which looks like the input signal, but at a higher amplitude. When an amplifier is unable to do this it becomes something else. What I mean is for you to look at the simulation waveforms and tell me if you think the output waveform looks like the input square wave at a frequency of 108.7 kHz. there are many reasons for this behavior associated with too much gain, too high a frequency, and a limited slew rate. A forum post is not really a good vehicle for understanding basic concepts.

With respect to the actual circuit that you constructed not working, I believe that is due to a wiring, construction, or component error, as I mentioned in my original post.

When faced with multiple simultaneous problems you have to attack them one at a time. Divide and conquer.
 

Audioguru again

Joined Oct 21, 2019
6,673
ALL transducers have a type (dynamic or piezo) and an impedance. Yours has neither.
With an input squarewave of 0.5V peak, show the input and output waveforms and voltages at 1kHz and a 100 ohms 2W resistor as a load. The output should be a perfect squarewave at 21Vp-p.
Show a photo of the veroboard circuit.

A 100kHz squarewave needs an amplifier that can produce at least 10 times higher (1MHz) at the gain and output level you need. An audio power amplifier cannot do it.
 

eetech00

Joined Jun 8, 2013
3,859
I decided to look for an LM675 model to convince you that this is the wrong part for your application. With a gain of 21-22, the output no longer looks like the input because the output is slew rate limited. The gain is not what you want it to be either. The swing is no longer symmetrical about 0 VDC because the input signal is just to fast for it to keep up. You want an opamp with a faster slew rate AND a higher GBW (Gain Bandwidth Product)

View attachment 247227
Why is the input biased at 1/2 supply?
 
Last edited:

Papabravo

Joined Feb 24, 2006
21,159
Why is the input biased at 1/2 supply?
It is not at 1/2 of the supply voltage. It is at:

\( \dfrac{Vcc\;+\;Vee}{2}\;\approx\;0 \)

We have a bipolar supply of ±18 or ±24 depending on which simulation you're looking at. The input is biased at approximately DC ground. That is because the input signal is supposed to be 5.4 VP-P or ± 2.72 V. The input signal coming from an Arduino is 0-5.4 V and so AC coupling is indicated. It does take a few cycles for the input to get to it's steady state level, but I'm thinking that this is a minor concern. Certainly you would not want to have a 5.4V signal going into an amplifier with a gain of 21.

EDIT: In simulations I have a habit of using positive supply voltages and orienting the symbol in such a way that the + end of the voltage source is connected to GND, and the - end of the voltage source is connected to the device. Sorry for the confusion. Putting the GND symbol between two voltage sources is supposed to be the tipoff.
 
Last edited:
Top