Facebook
 Google
 GitHub
 Linkedin

This is part of a series of articles "Let’s talk about series that can be found in my index." Since as a moderator I can insert my post to make them contiguous. If you comment before I am finished I will wait until It is convenient, to reply.
Wendy's Index.
What is constant current?
It uses a regulator similar to a voltage regulator, except as the name suggests, it will vary the voltage to create a fixed current in a load. As with voltage regulators it breaks down when power supply limits are reached. I will use the cc symbol to show a trace where the cc condition exist, it might also be used to show the circuit and its function.
The standard symbols for a constant current circuits have some variation (similar to the EU and USA symbols for resistors) so I will use this one.
F1,,,,,,,,,,,,,,,,,,,,,,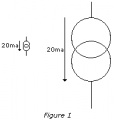
I have picked 20ma because that is my standard personal default value for 5mm LEDs. That will be my goal for all the circuits I will show hereafter.
Because I am planning on introducing another design that has been forming in my head I am going to create a new symbol. I will explain why later.
F2,,,,,,,,,,,,,,,,,,,,,,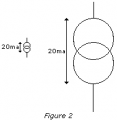
I will add these symbols to my PD schematic drawing tool called PaintCAD which can be found here.
Conventional current Flow vs. Electron Current Flow
The arrow shows the direction of current. Most CC circuits only regulate current in one direction. There are exceptions, which is why I made the dual facing arrow symbol. In this case I went with the Conventional Current flow standard.
The built in Constant Current in Op Amps
Figure 3 shows a typical classic op amp circuit. Virtual ground is a key concept in these circuits because the + input is forced by the output of the op amp to match the - input. An interesting thing happens with this circuit as the current in R feedback is forced to match the current in R Input, to the limits of the op amps ability.
F3,,,,,,,,,,,,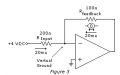
Using Constant Current to Charge Capacitors
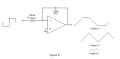
Something interesting happens when you charge a capacitor with a Constant Current Source. The charge becomes linear, instead of the classic log function of an RC circuit. It does something similar when used on inductors. Anyone who is interested in the math can review this thread.This means we can create sweep functions as was used in older TVs and oscilloscopes. It also, when used with Op Amps becomes a true calculus derivative function. This can be quite handy if you are making an analog computer. This was used before digital computers overtook analog computers for math calculations. Figure 4 shows an example of such a circuit.
F4,,,,,,,,,,,,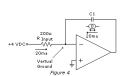
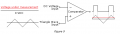
It still is very useful in electronics today. For example, turning a triangle wave into a sine wave is fairly straight forward. Many analog to digital conversion methods rely on translating a fixed analog voltage into a digital pulse whose duration is directly equivalent to an input voltage. This is called a dual slope to digital convertor, and is the heart of most digital voltmeters. It can do a similar conversion. In measuring the value of a capacitance or inductance by converting these values into a pulse whose duration is directly proportional to these values. I will show examples later in this article. Figure 5 shows a Square/triangle wave generator.
F5,,,,,,,,,,,,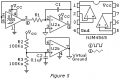
Note the phase relationships shown in the drawing. This is accurate. The 7555 changes state when the output of the op amp integrator reaches 1/3 or 2/3 of Vcc.
Examples of Constant Current Sources
I will show some examples of constant current sinks and sources. Whether a constant current regulator is a sink or source is a matter of perspective. The voltage that all the other voltages are referenced to is called ground. My personal preference is the negative side of the power source, this bias is reflected in many of my schematics. A current source limits the current from the voltage source to the load. A current sink limits the current going to ground. Polarity of the power supply is fairly irrelevant.
BJT Constant Current Regulators
Figure 6 show the Classic Current Mirror, it uses a little used theory for biasing a Bipolar Junction Transistor (BJT), that of the BE responding to a fixed voltage. In this case the voltage set by a fixed current in Q1 cause a mirror current in Q2.
This concept will work, but I would advise against using it. It is frequently used by IC (integrated circuit) designers because two transistors on the same die are very close to being the same electrically and are very close to being the same temperature. Both being very critical to the concept. The variation in temperature can lead to thermal runaway. Getting two matched transistors can also be a problem. Typically transistors can have significant variations, even within the same part number family.
F6,,,,,,,,,,,,,,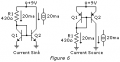
Common Emitter Current Regulators
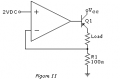
Though the circuit shown in Figure 7 may resembles a Common Collector design the fact that the load will be on the collector puts it firmly in the Common Emitter configuration. A stable fixed voltage on the base will create a very stable constant current regulator. It has the distinct advantage of being able to handle very large currents if the transistor is rated for the loads. I have used a variation of this circuit to create an electronic load to test power supplies.
F7,,,,,,,,,,,,,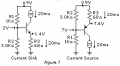
Wendy's Index.
What is constant current?
It uses a regulator similar to a voltage regulator, except as the name suggests, it will vary the voltage to create a fixed current in a load. As with voltage regulators it breaks down when power supply limits are reached. I will use the cc symbol to show a trace where the cc condition exist, it might also be used to show the circuit and its function.
The standard symbols for a constant current circuits have some variation (similar to the EU and USA symbols for resistors) so I will use this one.
F1,,,,,,,,,,,,,,,,,,,,,,
I have picked 20ma because that is my standard personal default value for 5mm LEDs. That will be my goal for all the circuits I will show hereafter.
Because I am planning on introducing another design that has been forming in my head I am going to create a new symbol. I will explain why later.
F2,,,,,,,,,,,,,,,,,,,,,,
I will add these symbols to my PD schematic drawing tool called PaintCAD which can be found here.
Conventional current Flow vs. Electron Current Flow
The arrow shows the direction of current. Most CC circuits only regulate current in one direction. There are exceptions, which is why I made the dual facing arrow symbol. In this case I went with the Conventional Current flow standard.
The built in Constant Current in Op Amps
Figure 3 shows a typical classic op amp circuit. Virtual ground is a key concept in these circuits because the + input is forced by the output of the op amp to match the - input. An interesting thing happens with this circuit as the current in R feedback is forced to match the current in R Input, to the limits of the op amps ability.
F3,,,,,,,,,,,,
Using Constant Current to Charge Capacitors
Something interesting happens when you charge a capacitor with a Constant Current Source. The charge becomes linear, instead of the classic log function of an RC circuit. It does something similar when used on inductors. Anyone who is interested in the math can review this thread.This means we can create sweep functions as was used in older TVs and oscilloscopes. It also, when used with Op Amps becomes a true calculus derivative function. This can be quite handy if you are making an analog computer. This was used before digital computers overtook analog computers for math calculations. Figure 4 shows an example of such a circuit.
F4,,,,,,,,,,,,
It still is very useful in electronics today. For example, turning a triangle wave into a sine wave is fairly straight forward. Many analog to digital conversion methods rely on translating a fixed analog voltage into a digital pulse whose duration is directly equivalent to an input voltage. This is called a dual slope to digital convertor, and is the heart of most digital voltmeters. It can do a similar conversion. In measuring the value of a capacitance or inductance by converting these values into a pulse whose duration is directly proportional to these values. I will show examples later in this article. Figure 5 shows a Square/triangle wave generator.
F5,,,,,,,,,,,,
Note the phase relationships shown in the drawing. This is accurate. The 7555 changes state when the output of the op amp integrator reaches 1/3 or 2/3 of Vcc.
Examples of Constant Current Sources
I will show some examples of constant current sinks and sources. Whether a constant current regulator is a sink or source is a matter of perspective. The voltage that all the other voltages are referenced to is called ground. My personal preference is the negative side of the power source, this bias is reflected in many of my schematics. A current source limits the current from the voltage source to the load. A current sink limits the current going to ground. Polarity of the power supply is fairly irrelevant.
BJT Constant Current Regulators
Figure 6 show the Classic Current Mirror, it uses a little used theory for biasing a Bipolar Junction Transistor (BJT), that of the BE responding to a fixed voltage. In this case the voltage set by a fixed current in Q1 cause a mirror current in Q2.
This concept will work, but I would advise against using it. It is frequently used by IC (integrated circuit) designers because two transistors on the same die are very close to being the same electrically and are very close to being the same temperature. Both being very critical to the concept. The variation in temperature can lead to thermal runaway. Getting two matched transistors can also be a problem. Typically transistors can have significant variations, even within the same part number family.
F6,,,,,,,,,,,,,,
Common Emitter Current Regulators
Though the circuit shown in Figure 7 may resembles a Common Collector design the fact that the load will be on the collector puts it firmly in the Common Emitter configuration. A stable fixed voltage on the base will create a very stable constant current regulator. It has the distinct advantage of being able to handle very large currents if the transistor is rated for the loads. I have used a variation of this circuit to create an electronic load to test power supplies.
F7,,,,,,,,,,,,,
Last edited: