LED Studded Astronomy Cloak

Thread Starter

TieDyeAstronomer

Joined Oct 1, 2017
3
Hello everyone!

I’m working on project that entails adding ~150 LEDs to a cloak, to wear to a costume party being held by my astronomy club in two weeks. The LEDs will together make an astronomically correct representation of the night sky. I have no electrical experience, and I desperately need advice.

What I need to know above all else: Is this safe? I really don’t want to be bursting into flames at the party (or anywhere else)!

Any other advice or insights are extremely appreciated!

-----

Background:

I created a similar cape back in 2014. However, the fabric was just a cheap, stretchy cape from the Halloween store, and the lighting consisted of premade strands of LEDs hot-glued to the inside. It worked for Halloween, but was hardly a durable design, and even though I haven’t used it since then, one of the wires has broken and caused a strand to go dead. In addition, I had to use 4 strands of lights, so there were 4 battery packs that I had to tuck into my waistband. No good.

My goal with my current project is to create an improved, durable version, that can be used over and over again. Not only will I want to use it for the astronomy club costume party and Halloween, but also astronomical educational events, where I often work with little kids.

Though I’m an astronomer, I have absolutely no electrical experience. To give you an idea of just how new I am to this, I didn’t even know Ohm’s Law until I started researching this project a few days ago. My mom has a soldering iron and plenty of experience using it, so soldering and putting stuff together shouldn’t be a problem- but since I’m so new to circuits, I don’t know whether I’m missing some kind of fundamental flaw in the design. That’s why I’m asking here.

-----

Details:

I’ve ordered a sturdy cloak made out of canvas to be the base:
http://www.darkknightarmoury.com/p-38301-aaron-canvas-cloak.aspx

I’ll be using Through Hole LEDs, about 150 in total, most likely ordered from here:
https://www.superbrightleds.com/cat/through-hole/?view=standard
I’ll use several colors of LEDs (orange, yellow, white, and blue) to roughly represent the actual star colors.

The LEDs and wires will be attached according to this tutorial:
http://www.instructables.com/id/How-to-Make-a-Color-Changing-Lighted-Faux-Fur-Scar/
In essence, the LEDs will be poked through from the outside, secured on the backside with buttons, and then the wires will be soldered to the LED leads. The exposed parts of the wires and leads will be sealed with hot glue.

The cloak will be lined with a cotton fabric, to cover up and protect the wiring. A pocket will be sewn into the lining to hold the battery pack, as described in the Instructable.

The finishing touches of fainter objects and the Milky Way will be added to the outside using glow in the dark fabric paint.

Here’s my current understanding of the requirements of the circuit:

  1. The LEDs should be wired in parallel so that they are all the same brightness.
  2. In the Instructable they used RGB color changing LEDs, which do not require resistors. However, since I’m using regular LEDs, I will need to use resistors to make sure that the LEDs don’t burn out.
  3. The LEDs will likely have a continuous forward current of 20mA. I don’t want to quite reach that limit, so 18mA is a better target. That means I need a resistor of at least 4.5V/0.018A = 250Ω.
  4. The LEDs will most likely be too bright for my purposes. It would be ideal to make them dimmable, so I’ll need to add a potentiometer.

-----

Questions:

  1. Is it safe to have a circuit sandwiched in between layers of fabric like this?
  2. Assuming it’s safe if I do it right, are there any risks that develop if I do it wrong by mistake?
  3. Do I only need one resistor, or several?
  4. Does it matter where the resistor(s) are placed in the circuit?
  5. Can I use a potentiometer as a brightness control? If so, can I put it directly next to the battery pack so that it can be accessed from the battery pocket?
  6. Roughly how much heat will be generated, by the resistor(s) or otherwise? I live in southern Texas, and will be using the cloak primarily outside, so heat is a definite concern.
  7. What wire should I use?
  8. Will three AA batteries be sufficient as a source of power, or should I use more for the ~150 LEDs?
  9. Obviously, not every star in the sky is the same brightness…. Is there a practical way to vary the brightnesses of individual LEDs? 3 different steps in brightness would be ideal, but even two steps would help. To create that effect, would I need to have a circuit for each level of brightness, or is there some other way to do it?

-----

Photos:

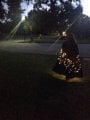
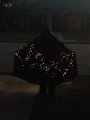
1-3. My previous cape. You can see that the LED strands were exposed on the inside.
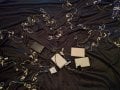
4. The inside of my previous cape.
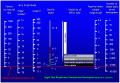
5. An example diagram of what I’m trying to do. It’s not the final design, because I haven’t figured out where to put the resistor(s) and potentiometer yet (and the locations of the stars will need to be tweaked to account for the distortion of the sky map I used, but I can’t do that until the cloak arrives).

Thank you for your time!

Clear Skies!
Lauren Herrington
 

Attachments

joeyd999

Joined Jun 6, 2011
6,279
Others will chime in here, but I want to say this: 150 LEDs at 18mA each will make you the brightest object in the universe. Or at least at the party. I think 2mA or so will probably be a much better target depending on LED color and efficiency.

This will be advantageous also WRT limiting the number of pounds of batteries you would require to shine for the duration of the party.

Edit: bursting into flames would be a heck of a Halloween party trick. If you can safety swing it, I highly recommend you consider it. :D
 

#12

Joined Nov 30, 2010
18,224
Starting with crude estimates, 150 LEDs x 0.018A x 3 volts = 8.1 watts
Something like a 50 watt incandescent bulb? I don't think so.
Halloween parties are dark. I'm thinking 5 ma to 10 ma.
Let's guess 5 hours: 5 x 150 x 10 ma x 3V =22.5 watt hours.
Add a minimum of 15% for energy wasted in the resistors = 25.875 WH
Alkaline = 110 WH/Kg
25.875/110 = .235 Kg = 235 grams
23 grams per AA battery: 235/23 = 10 batteries, or one AA per milliamp.
I prefer higher voltage because you can put several LEDs in series and use fewer resistors.
Pick your colors, find the voltages, add up some series strings, and calculate some resistors.
If we're starting with 15 volts, add up some LED voltages to about 12.75 volts per string and waste 15% of the power in a 220 ohm resistor per string.

Led voltages vary from 1.8 to 3.8 V/LED depending on color. Here's a chart:
http://oksolar.com/led/led_color_chart.htm

ps, your mileage may vary, depending on which colors you choose. You can still negotiate how much current you want to use.
 

Bernard

Joined Aug 7, 2008
5,784
I scrounged up some thoughts for discussion:
Based on a costume from last year with 30 LEDs on a hat , had 3 strings of 10 LEDs each driven
with 6V ? , with a DC-DC boost convertor set for 30 V. Here would plan for 150 LDs + Rs for 16 equiv.
of LEDs = 166 LEDs. DC V available = 30 V, ave. V / LED about 2.7 V. 30 / 2.7 = 11 LEDs / string.
166 LEDs / 11 = 15 strings. Total current = 15 strings @ 5 mA / string ( I agree with joey ) = 75 mA.
Power =.075 A X 30 V / 80 % = 2.8 W . At 6 V, 4 AA alk. = .468 A drain. Bat. @ 2000 mAh. should give about 4 h. ' think # 28 stranded wire would be OK. Return wire can be common for all strings.
Strings should be made up so that the sum of all LED v drops + a 1k ohm R = 30 V or what DC-DC can provide. 1k = 2 LEDs+-.
You will need a multi meter for any success. R = resistor. Might add a 150 ohm R in series with a 5k pot to select desired brightness of different colored LEDs & to measure V drop of LEDs.
 

philba

Joined Aug 17, 2017
959
Safe? Yes. Easy? probably not but if you're willing to give it a try...

Check out the adafruit wearables section. In particular, they have something called "sequins" that might meet your need. They would be fairly expensive (>$100) but could give you ideas as they are just an LED on a tiny board. But more importantly, they have tutorials and other info on wearables that should help you.

Good luck and feel free to ask for more help.

Phil

[edit] You might want to take a look at cosplay sites. They are big into that kind of stuff.[/edit]
 
Last edited:

dl324

Joined Mar 30, 2015
18,326
Welcome to AAC!
  • The LEDs will likely have a continuous forward current of 20mA. I don’t want to quite reach that limit, so 18mA is a better target. That means I need a resistor of at least 4.5V/0.018A = 250Ω.
  • The LEDs will most likely be too bright for my purposes. It would be ideal to make them dimmable, so I’ll need to add a potentiometer.
20mA will be overkill with ultra bright LEDs. You should determine the lowest luminous intensity you require and let that dictate battery specification. You want the battery voltage to be high enough that you can maximize the number you can have in series (which will decrease power wasted in current limiting resistors) and you want sufficient capacity to accommodate your desired operating time.

Being able to change brightness on the fly will increase complexity. Do you really need that capability?
 

Bernard

Joined Aug 7, 2008
5,784
Just a quick illustration of series parallel connection of LEDs. I spotted a DC-DC boost converter on eBay that will go to 60 V but would suggest no more than 48 V. I would allow about 10 to 12 V drop for R, A string about right, B could use a few more LEDs to = 38V. need about 10 strings.Star Vest 00000.jpg
 

Thread Starter

TieDyeAstronomer

Joined Oct 1, 2017
3
Thank you very, very much, everyone!

-----

LEDs:

I had no idea 18mA LEDs would be so bright!! I was trying to estimate based on mcd, so I just looked at the LEDs with the lowest mcd on this website : https://www.superbrightleds.com/cat/through-hole/?view=standard (mcd values of 100 and 20mA forward currents) and figured those would be around indicator LED brightness. (Though maybe I should have taken into account the website name of “Super Bright LEDs”- as they say, hindsight is 20/20!)

After further research, it seems like 50mcd is a better target for the LEDs, maximum? I just want it to be visible (during twilight) that the lights are glowing, not too bright or obtrusive. After all, the stars in the night sky are faint, and we astronomers are sensitive about our eyes- take a too-bright light to an astronomy event, and you just might get lynched! (Though I will admit you could be on to something there, joeyd999; a quasar cape would certainly make an impact! :) ) Lower mA is great too- I definitely don’t want to lug around 20 batteries.

The question then becomes how to find the proper LEDs- seeing as for the design it’s pretty important for them to be through-hole LEDs, and they’ll also need to be able to ship quickly so that I can get them at least a few days before the party. (Unless there’s some kind of a physical store that would stock them- I doubt it, but if one of you has knowledge to the contrary, I’m all ears!) Otherwise, any recommendations for where to get them?

It’s looking at this point like I should probably not bother with trying to have different star colors, except for maybe handpicking a few LEDs to represent the stars that are known for their intense color (Betelgeuse, Antares, and a few others). That way I don’t have to worry about finding different color LEDs that match, and anyhow I need to remind myself to keep it simple!

-----

@Bernard: Ok, so I’ll admit I’m having some trouble wrapping my head around what you said, and I have several questions. If I understand correctly, you’re suggesting a boost converter to increase voltage. That would mean that I can use fewer batteries, right? Is the DC-DC boost converter you mentioned the same as what joeyd999 linked to?

What’s the purpose of using multiple strands, rather than one large strand?

Why will I need a multimeter for success?

Also, is it better to wire the LEDs in series or in parallel?

Thank you very much for the illustration!

@philba, Easy, it certainly will not be! Fortunately, I’m pretty stubborn. :).Those sequins would be a nice solution, but the cost is prohibitive. The information section of the site is a goldmine, though!!! Thanks so much for linking it!!

@dl324 I don’t really need being able to change brightness on the fly; it’s one of those things that is worth it if it’s easy to implement, but if it’s complex to implement is not worth it. The ability to change the brightness would come in handy so that I can adjust the LEDs to the lighting situation, but otherwise I’ll just configure it so that the LEDs are optimum for a deep twilight.

Thanks for all the help, and Clear skies!
Lauren Herrington
 

Bernard

Joined Aug 7, 2008
5,784
How bright is bright ? 5 mm white LED, @ 3mA casts a circle on celling, about 5', 1 mA, 2.8V, still too bright, 400 uA. about right.
If you had a meter you could do this. 4 NiMH, AA, 680 ohm in series with 5k pot., measured with Heathkit MM1 multi meter ( 60 years old ).
DC-DC boost is a module, other is an IC. More tomorrow.
 

philba

Joined Aug 17, 2017
959
I can't imagine doing any electronic project, no matter how simple, without a multimeter. If everything goes perfectly, you might not use it but when the project doesn't work, it's invaluable for tracking down the problem. Verifying voltages, checking current, continuity checks, getting the resistor's value when you can't remember the color code, ...

A cheap multimeter will be good enough. Even this one for < $5 will work for you. If you are in the US, a harbor freight store is probably not far away. Just verify it works before you leave the parking lot - HF has a high failure rate but a very generous exchange policy.
 
Last edited:

joeyd999

Joined Jun 6, 2011
6,279
What’s the purpose of using multiple strands, rather than one large strand?
Depending on the color, a single strand of 150 LEDs in series could require as much as 450V to get them started, even at low current. Obvious safety issue.

You want to keep each strand voltage 48V or less for safety (and this is generally a limitation anyway wrt switchers).

Is it better to wire the LEDs in series or in parallel?
You cannot put LEDs directly in parallel. Each LED would require its own current limiting resistor.

On the other hand, putting them in series guarantees each LED receives exactly the same current, thereby providing consistent brightness. You only need one current limiting resistor (or current source -- switched or otherwise) per strand.
 

Bernard

Joined Aug 7, 2008
5,784
You might look at Electronic Goldmine, # G22353, low profile, warm white, frosted, 5mm, 120 deg., 3.6V @ 25 mA LED, $ 2.50 / 50 LEDs until 10-5 17, after $4 / 50.
If you are willing to go for 1 mA ave. some brighter, some dimmer as needed, then would go for parallel arrangement with a R for each LED. Battery = 4 AA NiMH = 5 V, 2Ah.good for about 13 h / charge. Battery box from Radio shack if you still have one.
R about 2.2k for 1 mA, 1k for brighter, 4.7 for dimmer. 1/8 or 1/4 W Rs. ; from my sample white 5mm LED.
 

Thread Starter

TieDyeAstronomer

Joined Oct 1, 2017
3

@Bernard


50mcd is probably about right for the brightness. I finally found a chart that compares candelas and millicandelas to the brightness of things in the sky, so I have a better understanding now of what the various mcd numbers correspond to:

50mcd is just about the brightness of the night sky in an extremely light polluted city center. (You’d be surprised how bright that can seem when you’re in a totally dark environment.)

It seems like the mA and mcd values of an LED aren’t all that related- I could buy a 100mcd LED and a 36000mcd LED that both have 20mA forward currents ( https://www.superbrightleds.com/mor...egree-viewing-angle-800-millilumens/343/1290/ and https://www.superbrightleds.com/mor...hole-led-w-15-degree-viewing-angle/4044/8764/ ) Maybe the difference has to do with viewing angle and/or efficiency?

In any case the LEDs you suggested from Electronic Goldmine look just about perfect, and somehow manage to have a far lower price than any I’ve seen!! The cool white, warm white, and yellow LEDs are actually the perfect star colors too. Thanks for suggesting them!! I’ve emailed to ask what the mcd is since it wasn’t listed in the description, but if I don’t get a response soon I think I’ll order them anyway, because from looking at the photos I really doubt they’ll be too bright unless the photos are significantly underexposed.

I notice they do have a high mA rating, though, at 25mA. According to what #12 said, that would mean I’d need 25 AA batteries, right? That’s not good at all. Is there something I can do about this, or do I need to find other LEDs?

You suggestions of LEDs wired in parallel with individual resistors sounds really tempting- fewer batteries, longer charge, and I can add the steps in brightness. Would that use the 25mA LEDs that you suggested?

@joeyd999 Ah, that makes sense, I understand now! Thank you!

@philba Good to know, thank you!! My dad has a multimeter that I can use.

@MrChips Thanks!! That looks like it’s full of good information that can help me get a better understanding of a lot of this.

Thanks for all of your help, and Clear Skies!
Lauren Herrington
 

Attachments

Bernard

Joined Aug 7, 2008
5,784
I would use a viewing angle of 120 deg. as a minimum, 360 deg. is over kill & expensive but not much choice in between.
For me, selecting brightness is by monitoring a LED as current is changed in surroundings similar to point of use.
 

Bernard

Joined Aug 7, 2008
5,784
Did the LEDs arrive ? Do you have a source for resistors ? I have used All Electronics , 1/4 W 10 for $.65, 100 for $ 3.75.
Even with a max. rating of 25 mA, your brightness will still be in the 1 to 5 mA range.
 
Top