Excellent. The major hard part is coming up, the transfer. Be picky, have acetone ready to clean the board if you see a flaw. Some flaws will come through anyhow, minor holes in the toner can be filled with sharpies. The traces close to each other will be the problem spots, like the short you had to cut out. I use magnifying head gear, but a high res photo on a computer screen is even better.
I picked up an etching tank ET-20 from Circuit Specialists, my question is can I use Bill M's etching solution using Muriatic Acid and H2O2 in this tank or must I use Ferric Chloride or Ammonium Presulphate? The instructions are very vague! The instructions do not say you can not use other solutions! Has anyone tried this ? The kit looks pretty good and comes with a pump and heater but again no instructions on temp or much of anything. A little help PLEASE, Jim
Personally I wouldn't use muriatic acid in this etcher, unless it specifically mentions it. This stuff is really nasty overall. The acid bath requires gloves, goggles, bowl, sponge, and an apron. Well, I don't use an apron, but I'm pretty careful.
FeCl and persulfate are much gentler overall (I've only used FeCl), and the FeCl will stain everything it touches. All of them will eat metal (of course), so storage is critical.
I'm using Natriulpersulfat, Na2S2O8, and I'm quite happy with it. The only drawback is, it needs to be around 40-50°C. My etching tray is an window washer container.
I've cut the top off, and have the etchant in. Everything is place in a sauce pan with boiling water, on the stove...
So I convert my kitchen to a laboratory from time to time.
lol on the kit. conversion to lab. ok now I'm down to Ammonium Persulphate or nerds stuff ( which I have no idea where to get) lol So does any one else have any ideas? I would realy like to try Bill M's concockshion but a bit leary in this tank even though it does look like it should handle it. Does anyone else have and use this modle tank? IDEAS?
Jim
Use of all the etchants is pretty straightforward. Good nitrile gloves are pretty standard. All of the etchants work better heated. Mixing muriatic acid (available from any hardware or swimming pool supplies store) and hydrogen peroxide (available literally everywhere) heats the liquid quite nicely by itself. I used FeCl when I was a teen knowing nothing about the subject using a sharpie to draw the board. Sharpies are also good for repairs before etching. I've never used ammonium perchlorate, but I suspect it is pretty easy to use as the rest.
For tanks I use disposable tupperware. It is cheap and easy to get. This is a very hands on process, professional tanks usually use bubbles to agitate the fluid. This is called sparging, by the way. It is meant to make automated processes easier.
I hand agitate the board instead of sparging. I either hold the edges and keep the board in motion, gently move the tupperware, or use a disposable sponge. I stand there and watch it happen, it should take between 5 to 15 minutes, usually on the shorter time scale. Since my eyes are not as good as they used to be I use a magnifying head gear to keep an eye on the small detailed areas to make sure they have completely etched.
This isn't a complex process. Getting the resist firmly on the copper is the challenge, be it toner or photographic, and is usually where things go wrong if they are going to. I bought a large can of acetone at the same hardware store (Lowes) I bought the muriatic acid from. Starting from scratch is advised if it isn't right, PCB stock isn't expensive but it can add up.
Bill,
I printed out your entire tutorial and have stuided it alot. I think I'm going to try my first PCB that way. Then I will try the tank method with bubbler and heater with other chems. Thanks Jim
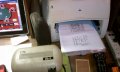
I followed the tutorial by Bill M. to the (T) and heated my laminater to 140 deg. C and couldn't get print to transfer (see attch.) Could it be my laser printer? I did get a good transfer to the wax paper! Any Ideas? Thanks Jim
OK I peeled back more of the wax paper and found about half of the circuit print after I attched photo so I"M thinkin I need more heat I'll try my other laminater and get back!
I fed the same arrangement 8 times, with my laminator turned up to max. There are projects in our completed projects where the OP pulled out the temperature regulator and bumped it up much hotter. This is where the major problem is, duration and temperature. Duration you get by feeding it through again and again, I'm not sure how to beat the temperature issue.
The other side is after you fuse the toner on you use really hot water and soak the paper for at least 5 minutes, then gently rub as much of the paper off as you can. Paper fibers stuck in toner is not a problem, inspect the close traces closely.
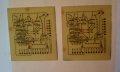
Ok Bill took my time and got these two pcb's ready to drill of course the #1 board didnt come uot as good as #2 but I'm gettin there lol. Thanks for all your help on this project and for the tutorial on PCB's. Now to get the right drill size and then the silk screen side. Jim
The wire holes will need to be slightly larger, about 0.0056" or bigger. You need to make the holes as small as possible while allowing easy insertion. Most of the holes will be around 0.0036 or so. I would rate a drill press as required. I didn't need a vise, although if you mess up and the board gets away from you it could break the drill bit (they are tiny) and mess up the PCB.
I drilled all the holes with the smallest drill bit first, and enlarged them as needed.
Bill,
Both boards done and not bad and you are right about leaving toner on the pcb until after drilling as the toner acts as a centering device. I did use a standard high speed steel bit in my dremel drill press and with a light hand (and mag. head gear) lol eyes! you can feel and see centering. The bit was a 3/64" and worked fine all parts fit well. Do you have an idea on a replacement part for the IRF510 from RS ? Can I pick up a replacement from BG when I type in 510 I get nada at BG. Is there a diff. number I can use? Thanks Jim
Almost all decent MOSFETs will work, the Radio Shack part is already on the low side for quality. In this application it doesn't matter. You are building two boards, right?
And yes, the specs are much better. IRF510 is 5.6A, 100V max, with on conduction of 0.54 ohms, the IRF530 is 14A, 100V and 0.160Ω.
I verified the pin outs are the same, which is the main thing you have to worry about. I suspect the folks at BG have been hunkering down from the weather, hopefully the worst is over (and mostly melted).
Ok now that this circuit is up and running how much trouble is it to convert my red, white, and blue LEDs to RGB's? If I can do this I'm sure I'll need a schematic (and may be a bit more lol) and how do you control the colors. The time duration of the 3 strings is fine but I would like to vary colors. Bill M. has helped me a great deal .Ron H. contributed the basic circuit. With Bills tutorial I am now building my own PCB's that are comming out perfect. I found that by pre-heating the board with a heat gun before putting it through the laminater it tranfers the toner quicker and tighter to the board. I would like to further my project by the addition of RGb's and can use help! Thanks Jim (Please remember still newbie lol )
 Facebook
 Google
 GitHub
 Linkedin
 293.1 KB Views: 28
 A little help PLEASE, Jim