LCD Display - Can't show characters

Thread Starter

BillGeek

Joined Oct 14, 2009
8
Hi All

I'm busy following a PDF "tutorial" on LCD displays, but am at a point where I can't seem to get the thing working. The PDF file is called lcd1.pdf and is found at http://cr4.globalspec.com/thread/13340/Driving-an-LCD-using-a-PIC-16F84A

Basically, I can clear the display and show a blinking cursor, but that's where it stops. Sending data through to the D0 to D7 pins to show a character "A" doesn't do a thing, even with the 'RS' pin set to high and after setting 'E' to 1 and back to 0.

I'm using a PIC16F627 with a display labelled "MC1602C-SYR". I have read on the forum that the recommended / suggested LCD display is a Hitachi HD44780A00, however the local supplier does not stock this, so I was forced to "improvise". :) In addition, I'm using GCBasic to compile the HEX for the PIC.

Another side note: The datasheet for this LCD shows pinouts that match exactly to the ones in the PDF document referred to above.

I have a couple of my own suspicions as to why I can't get this to work:
1. In the PDF a reference is made to the pixel size of the display per character. While it only refers to 7 x 5 and 10 x 5, the LCD I have has 8 x 5 pixels. If I set the D2 bit of Function Set to 0, will it automatically use the 8 x 5 pixels? (Default)

2. When using GCBasic, if I set a pin to 1 and back to 0, is this like pressing a momentary switch? I believe that this is indeed the case, as the display passes through each "stage" successfully. IE: In my code, I wait 1000 ms before clearing the display, 1000 ms before showing the cursor, and then 1000 ms before enabling the second line of the LCD display. In each stage, you are required to "push" a switch connected to "E", and this seems to be happening successfully.

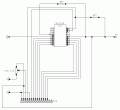
Just for some additional information, the pinouts of the components on the breadboard is below.

PIC:
Pin 4: 4.7k Resistor to Pin 14 (no reset switch)
Pin 5: Ground
Pin 6 - 13: D0 to D7 on the display (in numeric order so RB0 = D0, RB1 = D1, etc...)
Pin 14: +5V Supply
Pin 17: E pin on LCD display (Pin 6)
Pin 18: RS pin on LCD Display (Pin 4)

LCD: (Pins not specified above)
Pin 1: Ground
Pin 2: +5V Supply
Pin 3: (Vee / Contrast) 47K Resistor to Ground
Pin 5: (RW) Ground

Is there any apparent reason I can't seem to send data to the LCD in character mode? If neccessary, I can upload the BAS file for GCBasic as well as the ASM file generated when compiling...

Thanks!

EDIT: Additional Note: I'm using the internal 4MHz oscillator of the 627.
 

SgtWookie

Joined Jul 17, 2007
22,230
I can't seem to get the datasheet for your LCD to display.

Here's a link to it on Farnell: http://www.farnell.com/datasheets/20775.pdf
I think it's supposed to have a HD44780-compatible controller on it. The datasheet would say what it is.

Look at the part numbers on the IC's closely with a magnifying glass.

Meanwhile, it would be helpful if you posted a schematic of how you had things wired up, and also your Basic source code.
 

THE_RB

Joined Feb 11, 2008
5,438
Are you able to move the flashing cursor? Making a flashing cursor seems to show that you can send commands ok to initialise it and set a flashing cursor.

Moving the cursor will show it has not hanged and you can still send more bytes to it.

And to send characters to display you need to set the RS pin HI, so maybe you have a problem with the RS pin connection or the code that drives the RS pin. If that's the case you can send commands (RS = LOW) but you won't be able to send chars.
 

AlexR

Joined Jan 16, 2008
732
From your pin-out info I assume you are operating the LCD display in 8 bit mode. Is you LCD initialisation also for 8 bit mode or have you used 4 bit mode initialisation by mistake?

A software listing and copy of your circuit would help, Without those all we can do is make random guesses as to what is wrong.
 

Thread Starter

BillGeek

Joined Oct 14, 2009
8
I did find the following "image", which shows the pinouts and physical dimensions for the display: http://www.everbouquet.com.tw/MC1602C.gif While it doesn't help for the technical stuff, it at least shows that the pinouts match. (This is the "datasheet" I was referring to in the first post - I know... it's not a datasheet)

@SgtWookie: I had the same problem with that document and was able to open it with a program called "Cool PDF Reader". Still, in the document there is no mention of the driver IC. I had a look at the IC, but can't see anything printed on it either. It's just a big black blob. Nevertheless, I will check again tonight. There might be something that I missed somewhere else on the PCB of the LCD module.

I have attached the schematic of the project. I apologize for the crude drawing. As I'm at the office right now, drawing with MS Paint is a bit of a headache...

I will attach a proper schematic when I get home as well as the source-code.

@THE_RB: I have not tried moving the cursor. I will give this a shot tonight, as well as check the RS pinout. From what I can understand, it should be just a simple on / off "switch", implying 0 and 1 through the pin on the PIC.

@AlexR: Yes, I'm running the display in 8-bit. I believe I initialized it properly, as according to the PDF document, the Function Set code D4 should be 1 for 8 bit... (Hope this is right?)

@mik3: I did get the datasheet, (the one SgtWookie pointed out) but as mentioned, it does not say which driver IC is used. I emailed Everbouquet to find out what driver is used, so I'm waiting for a response from them now. Will post here when I get anything back.
 

Attachments

Thread Starter

BillGeek

Joined Oct 14, 2009
8
I got the code emailed to me. See below. :)

Will attach the generated assembler as well if required?
Rich (BB code):
    'Select proper device
    #chip PIC16F627, 20

    'Configuration bit for internal oscillator
    #config INTRC_OSC_NOCLKOUT

    'Define pinouts
    #define LCDPins PORTB
    #define RS      PORTA.1
    #define E       PORTA.0

    'Set port directions
    DIR LCDPins OUT
    DIR RS      OUT
    DIR E       OUT

    'Main application loop
    do
        SetupLCD
        SendAChar

        wait 10 ms
    loop

    Sub SetupLCD #NR
        'Display On and Show cursor
        RS = 0
        LCDPins = 0b00001111
        E = 1
        wait 10 ms
        E = 0
        
        wait 1000 ms
        
        'Pixel format and two lines
        LCDPins = 0b00111000
        E = 1
        wait 10 ms
        E = 0
        
        wait 1000 ms
    End Sub
    
    Sub SendAChar #NR
        RS = 1
        LCDPins = 0b01000001
        E = 1
        wait 10 ms
        E = 0
        
        wait 1000 ms
    End Sub
 
Last edited:

AlexR

Joined Jan 16, 2008
732
Your LCD initialisation procedure could be a fault. Take a look at the HD44780 data sheet at http://fab.cba.mit.edu/classes/MIT/863.05/classes/11_14/44780.pdf and follow the initialisation as outlined on page 45. Take special note of the time delays and don't try to skip any steps. Also your E pulse is waaaay too long, a 1usec delay or a single nop instruction between raising and lowering the E line is plenty, (in fact all your delays are too long, not that it's the cause of your problem but it will make the LCD very sluggish).
 

Thread Starter

BillGeek

Joined Oct 14, 2009
8
Alberto said:
BillGeek, I noticed two missing elements, in the schematic posted. Here, I attach the same schematic with the correction in red. (+5 Volts to the contrast pot and a pullup resistor to the RS pin).
Ah, well spotted. :) I didn't notice the missing resistor and will add it to the board.
I'm using a DC PSU which is grounded, yes. (Though to be honest, I'm not quite sure what you are referring to as pin 1, 5 and the VR from the LCD goes to negative of the supply. I'm sure this is what you mean?) Also, I'm using the standard GCBASIC compile.bat script that compiles the BAS into HEX.

AlexR, I'm reading through the document you posted right now and will change the delays.
 

Thread Starter

BillGeek

Joined Oct 14, 2009
8
Meh, got the thing working somehow. I rebuilt the breadboard and went looking through my code at the same time, so I can't pinpoint exactly what the problem was / is. One thing to note is that I changed "LCDPins" in code to the individual pins. While this might take up more space on the PIC, it makes it a little more clear which bit I'm setting to what value. In addition, I have changed the delays in the code as AlexR suggested. I don't know if this might have been the cause of the problem, but you never know. If I run the circuit now, the character "A" is repeatedly printed on the screen. :)

So attached is the "new" circuit diagram (drawn with CircuitMaker Student 6) and below is the "new" code if anyone is interested.

Thanks to everyone for all the help.

Rich (BB code):
    #chip 16F627, 20
    #config INTRC_OSC_NOCLKOUT

    #define E PORTA.0
    #define RS PORTA.1

    #define D0 PORTB.0
    #define D1 PORTB.1
    #define D2 PORTB.2
    #define D3 PORTB.3
    #define D4 PORTB.4
    #define D5 PORTB.5
    #define D6 PORTB.6
    #define D7 PORTB.7

    DIR RS OUT
    DIR E  OUT
    DIR D0 OUT
    DIR D1 OUT
    DIR D2 OUT
    DIR D3 OUT
    DIR D4 OUT
    DIR D5 OUT
    DIR D6 OUT
    DIR D7 OUT

    Dim iAltChar

    'Initial "boot" time - rather safe than sorry...
    wait 1 s

    do
        wait 1 us
        RunLCD
    loop

Sub RunLCD #NR
    'Set to Program mode
    RS = 0
    wait 1 us
    D0 = 1
    D1 = 1
    D2 = 1
    D3 = 1
    D4 = 0
    D5 = 0
    D6 = 0
    D7 = 0
    wait 1 us
    SendRW
    wait 2 ms

    'Enable second line
    D0 = 0
    D1 = 0
    D2 = 0
    D3 = 1
    D4 = 1
    D5 = 1
    D6 = 0
    D7 = 0
    wait 1 us
    SendRW
    wait 2 ms

    'Clear existing text
    D0 = 1
    D1 = 0
    D2 = 0
    D3 = 0
    D4 = 0
    D5 = 0
    D6 = 0
    D7 = 0
    wait 1 us
    SendRW
    wait 2 ms

    'Enter a character
    RS = 1
    wait 1 us

    D0 = 1
    D1 = 0
    D2 = 0
    D3 = 0
    D4 = 0
    D5 = 0
    D6 = 1
    D7 = 0
    wait 1 us
    SendRW
    wait 2 ms
End Sub

Sub SendRW #NR
    E = 1
    wait 1 us
    E = 0
End Sub
 

Attachments

Thread Starter

BillGeek

Joined Oct 14, 2009
8
Just to follow up here: I found an even easier way to do all of this in GCBasic. (Reading the manual really does help... :) )

Rich (BB code):
#chip P16F628A, 20
#config INTRC_OSC_NOCLKOUT
 
#define LCD_IO 8
#define LCD_RS PORTA.0
#define LCD_RW PORTA.1
#define LCD_Enable PORTA.2
 
PRINT "What you want"
As easy as that. Also, I had no problems rebuilding the circuit on the breadboard from memory. I once again omitted the pullup resistor on RS and the contrast on the pot but it still worked first time. Worth noting that it appeared as though I had much "finer" control over the contrast with the vdd on the contrast of the pot, though I couldn't notice any difference with or without the pullup resistor on RS. I suspect that this will have an effect when doing multiple quick extensive changes to the LCD?
 

THE_RB

Joined Feb 11, 2008
5,438
You don't need the pullup on RS. I checked the Hitachi 44780 LCD driver datasheet, the RS E and R/W pins are input only, they can be driven direct from your PIC digital outputs.

If you used PORTA.4 that PIC output pin is "open drain" only and needs a pullup resistor, but that is property of that special PIC pin, nothing to do with the LCD or RS.

I'm sure your original fault was that RS wasn't connected right (as I said before) it matched your symptoms perfectly.

Some LCDs don't need the contrast pot, but many do. I always include it.
 
Top