Im in the middle of redesigning your circuit to give you a pulsed alarm tone after a short delay when the fridge door has opened,all solid state with no relays.
Im in the middle of redesigning your circuit to give you a pulsed alarm tone after a short delay when the fridge door has opened,all solid state with no relays.
Yeah, I'm here. Sorry I'm in Australia, time difference.
I see what your saying, and I'll take it on board. I'm not a engineer though, I'm a network administrator. We do similar process to what your are saying when designing a network.
I didn't really design the circuit, I adopted other circuits together to do what I wanted it to do, but I am learning as I go.
That is what you are meant to be doing. Each circuit is a building block entity. Redesigning the wheel with every design isn't what it is about.
But sometimes, if the block doesn't exist, then you have to invent one. The blocks always require tailoring though. You cannot just simply whack in a block from another design, you need to calculate all of the components to suit your application.
For example, I require a block at the moment that dosen't seem to exist. I need a cheap universal approach using obsolete parts to interface an MCU to a TV or computer monitor.
So I am screwed, I have no choice but to invent because there isn't anything already out there that is what I require.
Looks good. I take it that the capacitor from pin 6, the variable resistor and the connecting resistor set the frequency of the oscillator?.
I may need your help changing the resistor values to suit 6V instead of 9V and some sort of circuit that will let me know that it is working and the battery isn't flat. Is there a way to do this without using a zener diode?. Maybe a short beep each time the door is opened?
For example, I require a block at the moment that dosen't seem to exist. I need a cheap universal approach using obsolete parts to interface an MCU to a TV or computer monitor.
So I am screwed, I have no choice but to invent because there isn't anything already out there that is what I require.
So Electronic Engineers use project management too. So how do you go from the block diagram to component level?
Do you just sort of look at what is needed at each block and think of what circuit could do that particular task and then put them together later to form the entire circuit?
So Electronic Engineers use project management too. So how do you go from the block diagram to component level?
Do you just sort of look at what is needed at each block and think of what circuit could do that particular task and then put them together later to form the entire circuit?
Yes, that's pretty much how it goes, like software programming. For bigger projects, it's literally a collection of "Black Boxes" that plug together with standard power and I/O and the entire system (theoretically) works when power is applied. Once it is found that it barely functions correctly if at all, then it is all ripped apart, and built in a sane manner. Again, just like software programming.
I need to know if the buzzer/sounder you are using has its own osc built in so i can design the driver to suit and the time for the delay before the alarm sounds is variable ,havnt put any component values there yet and will add the extra so it beeps as you open the fridge door.....
I need to know if the buzzer/sounder you are using has its own osc built in so i can design the driver to suit and the time for the delay before the alarm sounds is variable ,havnt put any component values there yet and will add the extra so it beeps as you open the fridge door.....
Wow, I can't believe I missed this thread. I built a fridge door sensor as a lark a few years back, mostly to have an excuse to work with the tiniest microcontroller available.
Door sensing is done with a photoresistor (R2), so it is detecting light not a switch. You could replace that with the switch if you want. I drew this from memory, if there is interest I'll dig op the full project files. I even still have the prototype on hand (and it is still running, it beeps when I open the project box).
R1 was as large as I could make it, it might even be 10 or 22 Meg. The goal is to drive the current to as low as possible. The micro U1 spends most of the time in sleep mode using a microamp if that. A change in light triggers the pin that wakes the micro up to start timing and driving a sonalert beeper. It runs for at least a year on it's own off a single coin cell battery the size of a quarter.
Internal oscillator on the microcontroller. They are pretty awesome devices. $50 to get started (PICKit 2 and demo board from microchipdirect.com), $1 or less for that uC, 5 minutes to run iwres to program it, then wire it up as shown.
Cool part, the PICKit 2 is a cone time cost, so thousands of previously c"hard" or "complicated" projects come within easy grasp if you know any programming language, or are willing to learn.
Can it be programmed to give a pulse tone, so I can use the buzzer I have already?.
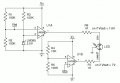
I want to add a circuit that monitors the battery voltage (Lm385 reference and a LM358 op amp, something like the attached picture but only for low battery) so that when the door opens the beep will only occur when the battery is low not every time the door is opened, is this possible with this?
What time period can be set for the delay before the alarm goes off?
 Facebook
 Google
 GitHub
 Linkedin