Digital clocks

magnet18

Joined Dec 22, 2010
1,227
You should be able to lock the various protoboards together to make a complete clock, but provisions for testing each section will also be made.
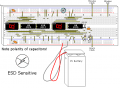
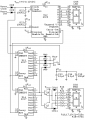
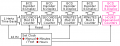
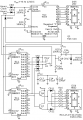
Just got back - haven't had time to read through the rest of the thread yet, but it sounds like you had the same process as me in the beginning, the problem I ran into with the multiple protoboards was that it was simply so much of a giant hassle to run ALL the wires that it wasn't worth it and it was actually easier to build and troubleshoot on one big board and just do it in stages. can't wait to get home and finish my clock. I'm looking forward to this, I might be able to contribute :D
 

magnet18

Joined Dec 22, 2010
1,227
Also, are you sure the crystal will work on the breadboard with the giant contacts?
I'll think on the alarm, I think it could be done on one protoboard though, I need to look through your planned schematics in depth tomorrow while sitting in the car bored and figure out the chips and such. I was daydreaming about circuits and logic chips while on the trail.
I CAN'T WAIT TO FINISH MY CLOCK!!
I think that I'll work out the final schematic with all it's features while in the car over the next few days. If I finish it in a reasonable amount of time I might take the initiative to write up a section or two for you to add in. A flashing colon is nothing more than a couple resistors, some LED's (or neon's if you're me), and a NOR or NAND gate.

I must say that at first glance I much prefer the 4017 method, as it leaves so much leeway for simple settable alarms and features, but it's probably more complicated when it comes to making an encoder for the 7-segments.
 

Thread Starter

Wendy

Joined Mar 24, 2008
23,421
Reread post #20. I won't add new posts unless I have to, instead I'll update the last post. Part of the reason is to keep thread bloat to a minimum. This doesn't mean I don't want to discuss the project, but I want to keep this thread short as possible, as I already know there will be 6 different articles on it.

I already have a working mod 60 counter (See CD4026 Questions). I also have an example of a mod 12 counter, and am looking for a mod 24. I also have a stable crystal oscillator.

I've decided to scrap the control circuit due to complexity, and am in the middle of redesigning it.

If I hadn't selected the 4026 chip alarms would be easy, as the BCD counter (OK, it isn't really a BCD counter, but close enough) would be accessible. Since it isn't I'm not going to bother, and if I didn't have the 4026 I might not have been able to fit the mode 60 timer in at all. I'm trying to keep it as simple as I can overall. A user named Pencil has been a real help.

*******************************************

OK, the Time Base and Control Circuit is finished, and baring proof reading errors is finished on the article. The schematic for the generic Mod 60 counter is finished, the circuit breadboarded and checked out. Now I have to draw it.
 
Last edited:

Thread Starter

Wendy

Joined Mar 24, 2008
23,421
3. The Seconds Counter


PARTS AND MATERIALS
  • 2X 6VDC Lantern Batteries or 9V Battery
  • U5,6 - CD4026 CMOS IC, BCD Counter with build in 7 segment decoder
  • U7 - CD4013 Dual Type D Flip FLop
  • DS1,2 - MAN 74A 7 segment LED display (Radio Shack P/N 276-075)
  • CR3,4 - 1N4454 Diode or equivalent (not critical)
  • C6,9,10 - 0.1µF Capacitors
  • C11 - 100µF Electrolytic Capacitor

SCHEMATIC DIAGRAM


ILLUSTRATION


INSTRUCTIONS

This is a spin off of the generic Mod 60 counter with a few wire changes and the tactile switch removed. It is meant to integrate into the rest of the clock.


THEORY OF OPERATION

The biggest difference is the reset circuitry. CR3 was added and becomes a part of the OR gate on the control board formed by CR1, CR2, and R12. This allows for a separate reset signal sent to by the control board. The total counter resets every time the minutes or hours are changed, allowing the clock to be zeroed to a precision time source.

A simple signal conditioner was also added to only allow the front side of the count pulse through. This is done with C9, R13, and CR4 so the remainder of the count pulse will not interfere with an OR gate in the next schematic.
 
Last edited:

Thread Starter

Wendy

Joined Mar 24, 2008
23,421
That went easy, as will the minutes counter. Of course, I still have the 12/24 hours section looming before me, but I've learned a few things getting to this point, it may not be a big deal.

***************************

An odd sort of problem has cropped up. The normal voltage level of the Minutes Clock is normally high, with a very short pulse that clocks the next counter (minutes of course). By itself it works fine, but adding a second signal from the control board (which is normally low) is proving to be not as easy as I'd hoped. Maybe an AND gate? I'm not sure at this time. Something to think about. If the pulse were wider I think it would easy, but this sucker is extremely narrow.
 

Attachments

Last edited:

Thread Starter

Wendy

Joined Mar 24, 2008
23,421
4. The Minutes Counter


PARTS AND MATERIALS
  • 2X 6VDC Lantern Batteries or 9V Battery
  • U8,9 - CD4026 CMOS IC, BCD Counter with build in 7 segment decoder
  • U10 - CD4013 Dual Type D Flip FLop
  • DS3,4 - MAN 74A 7 segment LED display (Radio Shack P/N 276-075)
  • CR5-7 - 1N4454 Diode or equivalent (not critical)
  • C10,12,13 - 0.1µF Capacitors
  • C11 - 100µF Electrolytic Capacitor
  • R14,15 - 100KΩ 1/4W 5% Resistors

SCHEMATIC DIAGRAM


ILLUSTRATION


INSTRUCTIONS

As with the Seconds counter, this has been modified from the generic Mod 60 counter. The reset lines remain unchanged, but it needs a dual clock input.

It should be possible to eliminate U9 if you use 4 protoboards side by side and use the unused side of U10 to replace it. Since only showing one board at a time is shown U9 and U10 were left in.


THEORY OF OPERATION

A diode OR gate is added to the input count circuit to allow the counter to be set to the correct time by the control circuit.
 
Last edited:

Thread Starter

Wendy

Joined Mar 24, 2008
23,421
M/S Paint. I have also created a set of templates that are available for download in my blog. I'm not the only one, too many people have the mindset you need to simulate the circuit with the drawings, I just want them to look readable, and good.

Bill's Index

Introduction and PaintCAD

PaintCAD is a continuing work in progress, I'm constantly updating it with new devices and images. This clock has added some new stuff for example, such as the tactile switches and 4026.

************************************************

OK, the seconds and minutes are completely working, including the control and clock set circuitry. I just have to draw what I've done with the minutes and add it.

I'm at that point I've been dreading a little, the 12/24 clock. The most significant digit (MSD) will not use a 4026 I think, but from there it is in the air. I'm thinking either a 4017 or 4013.

*************************************************

Took a lot longer to document the minutes protoboard, nothing left but hours.

I am finding I am continuously making changes and corrections to all the drawings periodically. If something looks different then it probably is.
 
Last edited:

Thread Starter

Wendy

Joined Mar 24, 2008
23,421
OK, I have the schematic finished, now to see if it works.


Basically I need to have the stash point on the same page while I make it. This page is a filler I will eventually delete.
 

Attachments

Last edited by a moderator:

Thread Starter

Wendy

Joined Mar 24, 2008
23,421
5. The Hours Counter


PARTS AND MATERIALS

  • Batteries
  • Semiconductors
  • Capacitors
  • Resistors
  • Test Equipment

SCHEMATIC DIAGRAM


ILLUSTRATION


INSTRUCTIONS

Body of Text.


THEORY OF OPERATION

More text, and possibly illustrations.
 
Last edited:

magnet18

Joined Dec 22, 2010
1,227
OK, I have the schematic finished, now to see if it works.


Basically I need to have the stash point on the same page while I make it. This page is a filler I will eventually delete.
Sorry to create a post, but if b for DS6 is always on, why not just pull it up and save on diodes?
 

Thread Starter

Wendy

Joined Mar 24, 2008
23,421
In what way is DS6 always on? It is either <blank>, "1", or "2".

Q6 is for 1, Q7 is for 2, and no LEDs are lit for 0, which is why segment b is still switched.

************************

I don't mind post being created, if it deals with the project. I just want to keep this thread a bit more on focus than usual.
 

Attachments

Last edited:

Thread Starter

Wendy

Joined Mar 24, 2008
23,421
No such thing my friend. There would have been some total beginner (which you aren't) wondering the same thing, but not saying anything.

I kinda hated going the 4017 route, but it was the lowest parts count I could think of. Of course, a 4022 is two pins less, each.

If there is anything else that isn't obvious feel free to ask. I'm going to be curious how accurate it is long term (I'm going to precision set it, then let it run for a week or so). The control circuit sucks, but it also does the job. When the minutes toggle over while setting it the hours will count it. This means set the minutes, then the hours... Hmmm, it might be worth eliminating the seconds set feature while setting the hours. A minor change. I'll think on it.

***********************************

Dagnabit, forgot I need to reset the 12 hour counter to 01. My thought is to introduce a extra count pulse somehow. I'll work on it.
 
Last edited:

magnet18

Joined Dec 22, 2010
1,227
No such thing my friend. There would have been some total beginner (which you aren't) wondering the same thing, but not saying anything.

I kinda hated going the 4017 route, but it was the lowest parts count I could think of. Of course, a 4022 is two pins less, each.
I've kinda grown fond of the little guys... they're darn tough to fry.

If there is anything else that isn't obvious feel free to ask. I'm going to be curious how accurate it is long term (I'm going to precision set it, then let it run for a week or so). The control circuit sucks, but it also does the job. When the minutes toggle over while setting it the hours will count it. This means set the minutes, then the hours... Hmmm, it might be worth eliminating the seconds set feature while setting the hours. A minor change. I'll think on it.
Could you use the inhibit on the hours while setting the minuets?
I just didn't bother with a seconds set feature at all.

Dagnabit, forgot I need to reset the 12 hour counter to 01. My thought is to introduce a extra count pulse somehow. I'll work on it.
A 555 that would be triggered for 1 second allowing another pulse?
If you can stomach another 4017 you can simply offset the outputs by 1.
 

Thread Starter

Wendy

Joined Mar 24, 2008
23,421
Could you use the inhibit on the hours while setting the minuets?
I just didn't bother with a seconds set feature at all.
If you look I reset seconds when minutes or hours are set, zeroing the second counter. Removing one diode should disable the hours/seconds reset. It isn't a precise as I would like, since I need the 4060 oscillator to provide the 16 Hz I can not zero its ripple counter. This means you can set the clock to ±1 sec. If not for the 16 Hz I could get much closer.

A 555 that would be triggered for 1 second allowing another pulse?
I'm trying very hard to keep parts count down. I may have to use a 555, but there are some other things I'll try first. A second pulse a couple of microseconds after the first would do it.

If you can stomach another 4017 you can simply offset the outputs by 1.
I'm using a 4026, the 4017 is just keeping track of the count, a parallel counter. There is no way to offset the 4026 counter by one, and it is saving me beaucoup circuitry. So I have to design around it.
 
Top