While they use Dura-Rock as a heat shield it isn't much for insulation. I'd probably try going to a heating(HVAC) place and see if they have any cutoffs of 'duct board'. It's a compressed fiberglass board used to make heating ducts, and has aluminum foil bonded to it. The foil will reflect the infrared and the fiberglass will insulate.
Well the lamps weren't exactly new, but no matter. They did come with new bulbs.
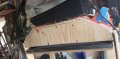
Anyway, built up a test model with 3x500w halogen lamps.
Ran a functionality test with no luck. After 10 minutes the plastic was barely deforming. Need to tweak my setup a bit. I was rushing due to pending rain---gotta work in the driveway, and I didn't get the box lined with foil. Didn't think it would matter that much but I guess it does. Plus I have a gap between the plastic holding frame and the bottom of the heat box I didn't account for--clamping system is in the way. Likely loosing heat there too.
also need to work out a method to hold the frame that includes a quick release that gets the holders out of the way quickly and easily. I've got an idea for that--if I stay with the wood version
Not to mention I need to add some switches--you can see the cords and the triple tap I used.
Plus I need a shelf for the molds
But, that's the whole point of this test. See what I need to do for the final version.
Working 2 jobs stinks, and progress on projects is slow...
Anyway, I finally lined the box with foil and closed the air gap and tested it again.
After 20 minutes the plastic was finally getting a little pliable and started drooping, but then I found a cool spot on one side so I stopped the test.
Back to the drawing board.
My box is 7" deep. I can cut it down shorter. Perhaps that would help speed the process up. That would certainly be more desirable, as my current process only takes 5-8 minutes.
If the box is 7" deep how deep are the lights? Or do you mean the lights are 7" away from the plastic sheet? Did you remove the glass from the light housing?
The glass has a property to it that doesn't transfer heat as well as one without the glass. And that is a long distance to transfer heat from a non infrared source.
Makes sense. My small test box I did the lamp had no glass and was closer to the plastic, and it heated the plastic much quicker. Gives me a good direction to go in next time I get a chance to work on it.
Thanks!
Took some measurements.
My test box has the bulb roughly 5" from the plastic. My larger prototype is at the least 10". Considerable difference.
I've got a game plan now, so I'll cut it down and see what happens.
See what happens when you wing it
... All in good fun though.
well darn. Looks like I may end up needing a custom element after all.
I modified my setup so the bulbs are roughly 5" inches above the plastic and it did work better and quicker-about 5 minutes and it was soft enough to form, but I had three hot spots and the rest wasn't soft enough to form. So I either need a way to evenly disperse the heat, or build a custom element. Would a fan for convection be enough?
As a humorous side note, I bought a laser thermometer so I could monitor the temps across the plastic as it heated. My 20 y.o. boy put in the battery and took it for a test drive checking anything with a temperature. Then he quickly turned the laser dot into a cat toy.
Before doing a custom element I would get one of those patio heaters. They are a strictly infrared output, and the infrared is what does the heating, same as the sun. There are a couple of Youtube videos of guys using them.
First with what to begin the calc procedure is evaluation of proper wire diamater. In http://www.west-l.com/uploads/tdpdf/06080303.pdf is said that kanthal-D gives a 4W/cm2 at natural convestion and 12 at forced. Thus take by a finger in wind method one diameter of choice, calculate the length by Ohm law and then check, do this power not exceeds that thermal flux. If exceeds - Your wire will be dramatically hot, in underexceeds, the wire never will get the aimed temperature. As the thumble-law for nichrome is 5W/cm2 at so low as 500C temperatures and 40W/cm2 at so high as 1300C. If the first guess gives the small discrepancy, be happy with, but if it is giant, then make an another choice and repeat the calc.
Okay.... I'm back down to one job again, more time to play around.
Anyway, I took my quartz heater and bypassed the tip-over circuit. It works too, but it seems to be line of sight also.
You can see from the lines and arrows I drew where I need the heat to radiate out to. -- I'm going from 15" heater height(length lettin down) to a needed 32".
I suppose the next step in this progression would be two of the lamps, one at each end.
Ok, thanks. That's the answer I was looking for.
This larger heater takes care of a good portion of the central part, so I can add 2 of the others to the ends and angle them so there is a zone overlap.
Look at Youtube again at the guys doing this. They don't form clear out to the frame holding the plastic, just like in metal stamping there is always going to be some material waste involved.
I think I'm spinning my wheels with the heater/light setup.
I managed to by-pass the overheat cutoff circuit, but not only is the heat inconsistent across the plastic surface, it doesn't soften the edges well enough.
I think I need to dig deeper on a custom element
 Facebook
 Google
 GitHub
 Linkedin