Facebook
 Google
 GitHub
 Linkedin
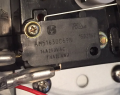
I have a specific microswitch I want to use for a project that is no longer made. I was able to find a NC SPST version, but need it to be NO SPST. Is there any way that I can adjust it internally where it becomes NO SPST?
Converting NC SPST to NO SPST
- Thread starter atummoilwily
- Start date