Circuit design feedback

Thread Starter

Qwazzerman

Joined May 8, 2012
10
Hello, everyone!
I'm quite new to electronics and I was hoping for some feedback.
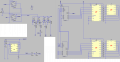
I'm building a device that will trigger an electromagnet for a specific period of time repeatedly.

The core is a simple circuit that powers the electromagnet (1). This circuit runs through a relay that is triggered by a 555 timer (2). R2 of this timer is attached to a 12-pole rotary switch which allows different delay times to be selected. 11 options are just different resistors that keep the cycle length fixed (3) but the last option feeds through a set of MOSFETs paired with resistors. These MOSFETs are triggered, one-by-one, by a decade counter (4) so that the delay time changes with each pulse instead of remaining fixed.
The power for the timer comes from a flip flop triggered by a countdown system made of two CD40192 up/down counters (5). The output from the 40192s also feeds into 7-segment LED drivers (HEF4543) which power the 7-segment displays (6).
The clock pulse for the countdown timer is provided by a second 555 chip calibrated for a 1s cycle (7).
Section 8 is the input switches, all debounced and put through a Schmitt inverter.

Functionally, the device works like this: after turning it on, use the Up/Down buttons to set the countdown timer to the desired delay. Then turn the knob to specify the interval for the magnet. Finally, press Start. The display counts down the specified number of seconds, and once it hits zero, it activates the pulse timer that controls the magnet. Then the magnet is triggered repeatedly until the device is turned off.


Have I made any glaring mistakes? Does everything seem to be wired correctly? From reading other threads I gather that the Vin is supposed to be at the top left. When making the schematic I organized it in a functional (to me) order.

I realize this is a tall order and if this is the wrong place to seek this kind of help I apologize. I appreciate any assistance you can give me.

Thank you!

Datasheets:
http://www.alldatasheet.net/datasheet-pdf/pdf/158029/TI/CD40192B.html
http://www.nxp.com/documents/data_sheet/HEF4543B.pdf
http://processmodeling.org/theory/electronics/ref/40xxx/40106.PDF
 

Attachments

#12

Joined Nov 30, 2010
18,224
That is not a simple circuit, and you are not likely to get some volunteer to spend an hour or two reading it, double checking every connection, and your theory of operation, based on "I haven't tried it yet". Better to build it and ask about working out bugs...if there are any. You are obviously not a beginner.
 

absf

Joined Dec 29, 2010
1,968
Did you try it out on a simulator like ISIS or multisim? Looks like it is possible to do on the ISIS as it didnt involve the use of mcu or mpu in your circuit.;)

You can make the time base proportionally faster so you dont have to wait too long for the results to appear. I read your descriptions and I think it was well written and clear. But it is quite complicated too.:D

BTW are you using LT Spice for drawing your schematics? If you save it under .ASC file, it would be easier for us to test the circuit for any weak points.

Allen
 
Last edited:

nerdegutta

Joined Dec 15, 2009
2,684
I think it would be easier to read the schematic if you placed the blocks after each other. Then the logic would be clearer, at least to me. I also think that you should wire the same block the same way. Ref to Block 5 and 6.

You have debounce capacitors with the switches, but do you have capacitors to the IC's power pins to GND? I think also you should have a diode with the relay in block 1.

What is the purpose of the lonely 6vin on the right side of block 8. Is the whole circuit running on 6v?

Just my layman's opinion. :)
 

Thread Starter

Qwazzerman

Joined May 8, 2012
10
You are obviously not a beginner.
I understand your point. While I do have some comprehension of circuits and components, my knowledge is quite piecemeal and I have little practical experience. It's easily possible that some basic element of circuit building has escaped my attention and become a problem in my design.
As I stated previously, I realize this is asking a lot. And, as you said, it is far from a simple circuit.
BTW are you using LT Spice for drawing your schematics? If you save it under .ASC file, it would be easier for us to test the circuit for any weak points.
I did build it in LTSpice, yes, and I would test it but I don't have actual model files for some of the chips.
I'll also look into the simulators you mentioned; thanks for the advice.


You have debounce capacitors with the switches, but do you have capacitors to the IC's power pins to GND? I think also you should have a diode with the relay in block 1.
You mean like a capacitor to prevent voltage spikes? Yes, I think it was a 22μF and a 1μF. Or do I need them more often?

What is the purpose of the lonely 6vin on the right side of block 8. Is the whole circuit running on 6v?
That was my original plan, yes. A 6V lantern battery. Is that insufficient?
 
Last edited:

#12

Joined Nov 30, 2010
18,224
The lantern battery will probably work fine (assuming all the chips are rated to run at 5 to 6 volts) but it is good practice to place a .1uf capacitor across the power pins of any chip that does fast switching. This is to compensate for the inductance of the circuit board traces so the capacitors must be placed VERY close to each chip.
 

SgtWookie

Joined Jul 17, 2007
22,230
You're going to have problems with how you are trying to use MOSFETs.

With an N-ch MOSFET, you usually have the source terminal connected to ground, and raise the gate to get Vgs to 5v (for logic level MOSFETs) or 10v (for standard level MOSFETs). You can find out where you need Vgs to be by looking at the Rds(on) specification in the datasheet; logic level MOSFETs generally have Rds(on) specified with Vgs at 4.5v or 5v. For the MOSFET to be considered turned OFF, it needs to be below the threshold value, but in your case, you really want it to be completely turned off; so you will need Vgs to be 0v. By the way, LTSpice default NMOS is very weak. It comes with a 2N7002 in the Misc folder; use that for low-current (<200mA) logic-level MOSFETs. There is a thru-hole version in a TO-92 package available as the 2N7000; the 2N7002 model will be "good enough" as a simulation.

With the multiple timing resistors, you are trying to float the MOSFETs across D23; that simply won't work.

Have a look at this circuit:


Instead of a 555 timer, I'm using a 4093 quad Schmitt-trigger NAND as the astable multivibrator. You could actually use a 555 wired as a Schmitt-trigger inverter if you would like, however you would need to use a CMOS version (such as a TLC555).
 

Thread Starter

Qwazzerman

Joined May 8, 2012
10
...it is good practice to place a .1uf capacitor across the power pins of any chip that does fast switching.
Good to know, thanks.

You're going to have problems with how you are trying to use MOSFETs.

With an N-ch MOSFET, you usually have the source terminal connected to ground, and raise the gate to get Vgs to 5v (for logic level MOSFETs) or 10v (for standard level MOSFETs). You can find out where you need Vgs to be by looking at the Rds(on) specification in the datasheet; logic level MOSFETs generally have Rds(on) specified with Vgs at 4.5v or 5v. For the MOSFET to be considered turned OFF, it needs to be below the threshold value, but in your case, you really want it to be completely turned off; so you will need Vgs to be 0v.
With the multiple timing resistors, you are trying to float the MOSFETs across D23; that simply won't work.
So the output of the 4017 is insufficient to power to MOSFETs correctly? Would it help if I added pull-down resistors, or would that not work with logic outputs?
The current through the MOSFETs don't travel across the diode, if I understand the 555 properly. The diode allows the capacitor to charge just through R1 (R21 on the diagram). Am I mistaken?
Instead of a 555 timer, I'm using a 4093 quad Schmitt-trigger NAND as the astable multivibrator. You could actually use a 555 wired as a Schmitt-trigger inverter if you would like, however you would need to use a CMOS version (such as a TLC555).
The problem I see with using the 4093 is that (according to my research) the frequency of the multivibrator depends on Vdd, which isn't constant in a battery-powered circuit.
The other issue is that I don't just need a pulse, I need a pulse of a fixed duration. The inter-pulse interval is what I'm trying to vary.
 

Thread Starter

Qwazzerman

Joined May 8, 2012
10
(Apologies for the double post; I can no longer edit the previous one.)
Okay, I've done some work and figured out a few things. I cut way back on the schematic to troubleshoot individual components. (Then I'll combine them once each part works on its own.) First section: the 'random' interval timer.
The main problem I found was that I had the MOSFETs in backwards. As previously advised, I used 2N7002 models for all the MOSFETs.
I've attached the .asc file (it requires the CD4000 library).

The output graph indicates that the intervals vary as I hoped they would, but I remain wary that maybe there is something wrong, like perhaps LTSpice makes assumptions I'm not aware of or there's a flaw in my design.
Am I using the MOSFETs correctly now?
 

Attachments

absf

Joined Dec 29, 2010
1,968
The main problem I found was that I had the MOSFETs in backwards. As previously advised, I used 2N7002 models for all the MOSFETs.
I've attached the .asc file (it requires the CD4000 library).

The output graph indicates that the intervals vary as I hoped they would, but I remain wary that maybe there is something wrong, like perhaps LTSpice makes assumptions I'm not aware of or there's a flaw in my design.
Am I using the MOSFETs correctly now?
My LT Spice IV doesnt have the CD4000 library so I downloaded it from the yahoo group. But my LTS rejected that library. Do I have to downgrade it to version III?

BTW, I noticed that Sgt Wookie did not use LTSpice, so it would be better for you to also include the schematics in JPG form in case others might be not be bothered to comply to help.

Allen
 
Last edited:

Thread Starter

Qwazzerman

Joined May 8, 2012
10
My LT Spice IV doesnt have the CD4000 library so I downloaded it from the yahoo group. But my LTS rejected that library. Do I have to downgrade it to version III?
I'm using version IV, but there are two CD4000 libraries. The correct one is CD4000.lib but there's also CD4000_v.lib. They're in the same folder in the Yahoo group.
 

Attachments

Thread Starter

Qwazzerman

Joined May 8, 2012
10
I've been working on the design and I think I've ironed out most of the issues. First, the timer portion:
I've broken the circuit into component areas to make it easier to read. LTSpice doesn't provide power pins for most ICs, but all of them have a 0.1μF ceramic cap across the power pins. In addition, there are two caps (a 22 μF electrolytic and a 0.1μF ceramic) across the main power traces.
Once the timer counts down to zero, it should stop and trigger the MOSFET on the left side of the diagram.
The way it's currently arranged, after turning the device on, I press the Reset button to make sure the flip-flops are at the correct output since the startup state is ambiguous. Is there a simple way to force them to start in the right position without requiring user input (like the button press setup I have now)?
 

Attachments

WBahn

Joined Mar 31, 2012
30,060
I'm a bit surprised that no one has mentioned this, so maybe I missed it as a Johnny-come-lately, the logic of what you seem to be doing seems pretty straightforward, but the discrete style of implementation you are using adds a lot of complexity. Have you considered using a microcontroller for this project? You could eliminate almost all of your hardware, get better accuracy and consistency in your timings, and have something that would let you add additional, custom pulse schedules with just software changes.
 

SgtWookie

Joined Jul 17, 2007
22,230
I didn't use LTSpice in the simulation I'd posted because I'd done that schematic several years ago, and I didn't have LTSpice at the time.

Qwazzerman,
Your timer.asc simulation references some 74hc models which are not in my version of the 74hc.lib


Your U2 is a device not in cd4000.lib, and I can't make out the part number (45?3)
Same thing with U3.
U4 and U22 has no part number; I presume it's just a CC 7-segment display
The 74HC192 is not in 74hc.lib; you must have put it in another library (cd4000.lib perhaps?) that is not posted.
Neither 74HC192 has a reference designator shown.
The simulation complains it couldn't find symbol(s): 74HC193 - and it doesn't exist in my 74hc.lib.
That must be something you either made yourself, or downloaded something new?
 

Thread Starter

Qwazzerman

Joined May 8, 2012
10
Have you considered using a microcontroller for this project? You could eliminate almost all of your hardware, get better accuracy and consistency in your timings, and have something that would let you add additional, custom pulse schedules with just software changes.
It's definitely something I've been looking at as a possibility. Right now I'm seeing what I can do with available parts, but microcontrollers are on the radar in terms of next steps.
Your U2 is a device not in cd4000.lib, and I can't make out the part number (45?3)
Same thing with U3.
U4 and U22 has no part number; I presume it's just a CC 7-segment display
Oh, right, I'd forgotten that I renamed some of the components for the image.
U2 and U3 (4543) are just BCD to 7-segment drivers. I don't actually have working models for them in LTSpice. Also, U4 and U22 are 7 segment displays, as you guessed.
Neither 74HC192 has a reference designator shown.
The simulation complains it couldn't find symbol(s): 74HC193 - and it doesn't exist in my 74hc.lib.
That must be something you either made yourself, or downloaded something new?
I've been using a model for 74HC193 since that's all I could find (http://tech.groups.yahoo.com/group/LTspice/files/ Lib/Digital 74HCxxx/Others/).
 

Thread Starter

Qwazzerman

Joined May 8, 2012
10
Oh, and I forgot to mention: in case it's not immediately evident, the diagram is not identical to the schematic file. The diagram is the ideal final setup but the schematic has some tweaks to make it LTSpice friendly (i.e. removing the 7-seg drivers and LEDs, adding substitute button presses).
 
Top