Help with rewiring new micro USB.

Thread Starter

ghettoelectronicsupgrade

Joined Sep 27, 2020
6
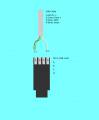
Hi i have just purchased 5 new micro USB connectors from china but they did not include the wiring diagram for them in the package. So i am needing to know which of the standard USB colored wires go where on the micro usb cable wiring pads x4 A,B,C,D. I have included the diagram of the cable and micro usb connector for reference. I have tried to rewire my armoured cable BUT after rewiring the new micro usb connector to the old cable the rewired micro usb connector only charges mobile phones and a bluetooth headset BUT cant recharge a PS4 controller and i cant get the Data connection from the PS4 to the PS4 controller with the rewired micro usb connector.
Any ideas please.
 

Attachments

BillB3857

Joined Feb 28, 2009
2,570
I wouldn't totally trust colors alone. Check continuity from the good connector to each wire that you will be attaching before attachment to the new connector. Just takes a minute and may save a lot.
 

Thread Starter

ghettoelectronicsupgrade

Joined Sep 27, 2020
6
Is a work in progress was a= none, b=green, c=white, d=red, e=ground e was on the other side of the connector. At the moment having problems such as wire lengths x4 colors as connecting them to each respective soldering pad affects the next wire in the chains length. I am thinking Red wire short then each respective wire after slightly longer by 3 mm.

The green and white wires are rather thin so need more subtle techniques for stripping and soldering.

The e wire (ground) needs to be a precise flat solder too lumpy and the clasp wont fit snugly over the module.

Also having problems with that the cable works on both PS4 and Phone charging without the clasp but when i sit the module inside the bottom and top clasps and clip togather then somewhere in the process the connector stops working. I think this may have linked to a weak solder join on one of the thin wires (White) which was also too short on the first attempt.
I guess estimating the correct wire length of the colored wires is a must.

The metal clasp micro USB b cable set x5 from ali express that i have are awesome but you must not bend the metal parts around too much otherwise they lose their structure and you will have problems assembling them correctly.
Once they lose there shape they are obsolete.
Also trying to disassemble them in order to repair a malfunction can be a bit of a problem and may affect the top and bottom clasps structure just try not to twist them around too much.
Lastly you need to have something to hold the wiring in place when soldering the micro-usb connectors which helps alot in precise placement of solder/wires to the join, and not forgeting to tin the wires which helps alot in firstoff placement on each of the 4 pads.

Will continue on tomorrow for another 2 hours and keep updated despite what other people may say electronics is always fun.
 

Thread Starter

ghettoelectronicsupgrade

Joined Sep 27, 2020
6
Okay took a couple of tries and a few experiments but job is done.
Have just repaired a broken micro usb connector with a ali-express version.
2 metre Cable.
Heres the gist will test out your cable stripping, fine soldering, and basic cabling and insulation skills.
1.The correct wiring sequence ended up being A-Black, B-Green, C-White, D-Red. Negated the e pad on the otherside of module as was problematic fiting the clasps on rerouted black wire.
2.Soldering-ensure you just have enough solder on each wire just a tiny blob on each end. Also add just a tiny amount to each of the four pads.
3.Wiring-Strip back the main sheath to the correct amount about 13mm. This exposes the four colored cables, Black, Red, White, and Green. Then you need to strip back each of these wires to only have about 3-4 mm of wire on each end this is important DO NOT strip the wire tubing back to far otherwise you will have problems.
4.Then it is a matter of holding the cabling and wiring into place with the micro usb module so that you can solder each of the four wires to there respective pads. You only use a minimal amount of exertion of the solder iron when hot to join the wires on this is important otherwise you will end up with a large blob and will have to start over again.
4.I had to cover my four solder pads of the micro usb connector with insulation tape to prevent unintended grounding after soldering wires.
5.Reassembled Done.
Do not test on a phone test on a PS4 controller as this ensures your data cabling is working.
Took a few test attempts to sort out problems this is only normal unless you are a real good solderer.
Awesome electronics project and am also proficient at dis-assembling and solder/wire reconciliation hint:Solder wick comes in handy.
 

DarthVolta

Joined Jan 27, 2015
521
I must say I am frustrated by USB and SATA cables in general........what a hassle. I find using a flashlight can help to see a lot better, but I should just use a lamp when attached stuff to my PC

I have repaired a few broken USB KB/M cables too, and I so have have no enjoyed that, my best wire strippers can barely strip the wires, I need some good, sub-AWG24 strippers, and some 24yo strippers too I suppose
 
Last edited:

Thread Starter

ghettoelectronicsupgrade

Joined Sep 27, 2020
6
I must say I am frustrated by USB and SATA cables in general........what a hassle. I find using a flashlight can help to see a lot better, but I should just use a lamp when attached stuff to my PC

I have repaired a few broken USB KB/M cables too, and I so have have no enjoyed that, my best wire strippers can barely strip the wires, I need some good, sub-AWG24 strippers, and some 24yo strippers too I suppose
Yes you are correct the problamatic wires to strip are the green/white wires as they are the data wirings. They are thinner and tend to either fray apart or break entirely but with some practice youll get there and plenty of patience. The insulation of the soldered pads on the micro usb module is a must.
 

Thread Starter

ghettoelectronicsupgrade

Joined Sep 27, 2020
6
Yes you are correct the problamatic wires to strip are the green/white wires as they are the data wirings. They are thinner and tend to either fray apart or break entirely but with some practice youll get there and plenty of patience. The insulation of the soldered pads on the micro usb module is a must.
This is due to the fact that the clasps are steel. Here is the product.
 
Top